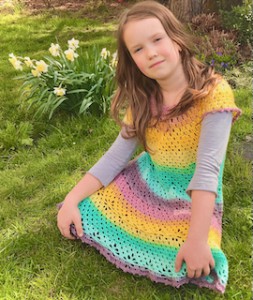
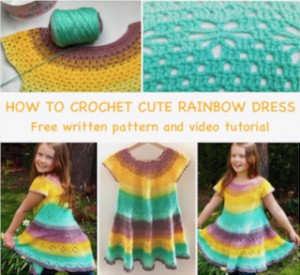
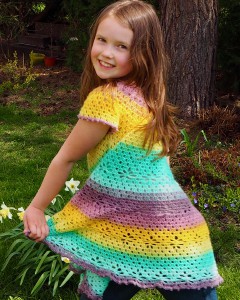
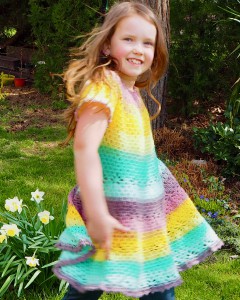
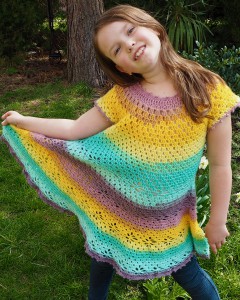
How to crochet Cute Rainbow Fairies Dress
Crochet this cute and simple colorful Rainbow Dress for little girls and bring bright colors into their life. If you are looking for the crochet dress for your Rainbow Fairies, try this easy and pattern with basic crochet stitches. It is easy for beginners to crochet for the coming summer weather.
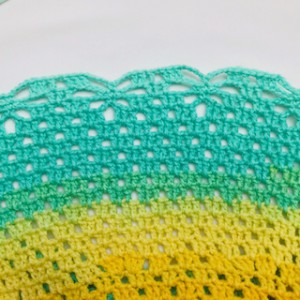
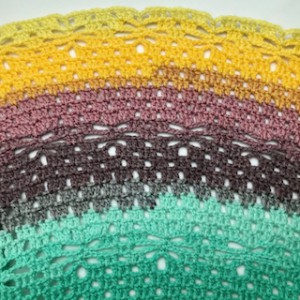
This is a really simple crochet dress pattern. It has a double crochet pattern for the top and then similar double crochet pattern with flowers for the rest of the dress.

It is a highly adaptable pattern that you can easily make in any size.
It is perfect for summer play and for fun in the sun. Rainbow color choices will give you different darling little dresses so have fun making some really cute and easy crochet dresses for a special little girl.
The pattern is available here below for free. It comes with a video guide as well.
VIDEO TUTORIAL
You can find the step-by-step video tutorials below which will help you along if you prefer to watch video instruction rather than using a written pattern.
Don’t forget to subscribe if you like me videos, it’s FREE!
![]()
A huge thanks to everyone who want to support my blog and download PDF paid pattern. Thank you very much, I really appreciate it and it helps me create more new video tutorials and patterns for you. Love you!
![]()
Let's start or PIN this idea to your Pinterest boards for later.
![]()
Do you like crocheting skirts? You may would like to try these patterns as well:
This pattern is made for beginners - only a basic skill level is required to make it. If you don't understand any of my instructions, don't worry I am here for you - enter the comments at the end of this post.
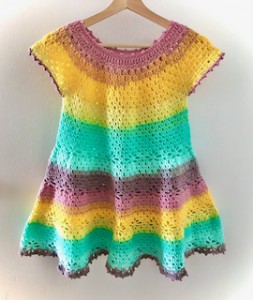
If you’re looking for a cute little day dress for the spring and summer or something more suited to special occasions, this is a perfect choice.
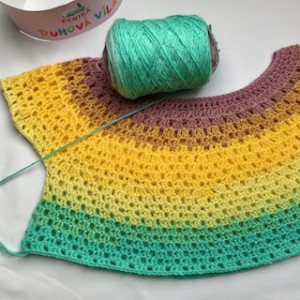
Rainbow Dress Directions
This lovely Rainbow Dress is easy to make.
The pattern uses only basic crochet stitches - single and double crochets and chains.
This dress is crochet from the top down.
The direction shown are for girl size, 135 cm, but can be easily converted into bigger size or smaller size – just by making the first part - according to the circumference of your bust.
Work in rounds from the top to bottom.
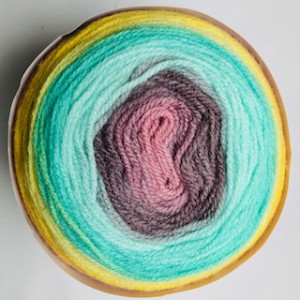
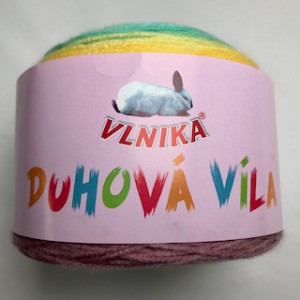
Yarn: Duhova vila, 150 g, 540m, 100% acrylic, 2 skeins
For this pattern you will need 3.5 mm crochet hook and 4.00 mm crochet hook.
Difficulty Level: Level 1 – Easy, for beginners
US crochet term:
SlSt – slip stitch
CH/s – chain/s
SC – simple crochet
DC - double crochet
SK - skip
T - turn
ST/s - stitch(es)
REP - repeat
Special stitches used: picot
Pattern Notes
1) Before you start take a neckline circumference and a bust circumference measurement.
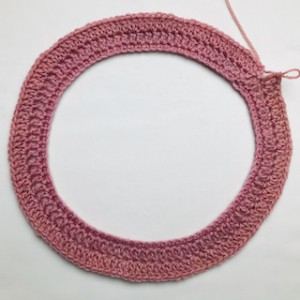
I started with 90 chains for neckline.
2) This pattern is for girl size but you can changed to bigger size by making more or less chains of the foundation chain.
3) A Ch 3 at beg of the row counts as dc throughout.
4) Finish each round with sl st to 3rd chain from beginning.

HOW TO CROCHET EASY CUTE RAINBOW DRESS
THE PATTERN
Pick up the 4.0 mm crochet hook and start the foundation chain.
R1: ch1 (don’t count as a st), 1sc in each st around, sl st in 1st ch from beg (90sc)
R2: ch3 (1dc), 1dc in each st around, sl st in 3rd ch from beg (90dc)
R3: ch3 (1dc), 1dc in same st, 1dc in next st, *2dc in next st, 1dc in next st* repeat from * to * till end of round, sl st in 3rd ch from beg (135 dc)
R4: ch3 (1dc), 2dc in same st, ch1, sk 3dc, *3dc placed between 3rd skipped dc and next dc, ch1, sk 3dc* repeat from * to * till end of round, sl st in 3rd ch from beg (45 groups of 3dc and ch1 between groups, in total 135 dc and 45 ch = 180st)
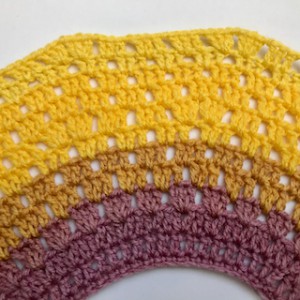
CHECKERBOARD PATTERN
R5: ch3 (1dc), ch1, sk 1st, 1dc in next 3st, *ch1, sk 1st, 1dc in next 3st* repeat from * to * till 2st left, work 1dc in last 2st, sl st in 3rd ch from beg (45 groups of 3dc and ch1 between groups)
R6: ch3 (1dc), 1dc in next st, ch1, sk 1st, *1dc in next 3st, ch1, sk1* repeat from * to * till 1st left, work 1dc in last st, sl st in 3rd ch from beg (45 groups of 3dc and ch1 between groups)
R7 = sl st in next st to move at beg of 3dc group from R6, ch3 (1dc), 1dc in next 2st, ch1, sk 1st, *1dc in next 3st, ch1, sk 1st* repeat from * to * till end of roud, sl st in 3rd ch from beg (45 groups of 3dc and ch1 between groups)
R8: INCREASE ROUND
R8: ch3 (1dc), ch1, sk1, 3dc in next st, ch1, sk1, 3dc in next st, ch1, sk1, *rep 2 times: (1dc in next 3 st, ch1, sk1) then rep 2 times: (3dc in next st, ch1, sk1)* repeat from * to * till 2 st left, 1 dc in last 2 st, sl st in 3rd ch from beg (60 groups of 3dc and ch1 between groups)
R9: ch3 (1dc), 1dc in next 2st, ch1, sk 1st, *1dc in next 3st, ch1, sk 1st* repeat from * to * till end of round, sl st in 3rd ch from beg (60 groups of 3dc and ch1 between groups)
R10: ch3 (1dc), ch1, sk 1st, *1dc in next 3st, ch1, sk 1st* repeat from * to * till 2st left, work 1dc in last 2st, sl st in 3rd ch from beg (60 groups of 3dc and ch1 between groups)
R11: INCREASE ROUND
R11: ch3 (1dc), ch1, sk 1st, *repeat 2 times: (3dc in next st, ch1, sk 1st) then rep 3 times: (1dc in next 3st, ch1, sk 1st) * repeat from * to * till 2st left, work 1dc in last 2st, sl st in 3rd ch from beg (75 groups of 3dc and ch1 between groups)
R12: ch3 (1dc), 1dc in next 2st, ch1, sk 1st, *1 dc in next 3st, ch1, sk1 st* repeat from * to * till end of round, sl st in 3rd ch from beg (75 groups of 3dc and ch1 between groups)
TIME TO ASSEMBLING THE SLEEVES OPENING:
Directions: Divide your work into 4 parts – place markers in ch1 spaces:
skip 15 groups of 3dc and place marker in ch1 space
skip 23 groups of 3dc and place marker in ch1 space
skip 15 groups of 3dc and place marker in ch1 space
skip 24 groups of 3dc and you are at the beginning of your work again, you can continue crocheting
R13: sk 15 groups work (you create the first arm hole)– there is the first marker in ch1 sp, work ch3 in ch1 sp, 1dc in next st, ch1, sk 1st, *1 dc in next 3st, ch1, sk 1st* repeat from * to * till you reach the second marker
skip 15 groups (you create the second arm hole) and there is the third marker, work 1dc in ch1 sp, 1dc in next st, ch1, sk 1st, *1dc next 3st, ch1, sk 1st* repeat from * to * till last st left, work 1dc in last st, sl st in 3rd ch from beg
R13: you created 2 arm holes and the body part of your dress = 55 groups of 3dc and ch1 between groups
CHECKERBOARD PATTERN
R14-R22 = repeat checkerboard pattern: 1dc in next 3st, ch1, sk 1st
PATTERN WITH FLOWERS
R23: ch3 (1dc), 1dc in next 2st, *repeat 2 times: (ch1, sk 1st, 1dc in next 3st), then (ch3, sk 1st, 1dc in next 3 st)* repeat from * to * till last st left, sk last st, ch3, sl st in 3rd ch from beg
R24: sl st in next 2st to move at beg of 3dc group from R23,
ch3 (1dc), 1dc in next 2 st, ch1, sk 1st, 1dc in next 3st, ch3, sk 4st, 1sc in ch3 sp, ch3, *sk 4st, 1dc in next 3st, ch1, sk 1st, 1dc in next 3st, ch3, sk 4st, 1sc in ch3 sp, ch3* repeat from * to * till end of round, sl st in 3rd ch from beg
R25: sl st in next 2st to move at beg of 3dc group from R24
ch3 (1dc), 1dc in next 2st, ch4, sk 4st, 1sc in next 3st, ch4, *sk 4st, 1dc in next 3st, ch4, sk 4st, 1sc in next 3st, ch4* repeat from * to * till end of round, sl st in 3rd ch from beg
R26: ch3 (1dc), ch1, sk 1st, 1dc in next 3st, ch4, sk 2st, 1sc, ch4, sk 2st, *1dc in next 3st, ch1, sk 1st, 1dc in next 3st, ch4, sk 2st, 1sc, ch4, sk 2st* repeat from * to * till 2st left, work 1dc in last 2st, sl st in 3rd ch from beg
R27 INCREASE ROUND
R27: ch3 (1dc), 1dc in next 2st, ch1, sk 1st, *1dc in next 3st, ch1, sk 1st * repeat from * to * till end of round, sl st in 3rd ch from beg
CHECKERBOARD PATTERN
R28 – R32: repeat checkerboard pattern: 1dc in next 3st, ch1, sk 1s
PATTERN WITH FLOWERS
R33 - R36 Repeat rounds R23 - R26
R37 INCREASE ROUND
R37 - R42: Repeat checkerboard pattern
PATTERN WITH FLOWERS
R43 - R46 Repeat rounds R23 - R26
R47: you can repeat R27 with checkerboard pattern or you can try a bit different pattern to increase:
R47: ch3 (1dc), 1dc in next 2st, *ch1, sk 1st, 1dc in next 3st, ch2, sk 2ch, 1dc in next st, ch2, sk 2ch, 1dc in next 2ch, 1dc in next st* repeat from * to * till 2st left, work 1dc in last 2st, sl st in 3rd ch from beg
CHECKERBOARD PATTERN
R48 – R52: Repeat checkerboard pattern
PATTERN WITH FLOWERS
R53 - R57 Repeat rounds R43 - R47
LAST ROUND = BORDER WITH PICOTS
R58 = border with picots: ch1, *rep 2 times: ((1sc in next ch1sp, picot (ch3, sl st in 3rd ch you just made), 1sc in next 3st)), 2sc in ch2 sp, 1sc in dc from R57, ch3, sl st in 3rd ch you just made, 2sc in ch2 sp, 1sc in next 3st * repeat from * to * till end of round, sl st in 3rd ch from beg
SLEEVE BORDER WITH PICOTS
Pick up the 3.5 mm crochet hook
Slip knot, start yarn in seam
ch1 (don’t count it as a stitch), * make a picot in each ch1sp: 1sc in ch1sp, ch3, sl st in 3rd chain you just made, 1sc in next 3st, * repeat from * to * till end of round, sl st in 1st ch from beg
NECKLINE BORDER WITH PICOTS
Pick up the 3.5 mm crochet hook
Slip knot, start yarn in seam
Ch1 (don’t count it as a stitch), * 1sc in next 3st, picot in next st: 1sc, ch3, sl st in 3rd chain you just made* repeat from * to * till end of round, sl st in 1st ch from beg
Fasten off. Weave in all ends.
THE FINAL SIZE MEASUREMENT:
Measurement: 32.3 inch / 82 cm around under armholes
Measurement: 24.4 inch / 62 cm around neck
Measurement: 12.6 inch / 32 cm around arms
Measurement: 23.6 inch / 60cm long
Measurement: 95 inch / 240 cm around bottom round
Measurement: hips circumstance 34.5 inch / 88 cm
For longer dress, you will need to add more rounds of R47-R58 until you reach the length you desire.
If you want your dress to be longer you can continue to increase number of rounds (repeat R47-R58) until you reach your desired length. Remember that when making your dress longer you will need more yarn.
Want a printable copy of this pattern? Why not visit my Etsy shop and purchase the PDF with photo instructions. Not only does it mean you get your own copy of the pattern to print, you also support a small business and help me to keep making free patterns!
Have fun and let me know what you make. I would love to know how your project turns out.
Please don't forget to like and I really appreciate your comments.
If the pattern did not make sense to you, please don’t hesitate to contact me, I am happy to help :)
If you like this pattern, please follow and share my projects on social networks as a THANK YOU and to help me to create new projects and patterns for you.
Thank you very much once again for your visit and see you soon!
♥♥♥