Go to content Go to menu

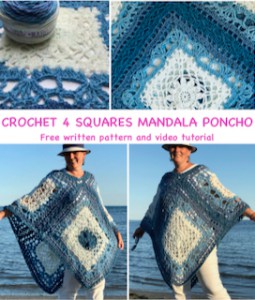
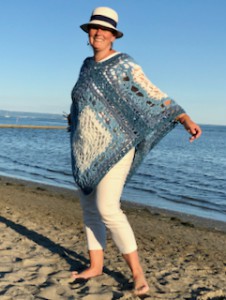
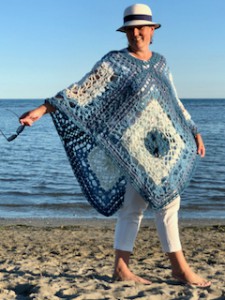
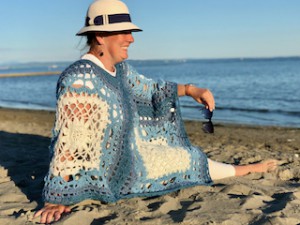
Crochet 4 Squares Mandala Poncho

2021-08-18
Ponchos are an extremely versatile clothing item, for they can be worn in almost any season and for all kinds of occasions. You can wear ponchos in summers if you want to wear something cool, and in winters, these are a warm and comfortable alternative to other clothing items. Making crochet ponchos helps you to create the designs and styles. 

Try this wonderful design for mandala poncho to make a great piece for yourself or for your friends & family!

img_6575.jpeg

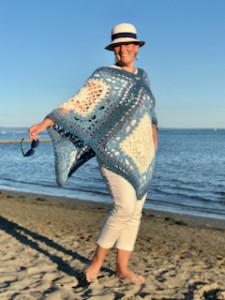
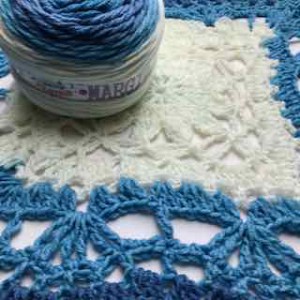
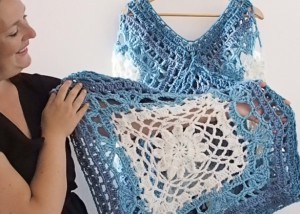
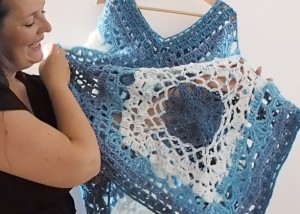
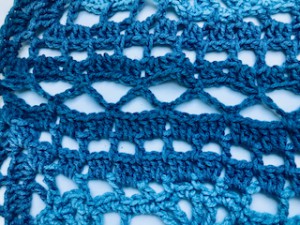
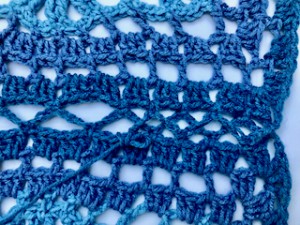
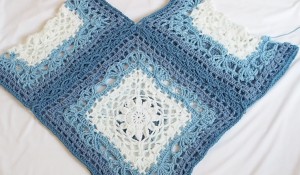
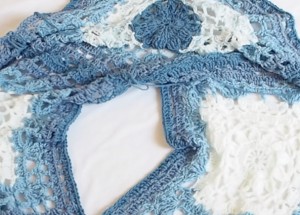
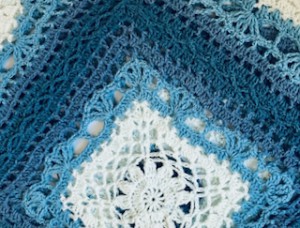
Crochet ponchos are made up of squares or rectangles that are stitched together. In this my new design, the square begins as a circle, so there is a beautiful mandala design in the center of each square. This design incorporates both open and dense stitches. This makes the poncho warm and gives it a great drape, while also giving you a little bit of airflow.

This poncho is perfect for this transition period between summer and fall time.

VIDEO TUTORIAL

You can find the step-by-step video tutorials below which will help you along if you prefer to watch video instruction rather than using a written pattern. Don’t forget to subscribe if you like me videos, it’s FREE!subscribe-bell-icon.jpeg


A huge thanks to everyone who want to support my blog and download PDF paid pattern. Thank you very much, I really appreciate it and it helps me create more new video tutorials and patterns for you. Love you!

etsy-heart-logo.gif

This pattern is made for advanced beginners - only a basic skill level is required to make it. If you don't understand any of my instructions, don't worry I am here for you - enter the comments at the end of this post.

Let's start or PIN this idea to your Pinterest boards for later.
pin-it-for-later-logo-1.jpeg

poncho-pin-eng--1-.jpeg

You may would love to try these Cardigans as well:


So let me now get started and tell you what you will need in order to crochet this amazing Mandala Poncho with Flower Pattern.

4 SQUARES MANDALA PONCHO DIRECTIONS 
 
This Mandala poncho is very fun and quick to make.
The pattern uses only basic crochet stitches - double crochets, triple crochets and chains.
The pattern was made with Margita yarn.

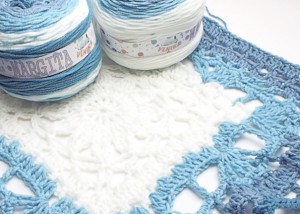
You will need 4 balls - 1 ball for 1 square.
Crochet hook: 7.0 and 5.5 mm
 

img_4274.jpeg


Difficulty Level: Level 2 – Advanced beginners
 
US crochet term: 
SlSt – slip stitch 
CH/s – chain/s 
TR - tripple crochet
DC - double crochet 
HDC - half double crochet
SC - single crochet
SK - skip
T - turn
ST/s - stitch(es)
REP - repeat 
sni--mek-obrazovky-2021-08-13-v--21.25.35.jpeg sni--mek-obrazovky-2021-08-13-v--21.25.53.jpeg
 
Special stitches used:
Tripple Crochet cluster (4 tr together)
 
Cluster
Wrap your yarn twice around your hook and insert hook into the double crochet of the previous round. 
Yarn over, pull up a loop. You have 4 loops on hook now.
Yarn over, draw through 2 loops on your hook.
Yarn over again and draw through 2 loops on your hook.
There are 2 loops remaining on your hook right now.
You do not finish this stitch, but you start a new triple crochet in the next double crochet of the previous round.
 
Wrap your yarn twice around your hook, insert into next double crochet of the previous round.
Yarn over and pull up a loop. You have 5 loops on your hook right now.
Yarn over and draw through 2 loops.
Yarn over again and draw through 2 loops.
There are 3 loops remaining on your hook right now.
You do not finish this stitch, instead you start a new triple crochet in the same double crochet of the previous round.
 
Wrap your yarn twice around your hook, insert into the same double crochet of the previous round.
Yarn over and pull up a loop. You have 6 loops on your hook right now.
Yarn over and draw through 2 loops.
Yarn over again and draw through 2 loops.
There are 4 loops remaining on your hook right now.
You do not finish this stitch, but you start a new triple crochet in the next double crochet of the previous round.
 
Wrap your yarn twice around your hook, insert into the next double crochet of the previous round.
Yarn over and pull up a loop. You have 7 loops on your hook right now.
Yarn over and draw through 2 loops.
Yarn over again and draw through 2 loops.
There are 5 loops remaining on your hook right now.
Now yarn over and draw yarn through all loops on your hook. 
You just made your first cluster of 4 triple crochets together.
 
img_6529.jpeg
 
 
PATTERN NOTES
1) A ch3 at beg of the round counts as a stitch throughout. A ch4 at beg of the round counts as a stitch throughout.
2) The project is made up of 4 squares crocheted together. One square measures: 23.6 inch x 23.6 inch // 60 x 60 cm each
3) You can make your Poncho bigger or smaller just by making the squares bigger or smaller. 
 

img_6574.jpeg


THE WRITTEN PATTERN
 
 
SQUARE
Make a magic ring
R1: ch3 (works as a dc), ch1, *1dc, ch1 in magic ring*, rep from * to * till end of row till you have 12 dc in the ring (ch3 as a dc included) and close the round with a sl st in 3rd ch from beg (12dc)

R2: ch3 (works as a dc), 2dc in ch1 space of the previous round. * 3dc in next ch1 *, rep from * to * till end of row till you have 12 times 3dc in the ch1 sp and close the round with a sl st in 3rd ch from beg (36dc)
 
R3: in this round we will create triple crochet cluster = 4 triple crochets together
You work 4 tr together (this is 1 cluster) into 3 dc of the previous round.
The first tr goes into the first dc 
The second and third tr go into the second dc 
The fourth tr goes into the third dc 
Ch4 before you start a new cluster.
Only at the beginning work ch3 as a first tr, so the first cluster is a cluster of ch3 and 3 tr

Repeat *4tr cluster and chain 4* until the end of the round. 
Close the round with a sl st in top of the first cluster 
In this row you will have 12 tr clusters
img_6516.jpeg
 
R4: ch5, sl st in the first ch at beg, this will form a loop - looks like your first corner of the square
Repeat * ch5, sl st in the top of next 4tr cluster of the previous round * 3 times 
ch5, sl st in the top 4th 4tr cluster of the previous round (second corner)
Repeat * ch5, sl st in the top of next 4tr cluster of the previous round * 3 times  
ch5, sl st in the top 7th 4tr cluster of the previous round (third corner)
Repeat * ch5, sl st in the top of next 4tr cluster of the previous round * 3 times  
ch5, sl st in the top 10th 4tr cluster of the previous round (fourth corner)
Repeat * ch5, sl st in the top of next 4tr cluster of the previous round * 3 times  

you will formed 4 corners. Between 2 corners you made 3 bows of chain 5.
Close the round with a sl st in first corner / first loop (made of ch5 at beg)

R5: sl st in next 3 ch - to move on top of ch5 sp (the first loop, the first corner)
ch5, sc in this current ch5 sp, this will form a loop - first corner in the corner

Repeat * ch5, sc in next ch5 sp of the previous round * 4 times 
ch5, sc in second corner of the previous round
Repeat * ch5, sc in next ch5 sp of previous round * 4 times  
ch5, sc in third corner of the previous round
Repeat * ch5, sc in next ch5 sp of previous round * 4 times  
ch5, sc in fourth corner of the previous round
Repeat * ch5, sc in next ch5 sp of previous round * 4 times  

you will formed 4 corners. Between 2 corners you made 4 bows of chain 5 followed by sc.
Close the round with a sl st in first corner / first loop (made of ch5 at beg)
 
R6: Place in the corner from previous round, in ch5 sp: ch3 (works as a dc), 2dc, ch1, 3dc
Repeat * 5dc in ch5 sp of the previous round * 4 times 
Repeat from *(3dc, ch1, 3dc) in the corner, 5dc in next 4 ch5 sp of the previous round* to 3 times till you reach the first corner.
You will formed 4 corners - there are 2 3dc groups and ch1 between them in the corner. There are 4 5dc groups between corners. 
Close the round with a sl st in 3rd ch from beg
 
R7: sl st in next 3 st to move on top of the first corner
Place on the top of the corner (in ch1 space): 1sc, ch3, 1sc, 
Repeat * ch3, sk 2st, 1sc in next st * 9 times = 9 bows (ch3 spaces) between corners
Repeat *(1sc, ch3, 1sc) in the corner, (ch3, sk 2st, 1sc in next st) 9 times * 3 times till you reach the first corner.
You will formed 4 corners - there are 2 sc and ch3 between them in the corner. There are 9 ch3 bows between corners. 
Close the round with a sl st in 1st ch from beg
 
 
R8: Place in the corner, in ch3 sp: ch3 (works as a dc), 2dc, ch3, 3dc
Repeat * 3dc in next ch3 sp of the previous round 9 times (9 3dc groups)
Repeat from *(3dc, ch3, 3dc) in the corner, 3dc in next 9 ch3 sp of the previous round * to * 3 times till you reach the first corner.
You will formed 4 corners - there are 2 3dc groups and ch3 between them in the corner. There are 9 3dc groups between corners. 
Close the round with a sl st in 3rd ch from beg
 
img_6536.jpeg
 

R9: sl st in next 3 st to move on top of the first corner 
Place in the corner this group of tr: ch4 (works as a tr), 1tr, ch3, 2tr, ch3, 2tr

ch2, sk 3 st (one 3dc group), 1tr between dc, ch2, sk 6 st (two 3dc groups), place between 3dc groups this pattern: (2tr, ch2, 2tr, ch2, 2tr), then ch2, skip 7 st (two 3dc groups and 1dc), 1tr in next st (you are in the middle point) skip 7 st (1dc and then two 3dc groups) and place between dc this pattern: (2tr, ch2, 2tr, ch2, 2tr), then ch2, sk 6 st (two 3d groups), 1 tr between dc, ch2, sk 3 st (one 3dc group)
 
Repeat from * Place in the corner this pattern: 2tr, ch3, 2tr, ch3, 2tr
ch2, sk 3 st (one 3dc group), 1tr between dc, ch2, sk 6 st (two 3dc groups), place between 3dc groups this pattern: (2tr, ch2, 2tr, ch2, 2tr), then ch2, skip 7 st (two 3dc groups and 1dc), 1tr in next st (you are in the middle point) skip 7 st (1dc and then two 3dc groups) and place between dc this pattern: (2tr, ch2, 2tr, ch2, 2tr), then ch2, sk 6 st (two 3d groups), 1 tr between dc, ch2, sk 3 st (one 3dc group)* to 3 times till you reach the first corner.
You will formed 4 corners pattern: 2tr, ch3, 2tr, ch3, 2tr
There are between corners: ch2, 1tr, ch2, (2tr, ch2, 2tr, ch2, 2tr), ch2, 1tr, ch2, (2tr, ch2, 2tr, ch2, 2tr), ch2, 1tr, ch2
Close the round with a sl st in 4st ch from beg
 
R10: sl st in next 6 st to move move on top (the first corner): ch1 (1sc), ch2, 1sc in the same sp, 3sc in next ch3sp, 1sc between 2tr from previous round
3sc in ch2sp, 1sc on top of 1tr from previous round, 3sc in next ch2sp,
in next 3 2tr groups place: 1sc between 2tr, 3sc in ch2sp, 1sc between 2tr, 3sc in ch2sp, 1sc between 2tr
3sc in next ch2sp,
1sc on top of 1tr, 3sc in ch2sp, 
in next 3 2tr group place: 1sc between 2tr, 3sc in ch2sp, 1sc between 2tr, 3sc in ch2sp, 1sc between 2tr
3sc in next ch2sp,
1sc on thop of 1tr, 3sc in ch2sp

 
Repeat from * in the corner made of 3 2tr groups work: 1sc between 2tr, 3sc in ch2sp, on top of corner work (1sc, ch2, 1sc) between 2tr, 3sc in next ch2sp, 1sc between next 2tr, 
3sc in ch2sp, 1sc on top of 1tr, 3sc in ch2sp
in next 3 2tr groups place: 1sc between 2tr, 3sc in ch2sp, 1sc between 2tr, 3sc in ch2sp, 1sc between 2tr
3sc in next ch2sp,
1sc on top of 1tr, 3sc in ch2sp, 
in next 3 2tr groups place: 1sc between 2tr, 3sc in ch2sp, 1sc between 2tr, 3sc in ch2sp, 1sc between 2tr
3sc in next ch2sp,
1sc on top of 1tr, 3sc in ch2sp 
*
to * 3 times till you reach the first corner and then finish the pattern for the first corner: 1sc between 2tr, 3sc in ch2sp, close the round with a sl st in 1st ch from beg

You will formed 4 corners pattern: 1sc, ch2, 1sc


R11: sl st in next st to move on top (the first corner): ch4 (1tr,), ch3, 1tr in the same ch2sp
ch3, sk 3sc, 1dc in next sc, ch3, sk 3sc, 1dc in next sc, ch3, sk 3sc, 1hdc in next sc, ch3, sk 1sc, 1sc in next st, ch3, sk 1sc, 1sc in next st, ch3, sk 1sc, 1sc in next st, ch3, sk 1sc, 1hdc in next st, 
ch3, sk 3sc, 1dc in next st, ch3, sk 3st, 1hdc in next st,ch3, sk 1sc, 1sc in next st, ch3, sk 1sc, 1sc in next st,
ch3, sk 1sc, 1sc in next st, ch3, sk 1sc, 1hdc in next st, 
ch3, sk 3sc, 1dc in next st, ch3, sk 3sc, 1dc in next st, ch3,

Repeat from in the corner (ch2sp): 1tr, ch3, 1tr in the same ch2 sp
ch3, sk 3sc, 1dc in next sc, ch3, sk 3sc, 1dc in next sc, ch3, sk 3sc, 1hdc in next sc, ch3, sk 1sc, 1sc in next st, ch3, sk 1sc, 1sc in next st, ch3, sk 1sc, 1sc in next st, ch3, sk 1sc, 1hdc in next st, 
ch3, sk 3sc, 1dc in next st, ch3, sk 3st, 1hdc in next st,ch3, sk 1sc, 1sc in next st, ch3, sk 1sc, 1sc in next st,
ch3, sk 1sc, 1sc in next st, ch3, sk 1sc, 1hdc in next st, 
ch3, sk 3sc, 1dc in next st, ch3, sk 3sc, 1dc in next st, ch3, 

* to * 3 times till you reach the first corner.
close the round with a sl st in 4st ch from beg

 
R12: Place in the corner (in ch3sp): ch3 (1dc), 2dc, ch3, 3dc
in each 3ch space from previous round place: 3dc till you reach the corner
Repeat from in the corner: 3dc, ch3, 3dc
in each 3ch space from previous round place: 3dc till you reach the corner to * 3 times till you reach the first corner. 
Close the round with a sl st in 3rd ch from beg
 
R13: sl st in next 3st, place in the corner: ch3 (1dc), 2dc, ch3, 3dc
repeat till you reach next corner: ch3, sk one 3dc group, place 1dc between two 3dc groups
 
Repeat from in the corner: 3dc, ch3, 3dc
repeat till you reach next corner: ch3, sk one 3dc group, place 1dc between two 3dc groups * to * 3 times till you reach the first corner.
Close the round with a sl st in 3rd ch from beg
 
R14 = R12:  Place in the corner (in ch3sp): ch3 (1dc), 2dc, ch3, 3dc
in each 3ch space from previous round place: 3dc till you reach the corner
Repeat from in the corner: 3dc, ch3, 3dc
in each 3ch space from previous round place: 3dc till you reach the corner* to * 3 times till you reach the first corner. 
Close the round with a sl st in 3rd ch from beg
 
img_6570.jpeg
 
Make 4 squares. 
Measurement: 23.6 inch x 23.6 inch // 60 x 60 cm each
NOTE: If you want a bigger poncho repeat ROUND 13-14 until desired measurements.
sni--mek-obrazovky-2021-08-13-v--21.16.14.jpeg
 
Join squares
Place 4 squares like this.
 
sni--mek-obrazovky-2021-08-13-v--21.16.45.jpeg
 
With your yarn and hook you will now join the squares together, making sure they are right sides together.
Remember not to make your stitches too tight and not too loose. 
Start in the corner, at the ch3 sp in between 3dc: ch1 (1sc), ch3, sk one 3dc group and place 1sc between next two 3dc groups, 
repeat: ch3, sk two 3dc groups, place 1sc on opposite square, ch3, sk two 3dc groups, place 1sc on opposite square till you reach the end, the corner.
Then 1sc in the both corners (in ch3 sp) to join the corners together.
 
img_5089.jpeg
Turn your work and crochet back the same way to the starting corner.
repeat: ch3, sk two 3dc groups, place 1sc on opposite square, ch3, sk two 3dc groups, place 1sc on opposite square till you reach the end, the starting corner.
img_5088.jpeg
 
Once you have assembled 1 and 2 square it is time to repeat the same for 1 and 3, putting right sides together and repeat the instruction above to crochet the squares together.
 
Making sure that when you are done your work will be joined and lay out like the pic above.

Now it is time to turn these 3 squares into your poncho by adding the 4th. Keeping your work right side facing you, you will take and fold in half square 2 and 3.
You will crochet the same as you did for the other squares assembling 3 with 4 and 2 with 4.
Making sure right sides are facing you, join them the same way you joined the first 3.
sni--mek-obrazovky-2021-08-13-v--21.21.05.jpeg
 
Now that your poncho is assembled you will hide all loose tails in the wrong side of your work and turn it right side facing you.


You will now work on the neck opening to make it smaller, if you like the size it is leave it and you are done, but if you want to decrease the opening continue below.
 
img_6578.jpeg
 
Make a neck opening:
With the right sides facing you, with your hook and yarn join with a slip knot to any of the corner of the neck opening. Join at the bottom of the V neck = start in the corner
crochet hook 5.5 mm
sni--mek-obrazovky-2021-08-13-v--21.21.38.jpeg
R1: ch3(1dc), ch2, sk 3dc group, 1dc between dc, 
repeat around the neck space: ch2, sk 3dc group, 1dc between dc till you reach the beg of round, sl st in 3rd ch from beg to close round
 
R2: ch3 (1dc), 2dc in next ch2sp, repeat around: 3dc in each ch2 sp till you reach the beg of round, sl st in 3rd ch from beg
 
Repeat round 1 and 2 for as many rounds as you like I did mine with 2 rounds only.
Fasten off, hide all loose tails in the back of your work and you are all done my friends.
You just created a beautiful Mandala Poncho! 
 

img_5093.jpeg

Have fun and let me know what you make. I would love to know how your project turns out. 
Please don't forget to like and I really appreciate your comments. 
If the pattern did not make sense to you, please don’t hesitate to contact me, I am happy to help :)
If you like this pattern, please follow and share my projects on social networks as a THANK YOU and to help me to create new projects and patterns for you.

If you pin my patterns to your Favorites and share it on social media as a link, I will be able to share a lot more free crochet patterns for you all.

Stay in touch at 
F
acebook
Instagram and Pinterest.

Thank you very much once again for your visit and see you soon!

♥♥♥