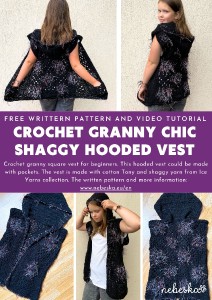
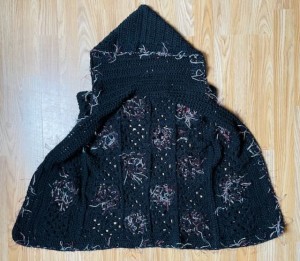
Crochet Granny square Chic SHAGGY Hooded Vest
Hello My Crochet Friends!
You know me, I like to work with effective and attractive yarns. There were some of them presented recently:
There are many different style and brands and so many colors!
For this project I chose a classic yarn Tony and effective yarn from ICE YARNS.
The vest is crocheted with squares - with simple granny squares.
If you like to crochet the Granny pattern, I have 2 more tips for you:
CROCHET EASY GRANNY CARDIGAN
CROCHET TURTLENECK GRANNY PONCHO
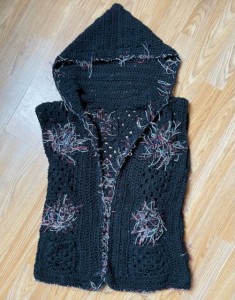
The project is super easy. In this pattern, squares are crocheted and joined into rectangles that make the front and back panels. These parts are crocheted with double crochets stitches. There is a simple hood, which is also crocheted with double crochets.
You can easily adjust the vest to bigger or smaller, there is no complicated shaping, the individual parts have the shape of rectangles.
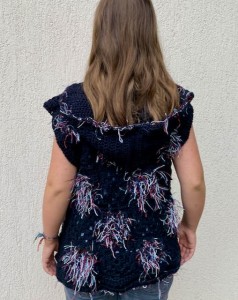
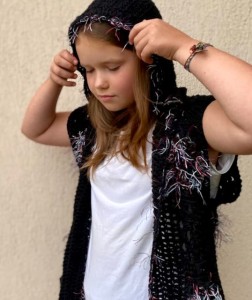
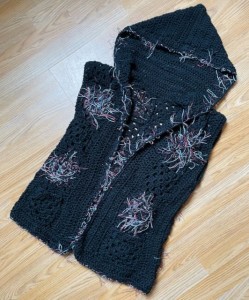
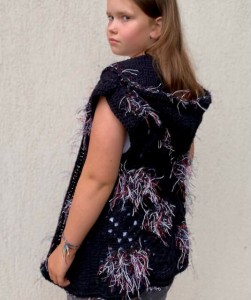
The vest is suitable from spring to autumn, it is unconventional, cheerful and chic thanks to the chosen yarn.
Those who prefer a classic style can crochet a vest in one color, and those who would like it to be even more cheerful and colorful can crochet multi-colored squares according to their creativity.
You can use any colors you like and make a wonderful piece for your Fall or Spring wardrobe!
This pattern is made for beginners - NO crocheting skill level is required to make it. If you don't understand any of my instructions, don't worry I am here for you.
Have questions? Join the Facebook Group OR my Youtube Community!
I hope this article will be useful for you! If you have any additional questions, feel free to join my Facebook Group or Youtube Community. I created these groups for you to share pictures, ask questions, and help each other out.
You can find the step-by-step video tutorials below which will help you along if you prefer to watch video instruction rather than using a written pattern.
Don’t forget to subscribe if you like me videos, it’s FREE!
![]()
CROCHET GRANNY CHIC SHAGGY HOODED VEST
MATERIAL
Effective Yarn from ICE YARNS: Příze Sale Winter 70941,
You will need about a half of skein
100g / 100m, 30% cottom, 35% acrylic, 35% polyester
https://www.vlnika.cz/z19123-prize-sale-winter
Interesting shaggy yarn for effective crocheting or knitting. The yarn consists of 2 threads - one classic yarn in dark brown color and one shiny shaggy colored thread. The threads can be easily separated from each other.
Yarn TONY:
50 gr/80m, 100% cotton
https://www.vlnika.cz/z2210-prize-tony
You will need: 8,5 skeins
Scissors
Sewing/Embroidery and yarn needle/tapestry needle
![]()
In the video tutorial, we will show you the entire process from the beginning, from the basic squares to joining the panels together.
Let's start or PIN this idea to your Pinterest boards for later.
![]()
PATTERN NOTES:
Difficulty Level: Level 1 – for beginners
US crochet terms:
SlSt – slip stitch
CH/s – chain/s
DC - double crochet
SK - skip
T - turn
ST/s - stitch(es)
REP - repeat
YO – yarn over
1) Before you start take a measurement of your body and a body measurement.
Please see the final measurement of the vest below.
2) This pattern is for XS women size, but you can easily adapt to a smaller size or bigger size just by reducing or increasing the number of edging panel's rows. Remember that when making your vest bigger you will need more yarn.
3) 3 chains at beg of the round count as a stitch = double crochet
4) Instructions between two asterisks should be repeated for the remainder of the round
5) Measurement:
Back panel: 46 cm / 18 inch wide // 56,5 cm / 22 inch long
Front panel: 22,5 cm / 8.8 inch wide // 56,5 cm / 22 inch long
*Measurements are taken from the garment lying flat, before the yarn has stretched out/dropped.
I suggest trying on the top. The corners markers should meet underneath your arms on both sides. The top should fit over your bust.
SIZE: one size, XS size
If you want the vest to be wider or longer, adjust the number of rows around the front and back panels.
We will crochet the back and front parts as large rectangles.
The front and back parts are joined at the sides and at the shoulders.
The front part is made of 5 squares - joined into a 5 x 1 square shape.
I crocheted 3 black and 2 colored squares.
The squares are crocheted into one piece, a rectangle. Add a row of double crochets along the longer the sides of the rectangle.
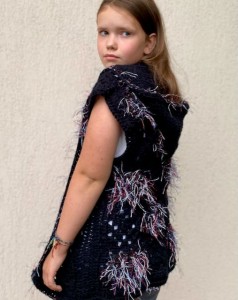
I also added pockets to the front - one pocket consists of one granny square on each front panel.
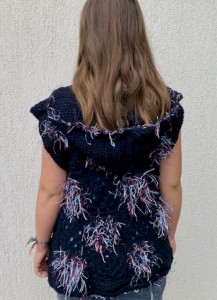
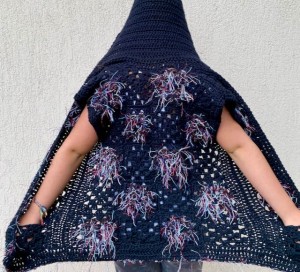
The back part is made of 20 squares - joined into a 5 x 4 squares shape.
I joined 10 black and 10 colored squares. The squares are crocheted into one piece, a rectangle. Add a row of double crochets along the longer sides of the rectangle.
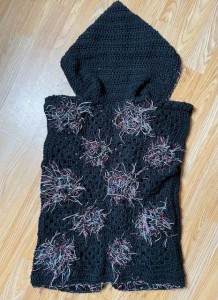
After joining the front parts with the back part, then there is a hood crocheted.
At the end, there are the edges crocheted around the vest.
FRONT PANEL
STEP 1) GRANNY SQUARE
In this video tutorial, I will show you step by step how to crochet a basic granny square pattern. It is crocheted in joined rows and the square is crocheted larger in the same pattern. The base consists of a group of three double crochets between which there is a crocheted chain.
Pick up the 5.5 mm crochet hook and start the Granny Square - make a magic ring and chain 3.
R1: Make the first Double Crochet Cluster: groups of dc stitches are the building blocks of crochet granny squares. Each cluster consists of three side-by-side double crochet stitches. The "chain 3" counts as the first double crochet stitch in the first cluster.
To complete the cluster, crochet two more dc into the magic ring. You should now have what looks like three dc stitches next to each other in your first group.
Then chain 2 and start to crochet the second dc cluster.
Make another cluster of three double crochet stitches. Crochet 3 dc stitches into the magic ring and chain 2.
Repeat the previous instructions two more times. You will have four clusters of double crochet with 2 chains one space between each of them, and the last chain two hanging on the end. To close the round and create the square shape, slip stitch into the top of the first ch 3 from the beginning.
This ends the first round - we just finished Round One (R1) of the Granny Square
R1: Work in Magic ring: ch3 (1dc), 2 dc, ch2, 3 dc, ch2, 3dc, ch2, 3dc, ch2, sl st to top of ch 3 to close round.
R2: Round Two of the Granny Square
To start round two and all other rounds, chain 3 - same as in the first round, this counts as the first double crochet of the first set. Complete the First Double Crochet Set: work 2 double crochet stitches right next to the chain 3 in the open corner immediately below the chain 3. With the first dc cluster finished chain 1.
Work around R2 of the Granny Square:
In the corner, crochet three double crochet stitches, chain 2, and crochet another 3 double crochet stitches, all in the same ch2 in the corner. Chain 1 and work every corner of the granny square this way, except for the starting corner.
Crochet around the granny square, repeating the previous instructions in each corner.
When you reach the corner where you started, make another cluster of 3 dc stitches, then chain 2.
Slip stitch to the top of the first chain 3 to close the round. The final corner should now look like all the others.
R2: Ch 3 (1dc), 2 dc in same corner sp, ch 1, repeat 3 times: working in next corner sp: (3 dc, ch 2, 3 dc, ch 1), 3 dc in starting corner, ch2, sl st to top of first ch 3 to close round.
R3: Round Three of the Granny Square
Begin the third round the same as the previous round.
Chain 3, then make 2 dc stitches in the same ch2 space. Chain 1.
Work Double Crochet Clusters on the Side = in this round, crochet a cluster of 3 dc stitches in the space on the side of the square, then chain 1.
Crochet Around the Third Round: Work into the corner the same way as the previous corners. Make a cluster of 3 dc stitches, chain 2, make another cluster, and chain 1.
As you work your way around the granny square, repeat the previous instructions so you get a cluster on each side and two clusters in each corner.
When you reach the last corner, which was also the starting corner, make a cluster of dc stitches, chain 2, then slip stitch to top of firs ch 3 to close the round.
R3: ch 3 (1dc), 2 dc in same corner ch2 sp, ch1, 3dc in next ch-1 sp, ch 1, Repeat 3 times: working in next corner sp: (3dc, ch2, 3dc, ch1), 3dc in next ch1 sp, ch1, till you reach starting corner: 3dc, ch2, sl st to top of first ch 3 to close round.
Growing It Larger
Now it is easy to grow the granny square larger. With each round, you will have more spaces and groups of dc along each edge. Keep adding them to grow the granny as big as you want.
In this granny square vest, I made a square of 3 rows.
The square size: 11 cm x 11 cm
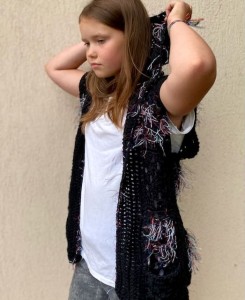
The FRONT PANEL consists of 3 black and 2 colored squares
I crocheted colored / shaggy squares by crocheting the second row R2 with shaggy yarn.
STEP 2) LET'S JOIN THE SQUARES
Put the squares in one row: 5 x 1 square rectangles. On the front panel, I alternate black and shaggy squares.
Squares are simply crocheted with double stitches: align 2 squares face to face, wrong sides out, start a new yarn and make a slip knot, insert a hook into the corner stitch of both squares and into the loop of the new yarn, and crochet a slip stitch. Then, I crochet one slip stitch in each stitch of both squares up to the next corner.
Cut the yarn and fasten off.
Next, we join another square with slip stitches, and repeat the instructions until you have 5 squares in a row.
STEP 3) LET'S MAKE THE SIDES
Crochet the rows of double crochet stitches along the longer side - make a panel wider.
Start the new yarn in the corner, work ch3 (ds) and 1dc in each stitch along the longer side of the rectangle to the end of the piece, turn the work and crochet another row, work ch3 (ds) and 1dc in each stich.
I made 2 rows of double crochets, you make more or less.
STEP 4) ATTACHED THE POCKETS
If you want to decorate your vest with pockets, crochet one more squares and sew it to the bottom of the last square of the front panel. I crocheted a BLACK square.
REPEAT STEP 1 - STEP 3 (or STEP 4) AND CROCHET THE SECOND FRONT PART
BACK PART.
REPEAT STEP 1 - STEP 3
The back panel is made of 20 squares - shaped into a 5 x 4 rectangle.
I crocheted 10 black and 10 colored squares. I joined the squares in a zigzag pattern.
We will also widen the back panel on the sides with rows of double crochets.
I made 2 rows of double crochet stitches along the longer sides (along the sides where we have 5 squares in a row).
STEP 5) JOIN THE FRONT PARTS TO THE BACK PART
Match both front panels to the back panel (right sides inside, wrong sides out), crochet on the wrong sides. Join the parts with slip stitches on the sides by crocheting from the bottom up, join 3 squares, leaving 2 squares free as space for the arms. Next, join the shoulders with slip stitches as well.
Cut the yarn and fasten off.
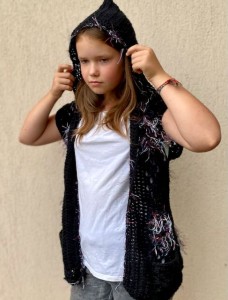
STEP 6) THE HOOD
The hood is crocheted very easily and simply, just rows of double crochet stitches.
Start crocheting at the level of the connection between the first and second square from the top on the first panel. Make a slip knot, ch3 (ds) and work 1dc in each stitch along the first top square, then along the neckline on the back panel and then from top to bottom on the opposite front panel to the seam of the first and second square.
Turn the work and crochet the next row, ch3, (dc) and crochet 1 dc in each stitch.
I made 25 rows of double crochets.
Fold the crocheted part of the hood in half. Work on the wrong side, join the hood with slip stitches. Cut the yarn and sew the end.
STEP 7) EDGINGS
Finally, we crochet the edgings around the vest.
Start the yarn in the corner, ch3, (ds) and crochet 1dc in each stitch along the side of the front panel (from bottom to top), along the hood and around the opposite side of the front panel (from top to bottom).
Turn the work and crochet the next row, ch3 (dc) and crochet 1 dc in each stitch.
I made 2 rows of double crochet stitches around the front panels and the hood.
Crochet the bottome edge n the same way. Start the new yarn in the corner, ch3 (ds) and crochet 1dc in each stitch along the bottom side from one corner to the other.
Turn the work and crochet the next row, crochet ch3 (dc) and crochet 1 dc in each stich.
I made 2 rows of double crochet stitches around the bottom edge.
Finally, I crochet slip stitches with shaggy yarn around the entire vest.
FINISHING: hide all ends and fasten off.
WE'RE DONE! HURRAH! FABULOUS CHIC AND SHAGGY VEST IS READY!
What’s Next?
Pin this post: Save this tutorial to your Pinterest boards so that you can come back to it later.
Leave a comment: I love to hear your feedback. Tell me in the comments below!
Share on Instagram and Facebook: When you make this project, share it on social media and tag me @sonanebeska. I love to see what you make!
Explore More Crochet Vest or Ponchos Patterns
If you love to crochet as much as I do, I think you’ll love these other free crochet patterns. ❤️
MORE PATTERNS?
You know me, I love to wear Neckwarmers during the Fall and Winter Time. If you do as well, you may would love to try these patterns as well:
I think you’ll love these other free crochet patterns for kids. ❤️
Show your love any day of the year and make lovely and sweet little things for your loved ones:
♥♥♥
Have fun and let me know what you make. I would love to know how your project turns out.
Please don't forget to like and I really appreciate your comments.
If the pattern did not make sense to you, please don’t hesitate to contact me, I am happy to help :)
If you like this pattern, please follow and share my projects on social networks as a THANK YOU and to help me to create new projects and patterns for you.
Thank you very much once again for your visit and see you soon!
♥♥♥


