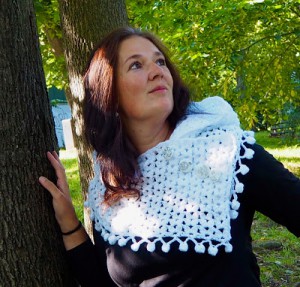
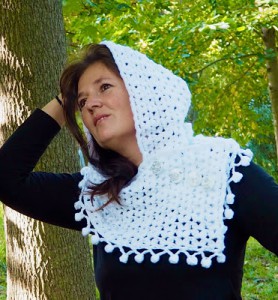
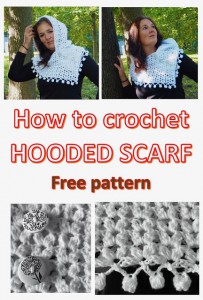
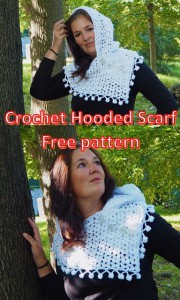
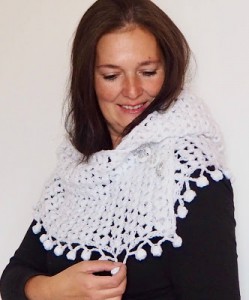
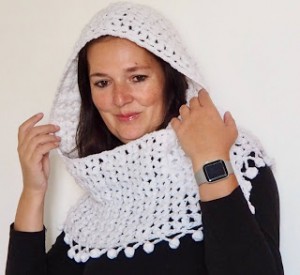
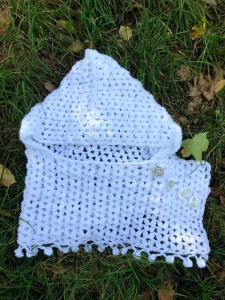
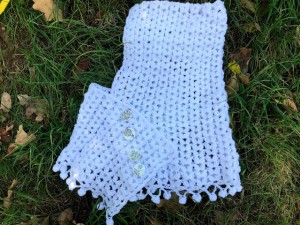
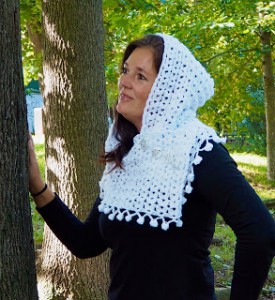
SnowWhite Romantic Hooded scarf with pom-poms and buttons
This crocheted Hooded scarf pattern is so practical and fun to make. And it is a perfect for this fall time – there is a bit cold in morning already, your head will be toasty thanks to the hood. And moreover, this is a trendy fall and winter wear item. I really love that the hooded style on this scarf.
This crocheted Hooded Scarf is my first fall hooded garment of the season and I’m so pleased with how it turned out! The great things about this new pattern are: it's beginners friendly, quick work, only two balls and wearing with or without hood - it can be worn wherever you need some warmth.
You know me - one of my the most favourite pattern is „V“ pattern – it is so simple shape and make a wonderful and interesting outcome. I used „V“ pattern for this scarf as well.
The pattern is available here below for free. It comes with a video guide as well.
VIDEO TUTORIAL
You can find the step-by-step video tutorials below which will help you along if you prefer to watch video instruction rather than using a written pattern. Don’t forget to subscribe if you like me videos, it’s FREE!![]()
A huge thanks to everyone who want to support my blog and download PDF paid pattern. Thank you very much, I really appreciate it and it helps me create more new video tutorials and patterns for you. Love you!
![]()
Let's start or PIN this idea to your Pinterest boards for later.
![]()
I have several Cowls, Shawls and Wraps related free crochet patterns. They are different levels of difficulties and techniques that you might have never seen before.
This pattern is made for beginners - only a basic skill level is required to make it. If you don't understand any of my instructions, don't worry I am here for you - enter the comments at the end of this post.When trying to decide on a yarn for this hooded scarf, I knew I wanted something warm and soft. I chose Red Heart Bella.
The colour choice was also easy – I picked a white colour – it looks so romantic! It looks like the scoodie is made from small snow-white flakes.
Sometimes I often avoid crocheting with white yarn because it can be hard to see the stitches on video tutorials. However, because of the absolutely simple stitch pattern, it’s really not hard to work with in this case!
It’s autumn, my friends – let’s grab a cup of coffee, cozy up and let’s get started to make this perfect autumn pattern!
Hooded Scarf Directions
For this M size you will need:
Red Heart Bella – 100% acrylic, 100g/300m – 2 skeins
For this pattern you will need 5 mm crochet hook.
This Hooded Scarf is made of 2 panels (crocheted as a one part) – one is for the scarf and one is for the hood.
Size: M this can easily be adapted to a smaller size or bigger size just by reducing or increasing the number of chains and rows for the scarf and as well as making less or more chains for the hood.
Difficulty Level: Level 1 – Easy, for beginners
US crochet term:
SlSt – slip stitch
CH/s – chain/s
SC – simple crochet
DC - double crochet
SK - skip
T - turn
ST/s - stitch(es)
REP - repeat
YO – yarn over
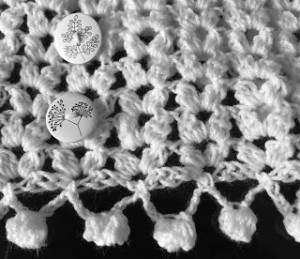
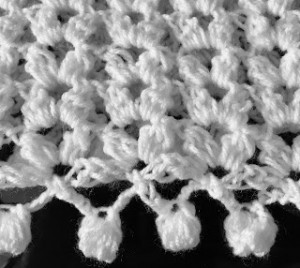
Special stitches used – see video tutorial - Pom-pom stitch
Chainless stretchy crochet foundation
“V” made from two 3dc cluster stitches

Pattern Notes
1) To determine how long your starting chain should be, measure the length from the centre of the upper chest around both shoulders till the shoulder.
2) Before you start take a measurement. Chain until you reach the measurement taken.
3) The direction shown are for M size but can be easily converted into bigger size or smaller size – just measure your starting chain around your shoulders (from the centre of the upper chest around both shoulders till the end of the shoulder), if it fits snuggly then you can use this chain amount for your size.
4) Starting crochet foundation has to be a multiple of 4 + ch1. I started with 129 sc (128 + 1)
5) A Ch 3 at beg of the row counts as dc throughout,a ch2 at the beg row counts as hdc throughout, and a ch 1 at beg of row counts as sc throughout
There are 4 parts of this project:
A) Scarf
B) Hood
C) Ending
D) Pom-poms
This pattern is for M size, but you can easily adapt to a smaller size or bigger size just by reducing or increasing the number of ch and rows for the hood and as well as making less or more chains for the Scarf.
PART A = THE SCARF
Pick up the 5mm hook and let’s make a chainless stretchy crochet foundation.
2R = „V“ made from two 3dc-cluster stitches
ch3 (those first ch3 will count as a dc), sk the 3 st at the 1R, in the 4sth st you will make a „V“ from 2 3-dc cluster stitches
*sk 3 st, in the next st make a „V“ from 2 3-dc cluster st* repeat from *to* across to the end.
You will have 32 „V“ in the row.
1dc into the last st. Turn your work.
3R: ch3 (those first ch3 will count as a dc), rep: *place in the middle of each „V“ one „V“ *, repeat from *to* across to the end of the row.
You will have 32 „V“.
1dc in the 3rd ch from beg. Turn your work.
4R- 13R: Repeat Row 3.
PART B = THE HOOD
Still use the 5mm crochet hook
Place a marker between the 20th and 21th "V" from the beg
14R: ch3, rep: *place in the middle of each „V“ one „V“ * repeat from *to* across till you reach the marker. You will have 20 „V“ made.
1dc between 20th and 21th „Vs“ from 13R. Turn your work.
15R: ch3, rep: *place in the middle of each „V“ one „V“ * repeat from *to* across till you reach the end of the row. You will have 20 „Vs“ in the row.
1dc in the 3rd ch from beg. Turn your work.
R16 – R30: Repeat Row 15
Join your Hood:
Directions: Fold the hood in half, place the beg to the end, slip stitch the 1st „V“ with the last, 20th „V“ from R30, then slip stitch the 2nd „V“ with the 19th „V“ from R30 etc – see bellow the directions:
R31: ch3, sl st into the last dc from the 30R.
Make the first part of „V“ = 3dc cluster,1 sl st in the first part of the last „V“ (the 20th „V“) from R30, 2 sl sts into the ch space of the last “V” from R30, make the second part of „V“ = 3dc cluster, 1 sl st in the second part of the last 20th „V“ from R30
Make the next first part of „V“ = 3dc cluster,1 sl st in the first part of 19th „V“ from R30, 2 sl sts into the ch space of the 19th „V“ from R30, make the second part of „V“ = 3dc cluster, 1 sl st in the second part of the 19th„V“ from R30
Repeat slip stitching till you have the last 2 „Vs“ to join.
Make 4 sl st, matching st to st.
Fasten off your work and hide all loose tails.
PART D = POM-POM ENDING DIRECTIONS
Continue crocheting the ending – now you are on the left bottom corner of your scarf
Step 1: Ch4 (you can change this to more or less depending on how long chain you want to have
Step 2: 2 parts of pom-pom = 2 x 5 sc‘s cluster stitches (see below in the Special Stitches Used section how to make the pom-pom)
Step3: Ch4 (you can change this to more or less depending on how long chain you want to have, just use the same number as you used for step1)
Step4: 1sc between „V“.
Step5: Repeat all of the directions across the row,
Step6: 1sc into the last st.
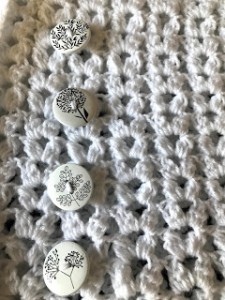
BUTTONS
Attach buttons. Use stitch markers as a guide where to add 4 buttons - place a markers on the 3th "V" from beginning. Start placing from the bottom up - the 1st button on the 3R, 2nd button on the 6R, 3rd button on the 9R and the 4th button on the 12R (still use 3rd V from beg as a guide). Use tapestry needle to fasten buttons into desired places.
THE FINAL SIZE MEASUREMENT:
Scarf (w/o pompom ending) = 43,5 inch / 110 cm long around in total, height = 9inch high / 23 cm
Scarf + hood height = 20 inch high / 51cm
Hood fold in half = 12 inch width / 30cm

Want a printable copy of this pattern? Why not visit my Etsy shop and purchase the PDF with photo instructions. Not only does it mean you get your own copy of the pattern to print, you also support a small business and help me to keep making free patterns!
Have fun and let me know what you make. I would love to know how your project turns out.
Please don't forget to like and I really appreciate your comments.
If the pattern did not make sense to you, please don’t hesitate to contact me, I am happy to help :)
If you like this pattern, please follow and share my projects on social networks as a THANK YOU and to help me to create new projects and patterns for you.
Thank you very much once again for your visit and see you soon!


