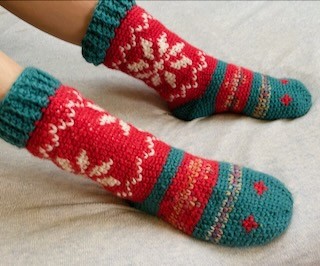
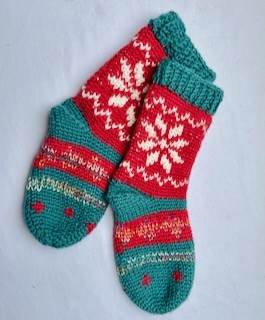
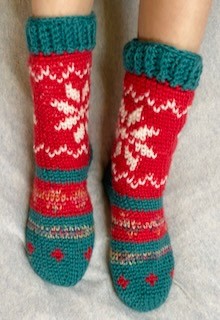
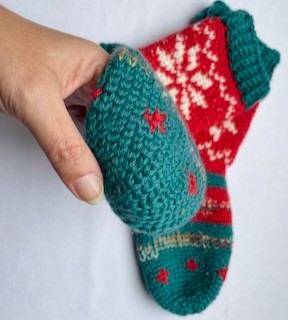
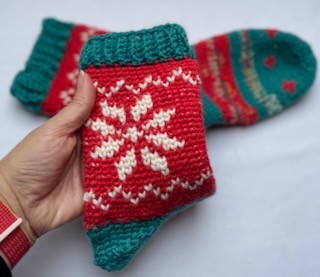
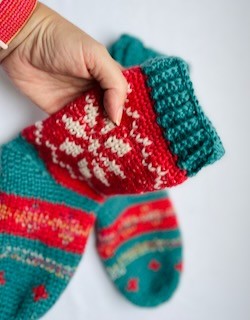
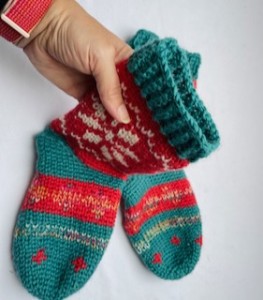
Easy Crochet Nordic Wool Socks - so cosy and warm!
Hello My Crochet Friends!
It's gotten really cold outside, winter is here in all its glory! And I really like to use this time, those long winter evenings, for crocheting. How else on the list are traditional winter things such as hats, neck warmers, beanies, all those warm and comfortable things, soft warm things for going out and lounging at home. I love warm socks and beanies that I can snuggle up in and keep warm.
In this new tutorial, I tried the wonderful Artisan wool yarn for warm cozy socks. I tried to match colors and come up with patterns charts, I really enjoy it!
The Artisan yarn is wonderful to work with and not only I am satisfied with the result, but especially my son, who ordered socks from me and was really looking forward to them.
I crocheted these comfortable wool socks in children's size 36. Because of the way these socks are constructed, they are very easy to resize. You can make them smaller or bigger, longer, wider or shorter or narrow them. There is no complicated increasing, decreasing or shaping. Easy, easy!
These crochet cosy slipper booties are so comfortable and easier to make than you think. They are also incredibly easy to size up or down, so you will be able to make a pair for anyone who wants some.
It's a fantastic piece for yourself or as a gift. Try this wonderful design for cosy socks to make a great piece for yourself or for your friends & family!
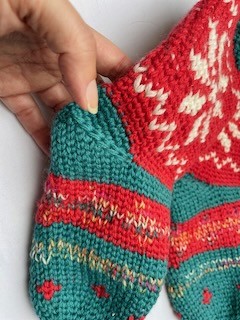
These crochet socks are made with Artisan yarn from 4 different colored balls, I estimate that I used about 1.5 - 2 balls because I crocheted with double yarn and the socks are crocheted mid-calf high.
I want to use the rest of the balls for hats, neckbands or gloves.
I hope you enjoy crocheting and wearing these cute Nordic pattern crochet socks and enjoy them throughout the colder weather season.
So let’s dive right into it!
VIDEO TUTORIAL
You can find the step-by-step video tutorials below which will help you along if you prefer to watch video instruction rather than using a written pattern. Don’t forget to subscribe if you like me videos, it’s FREE!![]()
This pattern is made for very beginners and with my video tutorials everyone will manage to crochet this amazing pattern. If you don't understand any of my instructions, don't worry I am here for you - enter the comments at the end of this post.
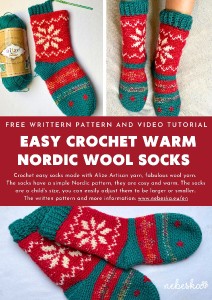
Let's start or PIN this idea to your Pinterest boards for later.
![]()
How to CROCHET COSY FURRY SLIPPER BOOTIES
This pattern is made for advanced beginners - only a basic skill level is required to make it. If you don't understand any of my instructions, don't worry I am here for you.
Have questions? Join the Facebook Group!
I hope this article will be useful for you! If you have any additional questions, feel free to join my Facebook Group. I created this group for you to share pictures, ask questions, and help each other out.
CROCHET NORDIC WOOL SOCKS - SO COSY AND WARM! - DIRECTIONS
So let me now get started and tell you what you will need in order to crochet these amazing CROCHET NORDIC WOOL SOCKS.
These CROCHET NORDIC WOOL SOCKS are very fun and quick to make.
The pattern uses only basic crochet stitches - centre stitch single crochets and standard single crochet stitches.
The slipper booties are crocheted with cosy wool yarn Alize Artisan.
YARN: Alize Artisan Superwash
Ball = 100g / 420 m / 75 % wool a 25 % polyamide
Very high-quality sock yarn in the composition of superwash wool and polyamide. There are multi-colored and single-colored balls that you can combine. The yarn is especially suitable for socks, but also for hats, shawls, scarves, neck warmers, gloves.
https://www.vlnika.cz/z23667-prize-superwash-artisan
Color A - green
Color B - red
Color C - white
Color D - multi-color, with colors A, B and C
Scissors and tapestry needle
Stitch Marker
Crochet hook: 4.5 mm

Difficulty Level: Level 1 – Easy, for beginners
US crochet terms:
SlSt – slip stitch
CH/s – chain/s
CSSC - centre stitch single crochet
SK - skip
T - turn
ST/s - stitch(es)
REP - repeat
YO – yarn over
BLO - back loop only
-cssc2tog = centre stitch single crochet 2 stitches together (decrease)
-cssc3tog = centre stitch single crochet 3 stitches together (decrease)

Special Stitches:
-centre stitch single crochet (cssc): The Waistcoat stitch is also known as center post stitch. It’s as easy as a single crochet. Instead of using the top two loops of the stitch, insert hook lower into the body of each stitch, i.e. the center of the two vertical threads that make the “V” of the stitch, yarn over, pull back through the “V”, yarn over and pull through both loops on hook.
The trick with this stitch is to insert your hook in the middle of the post, just under the inverted “v.”
Then, complete the stitch just as you would a sc: pull up the loop, yarn over, pull through both loops on the hook. To start this stitch, chain any number and start with one row of regular sc.
Some tips: when using cssc use a hook size bigger than usual, keep your stitches very loose, it helps when you’re trying to insert the hook. Use this stitch in the round to get a very consistent look.
Centre stitch single crochet 2 stitches together (ssc2tog): this is a decrease stitch. It takes 2 stitches and turns them into 1 stitch. Insert hook into center of the “V” of the stitch, yarn over, pull back through the “V”, insert hook into center of the “V” of the NEXT stitch also, yarn over, pull back through, yarn over and pull through 3 loops on hook.
Centre stitch single crochet 3 stitches together (cssc3tog): work as cssc2tog except over 3 stitches in a row instead of only 2.
BACK LOOP: The BACK loop can be found just behind the front loop. Working in this back loop, creates a nice ribbing look on the both sides of the pattern.
This pattern also requires familiarity with stitches used and using invisible join when you work in spiral rounds.
CROCHET NORDIC WOOL SOCKS - PATTERN NOTES
1) Before you start take a measurement of length of your leg from big toe to heel and a leg circumference (please see the final measurement of the slipper booties below).
2) This pattern is for Kids size, but you can easily adapt to a smaller size or bigger size.
There are 3 parts:
1) from the big toe to the leg
2) the heel
3) the body of the leg
4) the ribbing border
3) Except for the ribbing ending, the entire sock is crocheted in the round so there is no joining after every row.
4) We will first make the toe with increasing rounds. There is an opening for the heel, which will be finished as a separate second part. Then complete leg part, with nordic pattern. Finally we add a nice ribbing ending on the top of sock.
The finished size of the sock is approx. wide x long.
5) A ch1 at beg of the round DOESN'T count as a stitch throughout.
6) The Sock measures: 22 cm / 8.5 inch (length), 21 cm / 8.2 inch (width), 13 cm / 5 inch (body of sock), 4 cm / 1.5 inch riibbing ending lenght
*Measurements are taken from the garment lying flat, before the yarn has stretched out/dropped.
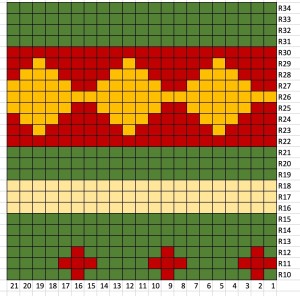
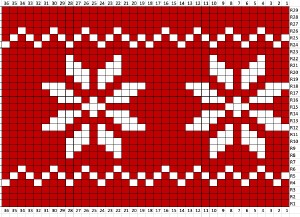
7) The Charts in pdf to download
Artisan Socks_Nordic pattern_Leg chart.pdf
Artisan Socks_Nordic pattern_foot chart.pdf
CROCHET NORDIC WOOL SOCKS
THE WRITTEN PATTERN
PART 1
work in spiral rounds
color A
ch1 at the beginning of round don't count as a stitch.
PART 1 – from the toe to the leg
make a magic circle.
R1: ch1, 7sc in mc (7sc)
R2: 2cssc into each st around (14)
R3: 1cssc into each st around (14)
R4: *2cssc into next st, 1cssc into next st*, * repeat from * to * till end of round (21)
R5: 1cssc into each st around (21)
R6: *2cssc into next st, ssc into next 2 st*, repeat from * to * till end of round (28)
R7: 1cssc into each st around (28)
R8: *2cssc into next st, cssc into next 3 st*, repeat from * to * till end of round (35)
R9: 1cssc into each st around (35)
Then work 1cssc into each st around (35 here and throughout the body of the sock)
Now begin working the charts (it is worked from right to left, bottom to top)
Note: for color changes, you want to complete the final yarn over of the previous stitch with the new color for the next stitch.
Foot chart:
Measurement: 15 cm / 5.8 inch length // 21 cm / 8.2 inch width
PART 2: HEEL
Heel: For the heel, you will chain 16 and then count and skip 16 stitches from the previous row.
The ssc2tog and ssc3tog stitches do a really nice job of pulling the corners together nice and tight and not creating a bulky misshapen heel.
Using Color A and 4.5 mm hook.
I recommend setting the sock so that the transitions between the rows, i.e. the beginning of the row, is in the middle of the lower part. That way transitions and bounces are well hidden.
We have 36 st, divide by 2 = 18 st.
It is easy to count 9 st to the end of the row and start crocheting the heel there.
Continue working your cssc stitches to the end of row 33, R33.
Start of R34, you will make 1cssc st in next 28 st, then chan 16 chains, skip 16 st, 1cssc in next st. Turn
R1: ch1, 1sc in next 15 chains, cssc2tog. You just finished at the place where you start to work on the heel, work 1cssc in next 15 st, then work in spiral rounds with cssc only.
R2: cssc3tog over the next 3 sts in the corner, then 1cssc in each st, till the corner st, cssc3tog, then 1cssc in each st, till the next corner st.
R3 - R7: we repeat row R2, in each row we decrease the number of st by 4 st
Finish with 10 st around in the last round.
Cut a longer tail and pull yarn through last loop.
Flatten the small opening you have left so the rows are on top of one another. Use a yarn needle and the sew stitches together, stitch to stitch. Fasten off and weave in ends.
PART 3 – the body of the sock
Now move on to the leg charts.
Lay the sock out in front of you. Place sock with right side up, right side facing you.
With yarn color B and a crochet hook 4.5 mm.
You will now make a border around the PART 2, making sure the right side up, work in a foundation chain on the opposite side.
Remember not to make your stitches too tight and not too loose.
Start at the seam, re-join the new yarn.
R1: ch1, work 1cssc in each st around. I made 36 st in total.
R2 - R29: 1cssc in each st around
Color B and color C
Now you will hide all loose tails in the wrong side of your work and turn it right side facing you.
PART 4 – RIBBING ENDING
We will use back loop only slip stitches. This method makes a nice stretchy ending that will retain its shape.
Using Color A and 4.5mm hook:
Rejoin the new yarn in any st and chain 5 ch, turn
R1: ch1, work in 2nd ch from hook, make 1sc BLO in next 5 st, sl st to next st in top of sock (the st directly after the st you rejoin Color A to), sl st to next st in top of sock once again, turn
R2: ch1, skip 2 sl st and ch1, work 1 sc BLO into each st across, ch 1, turn (5sc)
R3: ch1, 1sc BLO in next 5 st, across down back to body of sock, sl st to next 2 st in top of sock once, turn
Repeat row R2 and R3 all the way around the top of the sock.
Place the beginning row and the ending row of the ribbing ending on top of one another and sl st together 5 st down to join.
Fasten off and weave in end.
SLIP STITCH BORDER: start a new yarn, work 1sl st in each st around the sock. Finish with an invisible join.
Fasten off and weave in end.
You just created a beautiful CROCHET NORDIC WOOL SOCKS !
I hope you’ve enjoyed making this free CROCHET NORDIC WOOL SOCKS crochet pattern.
You can try also my COSY FURRY SLIPPER BOOTIES, LEG WARMERS or COSY MERINO SLIPPERS pattern:
More Crochet patterns?
For even more crochet Headbands and Earwarmers patterns, check out my collection.
All of the patterns on that list of beautifully designed, and suitable for both beginners and experienced crocheters. They are different levels of difficulties and techniques that you might have never seen before. Just click on them and you can find the free pattern, each of the patterns comes with a video tutorial.
Explore More Crochet Patterns
If you love to crochet as much as I do, I think you’ll love these other free crochet patterns.
What’s Next?
Pin this post: Save this tutorial to your Pinterest boards so that you can come back to it later.
Leave a comment: I love to hear your feedback. Tell me in the comments below!
Share on Instagram and Facebook: When you make this project, share it on social media and tag me @sonanebeska. I love to see what you make!
Have fun and let me know what you make. I would love to know how your project turns out.
Please don't forget to like and I really appreciate your comments.
If the pattern did not make sense to you, please don’t hesitate to contact me, I am happy to help :)
If you like this pattern, please follow and share my projects on social networks as a THANK YOU and to help me to create new projects and patterns for you.
If you pin my patterns to your Favorites and share it on social media as a link, I will be able to share a lot more free crochet patterns for you all.
Stay in touch at Facebook, Instagram and Pinterest.
Thank you very much once again for your visit and see you soon!
♥♥♥


