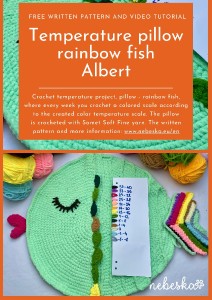
Crochet Temperature Pillow Rainbow Fish Albert
Hello My Crochet Friends!
I welcome you and cheers for the new year! Let's start the new year cheerfully, colorfully and creatively - with a temperature project - a crochet velvet pillow - a rainbow fish. The pillow has a round shape, and when we finish crocheting it, we connect the two circles together, sew them together, sew the mouth and tail and stuff the pillow.
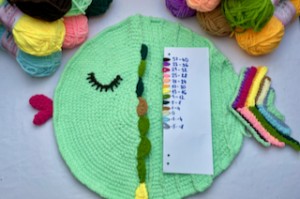
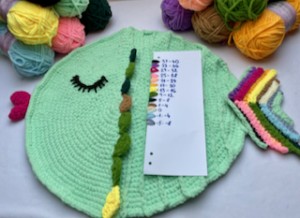
But in the meantime, we have to crochet 54 scales according to the measured highest temperature in the given week and according to the prepared temperature scale.
In the first part, I already showed you how to create a temperature scale and how to crochet a base for a pillow, and now we will start crocheting colored scales, a mouth and a tail.
The pillow is crocheted with the beautiful Samet Soft Fine yarn and I'm so glad I chose it because the pillow is nice and soft and the yarn has beautiful bright colors.
What about you? One color temperature piece per week? That is a challenge! I will look forward to you starting crocheting with me and showing off your pillows in a year.
For those who have not heard of temperature crochet, I offer an explanation and instructions below, and for those who are interested in the new project, here is the first part - an introduction to the project.
If you are interested in the temperature project of 2023: the temperature snake - the video tutorial is here:
Let's start or PIN this idea to your Pinterest boards for later.
![]()
MATERIALS:
The pattern was made with:
https://www.vlnika.cz/z23925-prize-samet-soft-fine
1 skein = 100 % polyester, 100g / 100 m
![]()
4.5 mm crochet hook
Scissors
Stuffings
Sewing/Embroidery and yarn needle/tapestry needle for sewing pieces together and weaving in ends
Markers
Pins
US crochet terms:
SlSt – slip stitch
CH/s – chain/s
SC - single crochet
SK - skip
T - turn
ST/s - stitch(es)
REP – repeat
SC2TOG = 2 single crochets together
This pattern requires familiarity with stitches used, attaching yarn, changing yarn colors, sewing parts together with a sewing needle.
PATTERN NOTES
1) A ch1 at beg of the row DOESN'T count as a stitch
2) Magic ring = the starting point for crocheting in a spiral. Use which ever method you prefer.
3) Continuous rounds - the snake is worked up in continuous rounds, which means that you will not be joining the last stitch of the round with the first one. Instead you will need to keep track of where each round started and how many stitches you have made because after each round you will continue right on to the stitches of the next round (with no join). It is useful to use a stitch marker or piece of yarn to mark the start or end of each round.
4) ( ) – The number of stitches that should be in a completed round/row are placed in brackets at the end of that round’s/row’s instructions.
THE WRITTEN PATTERN
FISH BODY
This part is worked in spiral rounds, without joining rounds. Do not join rounds.
Make a magic ring
R1: ch1, 6sc in magic ring (6sc)
R2: *2sc in each st around* repeat from * to * till end of row (12 sc)
R3: *2sc in next st, 1sc in next st* repeat from * to * till end of row (18 sc)
R4: *2sc in next st, 1sc in next 2 st* repeat from * to * till end of row (24 sc)
R5: *2sc in next st, 1sc in next 3 st* repeat from * to * till end of row (30 sc)
R6: *2sc in next st, 1sc in next 4 st* repeat from * to * till end of row (36 sc)
R7: *2sc in next st, 1sc in next 5 st* repeat from * to * till end of row (42 sc)
R8: *2sc in next st, 1sc in next 6 st* repeat from * to * till end of row (48 sc)
R9: *2sc in next st, 1sc in next 7 st* repeat from * to * till end of row (54 sc)
R10: 1sc in next 4 st *2sc in next st, 1sc in next 8 st* repeat from * to * till end of row, 1sc in last 4 st (60 sc)
R11: *2sc in next st, 1sc in next 5 st* repeat from * to * till end of row (70 sc)
R12: *2sc in next st, 1sc in next 6 st* repeat from * to * till end of row (80 sc)
R13: *2sc in next st, 1sc in next 7 st* repeat from * to * till end of row (90 sc)
R14: 1 sc in next 4 st *2sc in next st, 1sc in next 8 st* repeat from * to * till end of row, 1sc in next 4 st (100 sc)
R15: *2sc in next st, 1sc in next 9 st* repeat from * to * till end of row (110 sc)
R16: 1 sc in next 5 st *2sc in next st, 1sc in next 10 st* repeat from * to * till end of row, 1sc in next 5 st (120 sc)
R17: *2sc in next st, 1sc in next 11 st* repeat from * to * till end of row (130 sc)
R18: 1 sc in next 6 st *2sc in next st, 1sc in next 12 st* repeat from * to * till end of row, 1sc in next 6 st (140 sc)
R19: *2sc in next st, 1sc in next 13 st* repeat from * to * till end of row (150 sc)
R20: 1 sc in next 7 st *2sc in next st, 1sc in next 14 st* repeat from * to * till end of row, 1sc in next 7 st (160 sc)
R21: *2sc in next st, 1sc in next 15 st* repeat from * to * till end of row (170 sc)
R22: 1 sc in next 8 st *2sc in next st, 1sc in next 16 st* repeat from * to * till end of row, 1sc in next 8 st (180 sc)
R23: *2sc in next st, 1sc in next 17 st* repeat from * to * till end of row (190 sc)
R24: 1 sc in next 9 st *2sc in next st, 1sc in next 18 st* repeat from * to * till end of row, 1sc in next 9 st (200 sc)
R25: *2sc in next st, 1sc in next 19 st* repeat from * to * till end of row (210 sc). Cut the yarn.
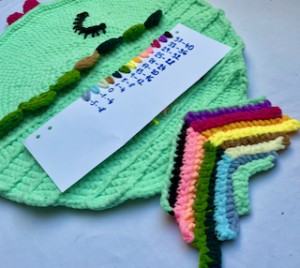
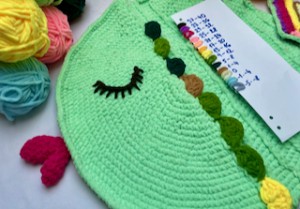
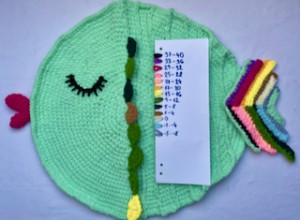
COLORED SCALES
Before continuing to crochet the scales according to the highest temperature of the week, let’s crochet vertical rows of double crochets from the centre (slightly to the left of the middle of the circle). A total of 9 rows in which we will crochet scales.
I recommend measure the spaces between rows evenly.
I measured about 2.5 cm between 2 rows. I crocheted the rows, making slip stitches, vertical straight rows from top to bottom. I prepared slip stitches in already crocheted round base.
We will crochet the scales in rows as follows:
1. row: 10 scales
2. row: 9 scales
3. row: 8 scales
4. row: 7 scales
5. row: 6 scales
6. row: 5 scales
7. row: 4 scales
8. row: 3 scales
9. row: 2 scales
54 scales in total = 54 weeks
Scales are crocheted as a shell pattern: 8 double crochets into slip stitches
Start crocheting in the 4th sl st from the beginning of the row, join the yarn, 3 ch (dc), sl st in the 1st st at the beginning of the row, then 7 dc in the stitch where we started to crochet the chain. Skip 1 sl st, crochet sl st in next sl st.
If there is another scales of a different color, cut the current yarn and sew the loose ends.
Let's skip 2 sl st. Start crocheting the next scales of the new color, in the same way as the 1st scales, ch3 and 7 dc.
If you continue to crochet other scales of the same color, just skip 2 slip stitches and crochet 8 dc in the next stitch.
Next, continue crocheting scales according to the chosen temperature scale, one scale every week.
MOUTH
This part is worked in spiral rounds, without joining rounds. Do not join rounds.
Make a magic ring
1th part:
Make a magic ring
R1: ch1, 5sc in magic ring (5sc)
R2: *2sc in each st around* repeat from * to * till end of row (10 sc)
R3 - R4: 1sc in each st around (10 sc)
R5: *1sc, sc2tog* repeat from * to *, 1sc in last st (7 sc)
2nd part
Make a magic ring
R1: ch1, 4sc in magic ring (4 sc)
R2: *2sc in each st around* repeat from * to * till end of row (8 sc)
R3: 1sc in each st around (8 sc)
R4: *sc2tog, 1sc* repeat from * to *, 1sc in last st (5 sc)
R5: Crochet on the 1st part: 1 sc in each st (7 sc) and the on the 2nd part: 1sc in each st (5 sc) 12 sc in total
R6: sc2tog all around (6sc)
R7: 1sc in each st (6 sc)
Cut the yarn and fasten off.
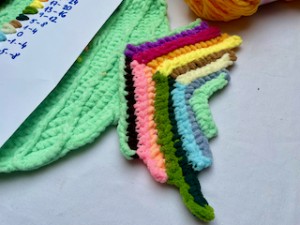
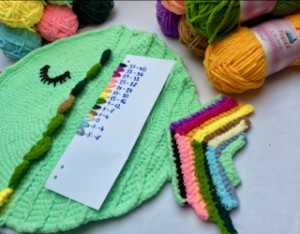
FISH TAIL
Work in rows. When you finish row, turn the work and ch1.
Work in back loop onlly BLO, ribbing pattern.
Foundation Chain: 30 ch
R1: ch1, 1 sc in next 13 chains in bump, sc2tog, sc2tog, 1sc in next 13 sc, ch2, turn (28 sc)
R2: ch1, 1sc in next 2 ch, 1sc in next 12 sc BLO, sc2tog, sc2tog, 1sc in next 12sc BLO, ch3, turn (29 sc)
R3: ch1, 1sc in next 3 ch, 1sc in next 11 sc BLO, sc2tog, sc2tog, 1sc in next 13 sc BLO, ch2, turn (29 sc)
R4: ch1, 1sc in next 2 ch, 1sc in next 10 sc BLO, sc2tog, sc2tog, 1sc in next 13 sc BLO, ch4, turn (27 sc)
R5: ch1, 1sc in next 4 ch, 1sc in next 12 sc BLO, sc2tog, sc2tog, 1sc in next 7 sc BLO, turn (23 sc)
R6: ch1, 1sc in next 6 ch BLO, sc2tog, sc2tog, 1sc in next 11 sc BLO, turn (19 sc)
R7: ch1, 1sc in next 10 st BLO, sc2tog, sc2tog, 1sc in next 4sc BLO, turn (16 sc)
R8: ch1, 1sc in next 3 st BLO, sc2tog, sc2tog, 1sc in next 6 sc BLO, turn (12 sc)
Cut the yarn and fasten off.
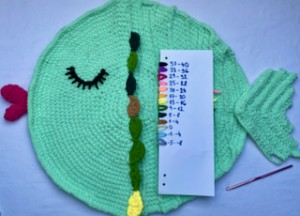
The tail can be crocheted in a one color or as a rainbow tail - I change the colors in each row. You can see how to change colors and how to re-join a new yarn in this video tutorial.
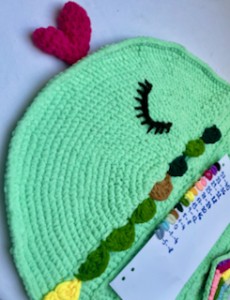
FISH EYE
Place an eye in the 4th quarter of the fish body.
Let’s make a foundation chain: 12 chains.
Sew the lashes and join the chain when sewing the lashes, work in bumps of the chain.
NOW WE HAVE PREPARED EVERYTHING FOR THE TEMPERATURE PILLOW FISH! LET ME WISH YOU A VERY HAPPY AND FUN CROCHETING YEAR!
It is up to you whether you choose to record the highest, lowest, or average daily temperatures, but whatever value you choose, simply use the assigned color from your gradient for that day’s temperature.
I am so excited, we can share and post photos of our pillows, to compare the progress with everyone else’s and admire how the fishes’ colors are changing, giving you accountability and encouragement to keep going!
All over the world, temperature projects look different - imagine how opposite an Australian pillow would be, compared to one from Italy or Sweden!
By the end of the year, you’ll have your own unique and personal pillow!
We can fully appreciate the colorful results of this year-long project. How will our fishes vary across the world? I can’t wait to find out! The great thing about this project is that, although we don’t know in advance exactly how our snakes will turn out and that’s part of the fun! I guarantee that they’re all going to look fantastic!
Stay in touch at Facebook, Instagram and Pinterest.
This pattern is made for beginners - only a basic skill level is required to make it. If you don't understand any of my instructions, don't worry I am here for you.
Have questions? Join the Facebook Group!
I hope this article will be useful for you! If you have any additional questions, feel free to join my Facebook Group. I created this group for you to share pictures, ask questions, and help each other out.
MORE PATTERNS?
You know me, I love making homemade things and creating beautiful gifts for my family and my friends. I also love doing my own crochet Amigurumi.
If you do as well, you may would love to try these patterns as well:
For even more crochet Home decor patterns, check out my collection.
All of the patterns on that list of beautifully designed, and suitable for both beginners and experienced crocheters.
Explore More Crochet Patterns
If you love to crochet as much as I do, I think you’ll love these other free crochet patterns.
What’s Next?
Pin this post: Save this tutorial to your Pinterest boards so that you can come back to it later.
Leave a comment: I love to hear your feedback. Tell me in the comments below!
Share on Instagram and Facebook: When you make this project, share it on social media and tag me @sonanebeska. I love to see what you make!
♥♥♥
Have fun and let me know what you make. I would love to know how your project turns out.
Please don't forget to like and I really appreciate your comments.
If the pattern did not make sense to you, please don’t hesitate to contact me, I am happy to help :)
If you like this pattern, please follow and share my projects on social networks as a THANK YOU and to help me to create new projects and patterns for you.
Thank you very much once again for your visit and see you soon!
♥♥♥


