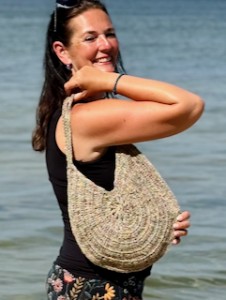
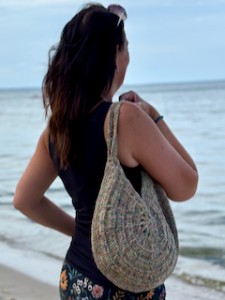
Crochet Round JUTA Bag with Flower in the middle
Hello My Crochet Friends!
Bags, rucksacks, sacks, purses, net bags, and market bags—this is my favorite crochet topic and go-to gift idea for friends, family, and anyone I want to delight with a handmade present.
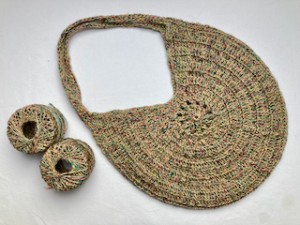
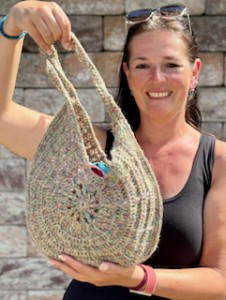
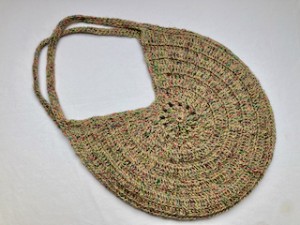
Today, I have a tutorial for an easy round bag with a cute flower pattern. This is both stylish and practical bag stretches to hold groceries with ease. It's simple and comfortable, and can be easily customized to your preferences.
The sizing is perfect—not too big, yet spacious enough, it's lightweight, flat, and convenient for carrying various items.
Crafted with juta yarn Toscana. You can make a small, a standard or big size bag. Crocheted with double crochet stitches, it's beginner-friendly, worked from the center in rounds.
This pattern is intended for beginners. No special knowledge of crocheting is needed, everything is explained and shown in detail in the video tutorial. There is no special shaping in the instructions, so it is absolutely ideal for very beginners.
So let's get started!
VIDEO TUTORIAL
You can find the step-by-step video tutorials below which will help you along if you prefer to watch video instruction rather than using a written pattern. Don’t forget to subscribe if you like me videos, it’s FREE!
This pattern is made for very beginners and with my video tutorials everyone will manage to crochet this amazing pattern. If you don't understand any of my instructions, don't worry I am here for you - enter the comments at the end of this post.
A huge thanks to everyone who want to support my blog and download PDF paid pattern. Thank you very much, I really appreciate it and it helps me create more new video tutorials and patterns for you. Love you!
If you pin my patterns to your Favorites and share it on social media as a link, I will be able to share a lot more free crochet patterns for you all.
Stay in touch at Facebook, Instagram and Pinterest.
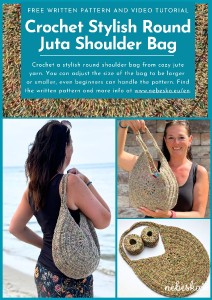
Let's start or PIN this idea to your Pinterest boards for later.
CROCHET ROUND JUTA BAG WITH THE FLOWER IN THE MIDDLE
This pattern is made for beginners - only a basic skill level is required to make it. If you don't understand any of my instructions, don't worry I am here for you.
Have questions? Join the Facebook Group!
I hope this article will be useful for you! If you have any additional questions, feel free to join my Facebook Group. I created this group for you to share pictures, ask questions, and help each other out.
So let me now get started and tell you what you will need in order to crochet this CROCHET ROUND JUTA BAG WITH THE FLOWER IN THE MIDDLE.
PATTERN DIRECTIONS
1 skein: 100 g / 330 m / 70% juta + 30 % microfiber
A fine Jute matched with a very thin printed ribbon giving it a pattern shade: this is Toscana, a yarn with a rustic and innovative character. Presented with a moderate colour chart, it was created to be crocheted and it lends itself to making accessories to wear, such as hats and bags, as well as home furnishing elements.
You will need 2 balls for standard size bag.
DC - double crochet
3) In rounds R1 - R4 finish the row with a slip stitch in the 3rd ch at the beginning of the row
width of one side 17 cm / 6.6 inch
high: 41 cm
width: 27 cm
width between handles: 14 cm
length of handle: 32 cm
width of the handle: 11 cm
THE WRITTEN PATTERN
Make a magic ring
R1: ch3 (dc), 11dc in magic ring, close row with sl st in 3rd ch from beg (12 dc)
R2: ch2, 1fpdc in 1st st, ch1, *1fpdc in next st, ch1* repeat from * to * close row with sl st in 1st st from beg (12 fpdc and ch1 between them)
R3: ch3 (dc), 1fpdc in 1st st, ch1, *1dc in next st, 1fpdc in same st, ch1* repeat from * to * close row with sl st in 3rd ch from beg (24 sl and ch1 between fpdc)
R4: ch3 (dc), 1dc in next st, 3dc-cluster in ch1sp, ch1, *1dc in next 2 st, 3dc-cluster in ch1sp, ch1* repeat from * to * close row with sl st in 3rd ch from beg
R5: ch3 (dc), 1dc in next st, 1fpdc in same st, 1dc on top of cluster, 1dc in ch1sp, *1 dc in next st, 1dc in next st, 1fpdc in same st, 1dc on top of cluster, 1dc in ch1sp* repeat from * to * till you have 4 stitches at the end, don’t work in these 4 st, turn.
R6: ch3 (dc), 1dc in same st, 1dc in next 4 st *2 dc in next st, 1dc in next 4 st* repeat from * to * till end of row, turn. (66 dc)
R7: ch3 (dc), 1dc in next st, 1dc in next st, 1fpdc in same st, 1dc in next 3 st *1 dc in next 2 st, 1dc in next st and 1fpdc in same st, 1 dc in next 3 st* repeat from * to * till end of row, turn. (77 dc)
R8: ch3 (dc), 1dc in same st, 1dc in next 6 st *2 dc in next st, 1dc in next 6 st* repeat from * to * till end of row, turn. (88 dc)
R9: ch3 (dc), 1dc in next 2 st, 1dc in next st, 1fpdc in same st, 1dc in next 4 st *1 dc in next 3 st, 1dc in next st and 1fpdc in same st, 1 dc in next 4 st* repeat from * to * till end of row, turn. (99 dc)
R10: ch3 (dc), 1dc in same st, 1dc in next 8 st *2 dc in next st, 1dc in next 8 st* repeat from * to * till end of row, turn. (110 dc)
R11: ch3 (dc), 1dc in next 3 st, 1dc in next st, 1fpdc in same st, 1dc in next 5 st *1 dc in next 5 st, 1dc in next st and 1fpdc in same st, 1 dc in next 5 st* repeat from * to * till end of row, turn. (121 dc)
R12: ch3 (dc), 1dc in same st, 1dc in next 10 st *2 dc in next st, 1dc in next 10 st* repeat from * to * till end of row, turn. (132 dc)
R13: ch3 (dc), 1dc in next 4 st, 1dc in next st, 1fpdc in same st, 1dc in next 6 st *1 dc in next 6 st, 1dc in next st and 1fpdc in same st, 1 dc in next 6 st* repeat from * to * till end of row. (143 dc)
Continue crocheting, don’t turn your work, chain 50 chains = the handle and close row with sl st in 3rd ch from beg.
BAG SIDES
R1: ch2 (hdc), 1hdc in each st back loop only all around, 1hdc in each chain back loop only. Close row with sl st in 2nd ch from beg.
R2: ch2 (hdc), 1hdc in each st third loop only all around. Close row with sl st in 2nd ch from beg.
Cut the yarn and fasten off.
Repeat the instruction and make the second part of the bag.
Continue crocheting and join both parts together with slip stitches.
Place both parts together with the inner sides, crochet on the front sides.
Join stitch to stitch with a slip stitch. Work in third loop only.
Cut the yarn and fasten off.
BORDER AROUND
Re-join a new yarn. Crochet single crochet stitches. Work in double crochet stitches (or 3 chains) at the end of each row. I would recommend you to make 2 or 3 single crochets in each st.
Work around each side.
Cut the yarn and fasten off.
What’s Next?
Pin this post: Save this tutorial to your Pinterest boards so that you can come back to it later.
Leave a comment: I love to hear your feedback. Tell me in the comments below!
Share on Instagram and Facebook: When you make this project, share it on social media and tag me @sonanebeska. I love to see what you make!
More Crochet patterns? Check some of my favorite tutorials:
For even more crochet Home Decoration patterns, check out my collection.
I prepared a playlist:
or visit the web page:
All of the patterns on that list of beautifully designed, and suitable for both beginners and experienced crocheters. They are different levels of difficulties and techniques that you might have never seen before. Just click on them and you can find the free pattern, each of the patterns comes with a video tutorial.
Explore More Crochet Patterns
If you love to crochet as much as I do, I think you’ll love these other free crochet patterns.
♥♥♥
Have fun and let me know what you make. I would love to know how your project turns out.
Please don't forget to like and I really appreciate your comments.
If the pattern did not make sense to you, please don’t hesitate to contact me, I am happy to help :)
If you like this pattern, please follow and share my projects on social networks as a THANK YOU and to help me to create new projects and patterns for you.
If you pin my patterns to your Favorites and share it on social media as a link, I will be able to share a lot more free crochet patterns for you all.
Stay in touch at Facebook, Instagram and Pinterest.
Thank you very much once again for your visit and see you soon!
♥♥♥

