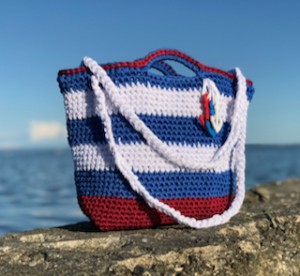
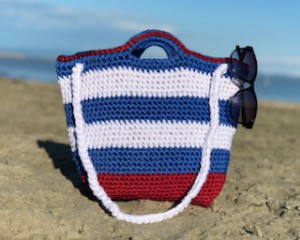
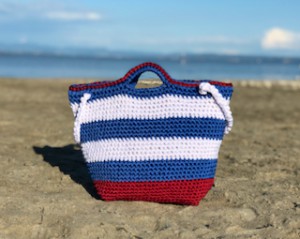
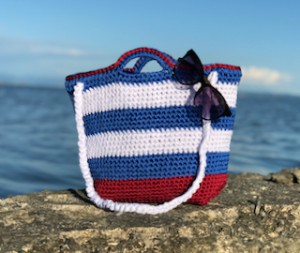
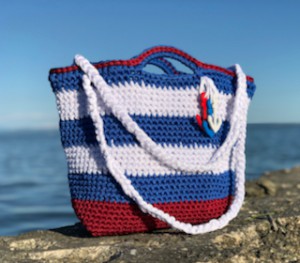
You'll definitely get noticed when you tote this beach bag with anchors. With these bright colors and a perfect shape, this free crochet beach bag pattern will definitely come in handy. This brightly colored bag will bring happiness to your day. Toss in your sunscreen, magazines, and beach towel and get ready to enjoy the sunshine.
You need only the basic crochet stitches - single and half-double crochets!
A confident beginner could make this bag, easily, and yet it still looks like something you could buy at the beach shop. It has a very classic nautical-style pattern, but with really fun color options thanks to the yarn LACE AYAZ. I am absolutely in love with it!
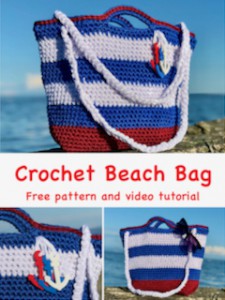
There is a crochet video tutorial to show you this wonderful pattern.
VIDEO TUTORIAL You can find the step-by-step video tutorials below which will help you along if you prefer to watch video instruction rather than using a written pattern. Don’t forget to subscribe if you like me videos, it’s FREE!
A huge thanks to everyone who want to support my blog and download PDF paid pattern. Thank you very much, I really appreciate it and it helps me create more new video tutorials and patterns for you. Love you!
Let's start or PIN this idea to your Pinterest boards for later.
You may would love this simple mini handbag as well:
This crochet bag pattern comes in one size, but you can easily adapt the size and can create the perfect bag for your beach adventures. You can very easily choose width and height you like! This is the very basic pattern, this bag is actually much easier to crochet than you might think and you will love it as it works up very quickly. I simply fall in love with crocheting this easy beach bag.
STITCHES USED, IN US TERMS: ch = chain sc = single crochet cssc = crossed single crochet hdc = half double crochet sl st = slip stich
Special stitch used: cssc = crossed stitch single crochet step 1: insert hook into next stitch as normal sc, step 2: instead of yarning over, with hook pointing down, grab yarn, step 3: pull up a loop, finish as a normal sc - yarn over and pull through 2 loops on hook
WRITTEN PATTERN BASEMENT Colour A Use crochet hook 5.0 mm Foundation chain: ch100
Join chain by slip stitch.
Work in rounds.
R1: ch1 (1sc), 1cssc in each chain around till end of round, 1sl st in 1st ch at beg to close round (100 sc)
R2: ch1 (1sc), 1cssc in each cssc around till end of round, 1sl st in 1st ch at beg to close round (100 sc)
R3 - R15: Repeat R2
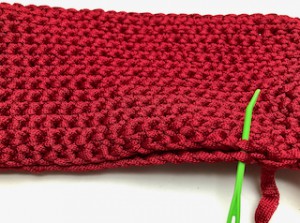
Let's shape the basement: sewing the bottom part
Keeping the bag inside out, lay it flat, lining up the grommets. Use still color A. (about 100 cm) to sew the bottom of the bag closed, work stitch by stitch. Fasten off and weave in ends.
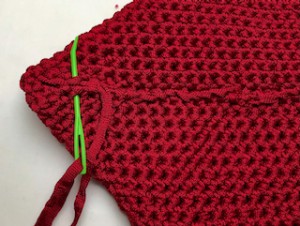
With the bag still keeping inside out, turn it now upside down and position the bottom so that one end lays out in a triangular shape, with the seam centered. Work on the 6th round of the basement. You can use a short string to mark a line across the corner of the base.
Sew a seam across the line, work through both layers.
Repeat these instructions on the opposite side.
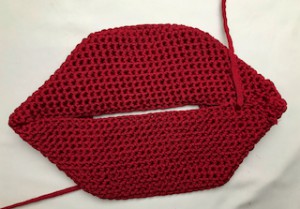
This will make the beach bag to easily stand up straight without caving in on the sides and still the inside of the bag roomy enough.
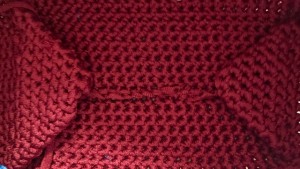
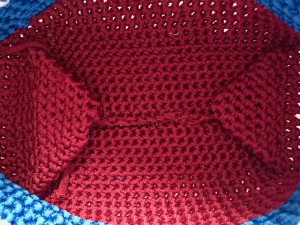
Turn bag right-side out. Here’s what it should look like on the inside:
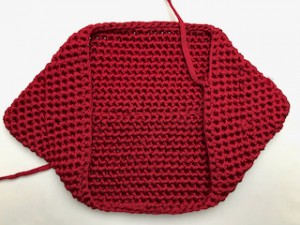
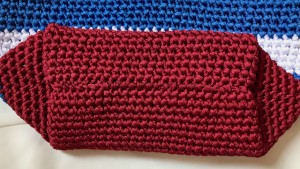
And here’s what it should look like on the bottom:
HANDBAG BODY Use crochet hook 5.5 mm Work in rounds.
Color B R16 - R20: repeat R2, 100 cssc in each round, join round with sl st
Color C R21 - R25: repeat R2, 100 cssc in each round, join round with sl st
Color B R26 - R30: repeat R2, 100 cssc in each round, join round with sl st
Color C R31 - R35: repeat R2, 100 cssc in each round, join round with sl st
Color B R36 - R37: repeat R2, 100 cssc in each round, join round with sl st
HANDLE We will create the handle in next round. Centre your beach bag, make sure handles on each side are centered in the middle, you may have to adjust in case you have different number of stitches.
I would recommend to you use 4 markers, place 2 markers on front side (skip 10 cssc between markers) and also 2 markers on back side, make sure the markers are on the same positions on each side.
R38: ch 1, 1 cssc in next 6 cssc, ch 12, skip 10 cssc, 1 cssc in next 40 cssc, ch 12, skip 10 cssc, 1 cssc in next 34 cssc, sl st to close the round
R39: 1 sl st in next 6 st to move to the handle.
Work 14hdc over chain.
Work sc into bottom of cssc from previous round. This will create a long single crochet stitch around the top of the bag. 1 sc in next 40 sc, 14 hdc over chain, 1 sc in next 40 sc
Cut the yarn, make an invisible last stitch, fasten off, weave in end.
Let's make a last row - border around the beach and just crochet slip stitches with red yarn around the last round.
colour C, crochet hook 5.5 mm
R40: make a slip knot, pull knot through the last round (R39) st, make a slip stitch in each st around, incl the handle.
Cut the yarn, make an invisible last stitch, fasten off, weave in all ends.
Measurement: 15.75 inch / 40 cm width
Measurement: 10.2 inch / 26 cm high
Basement: 5 x 7.9 inch // 13 x 20 cm
Cord Chain 63 inch / 160 cm long
Now you can add anchors or flowers or a label or you can use some buttons on your wonderful beach bag! Feel free to add some decoration to make your bag just perfect! That’s it – you’re done! Grab your favorite sunglasses and a beach towel and head to your favorite sandy spot in style. And don’t be surprised if someone asks you where you got your gorgeous beach bag!
CORD
If you want to make your beach bag wear as a cross body bag, feel free to add a cord or rope as well. Pull the cord through the stitches on front side -about 10 stitches left from the handle on side and 10 stitches right from the handle, then pull the cord through inside part to back side, make sure you have the cord through on the same position. Sew both end of the cord in inside part.
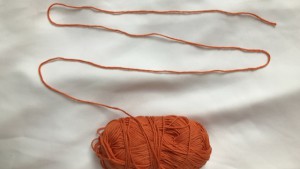
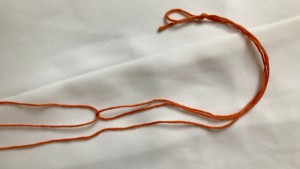
You can use any rope or you can create this cord as per mine instructions:
Use color C
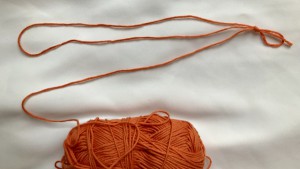
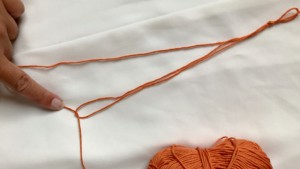
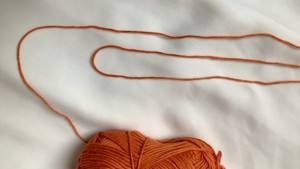
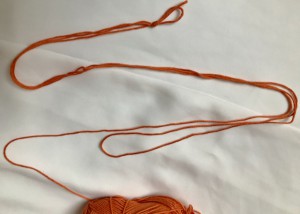
Lay the yarn down and make an "S" with your yarn, so there are 3 rows: you will have a loop on 2 sides and the beginning of the yarn and the yarn ball opposite from each other, push them together, combine start of the yarn with one loop – creating 3 strands and make a slip knot to hold these 3 strands together and start crocheting.
Make a chain till you reach the second loop, you will pull the yarn from the yarn ball through to create another loop. And keep crocheting, you will not need to cut your yarn or create knots. simply use that one skein of LACE AYAZ yarn and create a bulky yarn from it while you crochet
This seems very hard to understand. The pictures show you how to expand the yarn further and further into 3 strands and to create the bulky yarn – while you crochet.
Have fun and let me know what you make. I would love to know how your project turns out. Please don't forget to like and I really appreciate your comments. If the pattern did not make sense to you, please don’t hesitate to contact me, I am happy to help :) If you like this pattern, please follow and share my projects on social networks as a THANK YOU and to help me to create new projects and patterns for you. Thank you very much once again for your visit and see you soon!