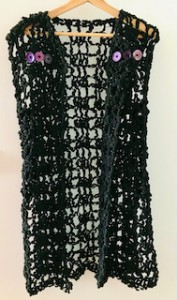
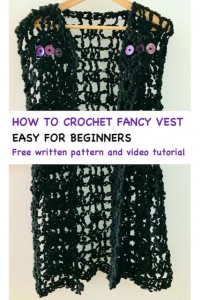
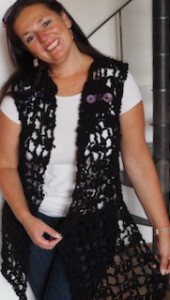
Crochet EASY LONG fancy vest
This crochet pattern is a long, very easy crocheted vest that is just super pretty.
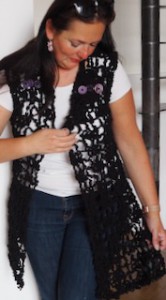
This long, crocheted vest is so beautiful and fun to wear with dresses, skirts, jeans or even shorts! It’s great to cover the rear end and also can easily be dressed up or down.
While this vest could be used any time of year, I’m loving it for fall and spring and also summer time.

VIDEO TUTORIAL
You can find the step-by-step video tutorials below which will help you along if you prefer to watch video instruction rather than using a written pattern. Don’t forget to subscribe if you like me videos, it’s FREE!![]()
A huge thanks to everyone who want to support my blog and download PDF paid pattern. Thank you very much, I really appreciate it and it helps me create more new video tutorials and patterns for you. Love you!
![]()
This pattern is made for very beginners - only a basic skill level is required to make it. If you don't understand any of my instructions, don't worry I am here for you - enter the comments at the end of this post.
Let's start or PIN this idea to your Pinterest boards for later.
![]()
If you like this EASY VEST, you may would like to try this amazing lovely and romantic scarfs and cowls:


EASY and SIMPLE VEST DIRECTIONS
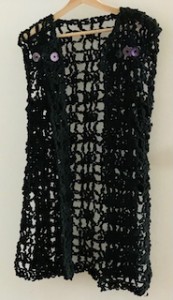
It’s crocheted with only double crochet stitches and chains. The entire vest is crocheted with fancy yarn Alfa.
The vest is made in three rectangular pieces and is joined together. You’ll crochet each panel from the bottom up, working double crochets stitches only. Easy, easy!
There’s no complicated increasing, decreasing or shaping.
The perfect bit of comfort and length come together to make this black fancy vest. Simple enough for new crocheters and easy to make.
It can be dressed up or down with any outfit.
Because it’s made with simple shapes, you’ll find it a nice meditative pattern to crochet while hanging out at home. The long, straight lines and understated pattern make it slimming and beautiful.
Material:
For this S/M size you will need:
Alfa Fancy Yarn: 50g/75m, 100% polyester, fancy yarn with pom-poms
https://www.vlnika.com/z2087-alfa-yarn
You will need 5 balls.
Crochet hook: 7.00 mm
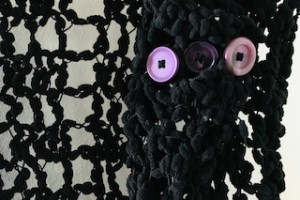
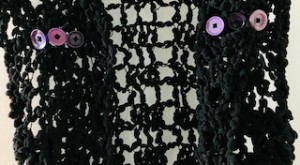
6 Buttons - different colors and shapes, approx 1 inch each.
Scissors and tapestry needle
Difficulty Level: Level 1 – Easy, for beginners
US crochet term:
SlSt – slip stitch
CH/s – chain/s
DC - double crochet
SC - single crochet
SK - skip
T - turn
ST/s - stitch(es)
REP - repeat

Pattern Notes
1) Before you start take a measurement of height of your body and a body measurement (please see the final measurement of the vest below).
2) This pattern is for S/M women size, but you can easily adapt to a smaller size or bigger size just by reducing or increasing the number of rows. Remember that when making your vest bigger you will need more yarn.
3) A ch3 at beg of the round DOESN'T count as a stitch.
4) The project is made up of 3 panels/rectangles joined together: 2 front panels and 1 back panel. The panels have the same pattern.
WRITTEN PATTERN
Foundation chain: 33 chains
R1: ch2 (don’t count as a stitch), 1dc in 3rd ch from your hook, then work 1dc in each ch till end of row, turn (33 dc)
R2: ch2, 1dc in 1st st, (ch1, skip 1 st, 1dc in next st) repeat 2 times * ch2, sk 2 st, 1dc in next st, (ch1, skip 1 st, 1dc in next st) rep 2 times *, rep from * to * till end of row, turn
R3: ch2, 1dc in 1st st, 1dc in ch1sp, 1dc in next st, 1dc in ch1sp, 1d in next st, * ch2, sk ch2sp, 1 dc in next st, 1dc in ch1sp, 1dc in next st, 1dc in ch1sp, 1dc in next st* rep from * to * till end of row, turn
R4 = R2
R5 = R3
Repeat R2 and R3
Make 24 rows
Last row: R25: ch2, 1dc in each st and in each ch1sp till end of row (33 dc)
Fasten off, hide all loose tails in the back of your work
Front part A (wider): 26 stitches
Foundation chain: 26 chains
R1: ch2 (don’t count as a stitch), 1dc in 3rd ch from your hook, then work 1dc in each ch till end of row, turn (26 dc)
R2: ch2, 1dc in 1st st, (ch1, skip 1 st, 1dc in next st) repeat 2 times * ch2, sk 2 st, 1dc in next st, (ch1, skip 1 st, 1dc in next st) rep 2 times *, rep from * to * till end of row, turn
R3: ch2, 1dc in 1st st, 1dc in ch1sp, 1dc in next st, 1dc in ch1sp, 1d in next st, * ch2, sk ch2sp, 1 dc in next st, 1dc in ch1sp, 1dc in next st, 1dc in ch1sp, 1dc in next st* rep from * to * till end of row, turn
R4 = R2
R5 = R3
Repeat R2 and R3
Make 24 rows
Last row: R25: ch2, 1dc in each st and in each ch1sp till end of row (26 dc)
Don't fasten off, continue crocheting slip stitching to join Front panel with Back panel - see instructions below how to join Shoulders.
Front panel B (narrower) 19 stitches
Foundation chain: 19 chains
R1: ch2 (don’t count as a stitch), 1dc in 3rd ch from your hook, then work 1dc in each ch till end of row, turn (19 dc)
R2: ch2, 1dc in 1st st, (ch1, skip 1 st, 1dc in next st) repeat 2 times * ch2, sk 2 st, 1dc in next st, (ch1, skip 1 st, 1dc in next st) rep 2 times *, rep from * to * till end of row, turn
R3: ch2, 1dc in 1st st, 1dc in ch1sp, 1dc in next st, 1dc in ch1sp, 1d in next st, * ch2, sk ch2sp, 1 dc in next st, 1dc in ch1sp, 1dc in next st, 1dc in ch1sp, 1dc in next st* rep from * to * till end of row, turn
R4 = R2
R5 = R3
Repeat R2 and R3
Make 24 rows
Last row: R25: ch2, 1dc in each st and in each ch1sp till end of row (19 dc)
Don't fasten off, continue crocheting slip stitching to join Front panel with Back panel - see instructions below.

Join shoulders:
join last row of Back and Front Panel A: 12 stitches together from the corner.
join last row of Back and Front Panel B: 12 stitches together from the corner.
Join sides together: skip 9 rows, start new yarn,
make a slip know and join yarn to R7 (working from the bottom up): ch2, 1dc in the same st, sl st on the same st on opposite site/panel - join 9 rows togethers
Fasten off, hide all loose tails in the back of your work and you are all done my friends.
You just created a beautiful fancy vest!
Attached the buttons: Arrange the buttons in a way that makes you happy and hand sew them to the right and left front panels.
Or use this guide: use stitch markers as a guide where to add 3 buttons - place a markers on the R22. Use tapestry needle to fasten buttons into desired places.
Vest is 33.5 inch / 85 cm long
Back panel is 16.5 inch / 42 cm wide
Front panel is 9.8 inch / 25 cm wide
Front panel is 13 inch / 33 cm wide
Shoulders 4.7 inch / 12 cm
Have fun and let me know what you make. I would love to know how your project turns out.
Please don't forget to like and I really appreciate your comments.
If the pattern did not make sense to you, please don’t hesitate to contact me, I am happy to help :)
If you like this pattern, please follow and share my projects on social networks as a THANK YOU and to help me to create new projects and patterns for you.
If you pin my patterns to your Favorites and share it on social media as a link, I will be able to share a lot more free crochet patterns for you all.
Stay in touch at Facebook, Instagram and Pinterest.
Thank you very much once again for your visit and see you soon!
♥♥♥


