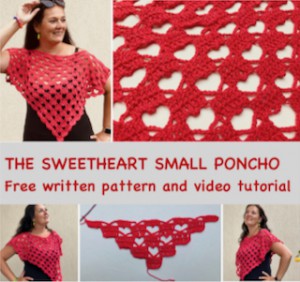
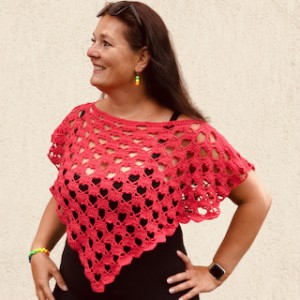
Crochet Sweetheart Small Poncho
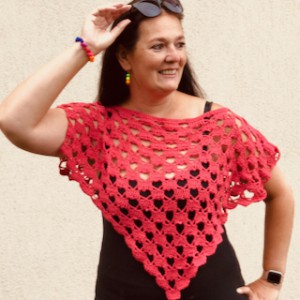
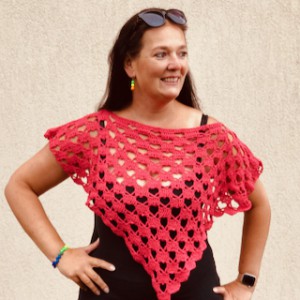
Try this wonderful sweetheart design for small poncho to make a great piece for yourself or for your friends & family!
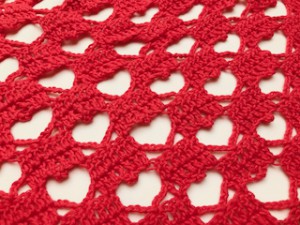
This design has open and airy stitches creating small sweethearts on the poncho. This makes the poncho light and easy to wear.
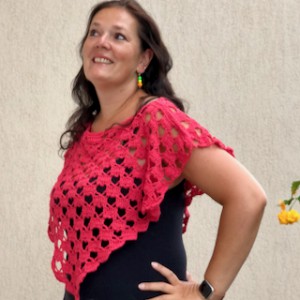
This poncho is perfect for this transition period between summer and fall time and also wearing for special events, for romantic dinners and so.
This Poncho is absolutely fabulous and outstanding and will complete your outfits.
VIDEO TUTORIAL
You can find the step-by-step video tutorials below which will help you along if you prefer to watch video instruction rather than using a written pattern. Don’t forget to subscribe if you like me videos, it’s FREE!![]()
A huge thanks to everyone who want to support my blog and download PDF paid pattern. Thank you very much, I really appreciate it and it helps me create more new video tutorials and patterns for you. Love you!
![]()
This pattern is made for advanced beginners - only a basic skill level is required to make it. If you don't understand any of my instructions, don't worry I am here for you - enter the comments at the end of this post.
Let's start or PIN this idea to your Pinterest boards for later.
![]()
You may would love to try these Poncho and Cardigans as well:
So let me now get started and tell you what you will need in order to crochet this amazing sweetheart Poncho.
100% cotton, 5ply/sport, 50g = 160m
You will need 3 balls.
Difficulty Level: Level 1 – Easy, for beginners
US crochet term:
SlSt – slip stitch
CH/s – chain/s
DC - double crochet
SC - single crochet
SK - skip
T - turn
ST/s - stitch(es)
REP - repeat
YO – yarn over
PATTERN NOTES
1) Before you start take a measurement of height of your body and a body measurement (please see the final measurement of the small poncho below).
2) This pattern is for M women size, but you can easily adapt to a smaller size or bigger size just by reducing or increasing the number of rows. Remember that when making your poncho bigger you will need more yarn.
3) A ch3 at beg of the round DOESN'T count as a stitch (only when in the R1).
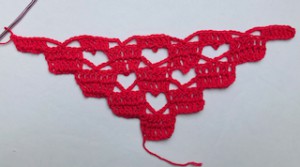
4) The project is made up of 2 panels joined together. The front panel is a bit bigger than the back panel to fit perfectly and make a nice neckline as well.
The below instructions make 1 panel.
Make in total 2 panels.
Crochet hook 3.00 mm
Make a slip knot
Make a foundation chain: ch7
R1: ch3 (counts as 1dc), sk 3ch, 1dc in 4th ch from hook, 1dc in each ch along = 7dc
R2: ch3, ch6, turn, sl st in next 6 ch, sk 3ch, 1dc in next 7st, ch6, turn
R3: ch2, 1dc in 3rd ch from hook, 1dc in next 6st, ch4, sk 2st, sl st in next st, ch4, sk 2st, 1dc in next 7 st, turn
R4: ch3 + ch6, turn, sl st in next 6 st, sk 3ch, 1dc in next 7 st, ch2, picot (ch3, sl st in 3rd ch from hook), ch2, skip ch4 spaces, 1dc in next 7st
R5: ch6, ch2, turn, sk 2ch, 1dc in next 7 st, ch4, sk 2 st, sl st in next st, ch4, sk 2st, 1dc in next 7st (1dc in next dc, 1 next 2ch, 1dc in picot, 1dc in next 2ch, 1dc in next dc), ch4, sk 2st, sl st in next st, ch4, sk 2st, 1dc in next 7 st
R6: ch3 + ch6, turn, sl st in next 6 st, sk 3ch, 1dc in next 7 st, * ch2, picot (ch3, sl st in 3rd ch from hook), ch2, skip ch4 spaces, 1dc in next 7st* rep from * to * till end of row
R7: ch6, ch2, turn, sk 2ch, 1dc in next 7 st, * ch4, sk 2 st, sl st in next st, ch4, sk 2st, 1dc in next 7st (1dc in next dc, 1 next 2ch, 1dc in picot, 1dc in next 2ch, 1dc in next dc) * rep from * to * till end of row
R8 = R6: ch3 + ch6, turn, sl st in next 6 st, sk 3ch, 1dc in next 7 st, * ch2, picot (ch3, sl st in 3rd ch from hook), ch2, skip ch4 spaces, 1dc in next 7st* rep from * to * till end of row
R9 = R7: ch6, ch2, turn, sk 2ch, 1dc in next 7 st, * ch4, sk 2 st, sl st in next st, ch4, sk 2st, 1dc in next 7st (1dc in next dc, 1 next 2ch, 1dc in picot, 1dc in next 2ch, 1dc in next dc) * rep from * to * till end of row
Repeat R6 and R7 till you have a desired width of your poncho.
I made 34 rows with increase at the beginning of each row.

Continue with no increase:
R35: ch2, turn, 1dc in next 7st, * ch2, picot (ch3, sl st in 3rd ch from hook), ch2, skip ch4 spaces, 1dc in next 7st* rep from * to * till end of row
R36: ch2, turn, 1dc in next st * ch4, sk 2 st, sl st in next st, ch4, sk 2st, 1dc in next 7st (1dc in next dc, 1 next 2ch, 1dc in picot, 1dc in next 2ch, 1dc in next dc) * rep from * to * till end of row
Repeat R35 - R36
I made 16 rows with no increase
The last row: ch2, turn, 1dc in each st along till end of row
I made 51 rows in total
Repeat the instructions above for the BACK PANEL
I made 30 rows with increase and 16 rows with no increase at the beginning.
FINISHING
With your yarn and tapestry needle you will now join the panels together, making sure they are right sides together. Work on wrong sides.
Start in the corner.
Seam shoulders - seam the last rows together, sew 36 st together (6 rectangles) on the right side and also 36 stitches together on the left side.
Now that your poncho is assembled you will hide all loose tails in the wrong side of your work and turn it right side facing you.
MEASUREMENT:
2 rows high: 2.5 cm / 1 inch
10 rows high: 12 cm / 5 inch
1 panel (7dc group) width: 3 cm / 1.18 inch
10 panels (10 groups) width: 29 cm / 11 inch
Poncho is 25.5 inch / 60 cm long

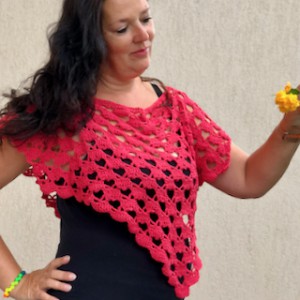
You just created a beautiful sweetheart Poncho!
Have fun and let me know what you make. I would love to know how your project turns out.
Please don't forget to like and I really appreciate your comments.
If the pattern did not make sense to you, please don’t hesitate to contact me, I am happy to help :)
If you like this pattern, please follow and share my projects on social networks as a THANK YOU and to help me to create new projects and patterns for you.
If you pin my patterns to your Favorites and share it on social media as a link, I will be able to share a lot more free crochet patterns for you all.
Stay in touch at Facebook, Instagram and Pinterest.
Thank you very much once again for your visit and see you soon!
♥♥♥


