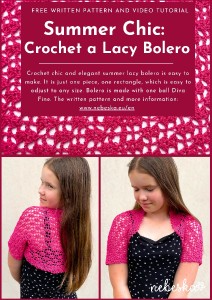
Summer Chic: Crochet a Lacy Bolero
Hello everyone!
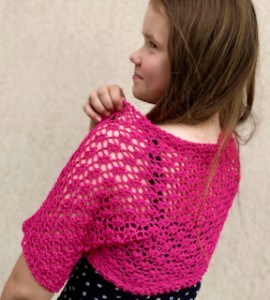
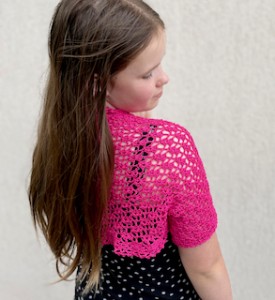
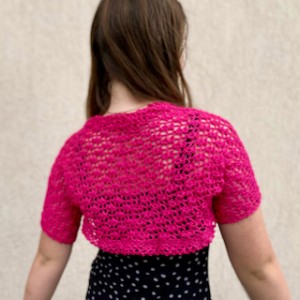
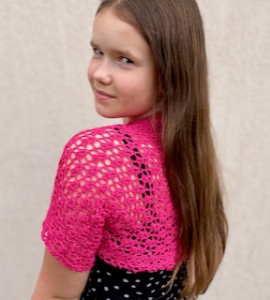
We have beautiful sunny days here, and I think it’s the perfect time to crochet a romantic lace bolero with short sleeves. I love to throw a short bolero over my shoulders, whether I'm wearing a tank top or a dress. The bolero covers the shoulders and makes your outfit look elegant and romantic. I chose an easy lace pattern and a simple cut for this bolero.
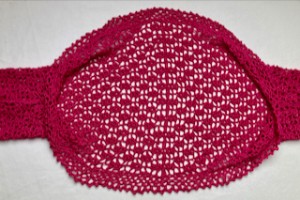
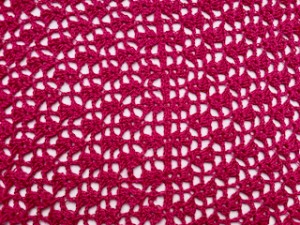
Try this delicate lace pattern featuring v-stitches, double crochets and chain stitches. The bolero is crocheted starting from the center of the back, first to one side, then again from the center to the other side. This creates a longer rectangle that grows from the center to the sides. Once you are satisfied with the width of the bolero and the length of the sleeves, simply sew a few centimeters onto the sleeves. You can also use a simple mesh pattern for the bolero.
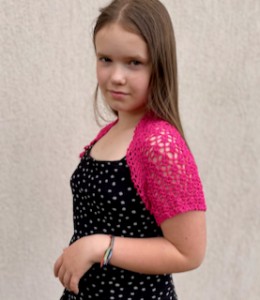
You can crochet a longer or shorter bolero—I chose a length that reaches halfway down the back, just below the bra line. You can also make the sleeves longer or shorter, depending on your preference.
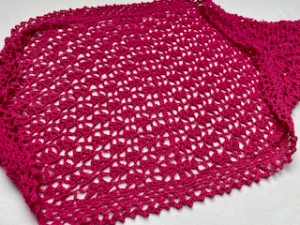
I crocheted with the new-to-me Alize Diva Fine yarn, and I must say that I am very happy with it! Diva is a very soft, shiny, thin yarn that gives the crocheted bolero a touch of elegance and luxury.
The lace pattern is easy to remember, with only 4 rows repeating, so there’s no complicated counting. It’s quick and easy, and you’ll be delighted to see the bolero growing larger.
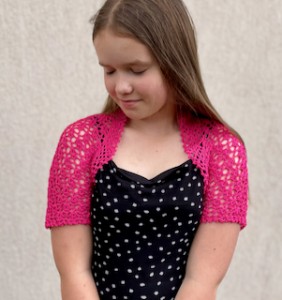
This bolero can be worn all year round with a dress, T-shirt, or tank top. The great thing is that you can easily adapt it to any size, your taste, and style. Even a beginner can try it! Doesn't that sound wonderful? Let’s start crocheting together.
VIDEO TUTORIALS
You can find the step-by-step video tutorials below which will help you along if you prefer to watch video instruction rather than using a written pattern. Don’t forget to subscribe if you like me videos, it’s FREE!
![]()
If you pin my patterns to your Favorites and share it on social media as a link, I will be able to share a lot more free crochet patterns for you all.
Stay in touch at Facebook, Instagram and Pinterest.
Let's start or PIN this idea to your Pinterest boards for later.
![]()
More Crochet patterns?
For even more crochet patterns, check out my e-book.
CROCHET WITH LOVE AND NEBESKA
I prepared for you the e-book CROCHET WITH LOVE AND NEBESKA, it is a set of more than 60 projects with instructions and video instructions for the whole year 2023!
You can download the e-book as a pdf with links to allow you to better find the guide you need. Or maybe you missed one of the pattern instructions and now it will make you happy, or you are just looking for inspiration and one of my ideas will move you in your next creation!
This e-book is FREE and you can share it with your friends. Due to the size, it is necessary to download CROCHET WITH LOVE AND NEBESKA from the link (it cannot be sent as an e-mail attachment). Click on the ebook link or image and download the e-book CROCHET WITH LOVE AND NEBESKA 2023 for FREE.
https://forms.gle/CyJZqXs4fTWechtE6

All of the patterns on that list of beautifully designed, and suitable for both beginners and experienced crocheters. They are different levels of difficulties and techniques that you might have never seen before. Just click on them and you can find the free pattern, each of the patterns comes with a video tutorial.
SUMMER CHICK: CROCHET A LACY BOLERO WITH SHORT SLEEVES
This BOLERO is perfect for beginners, featuring a simple filet pattern of double crochets and chain stitches.
All you need is a basic understanding of crocheting, as everything is clearly explained in the step-by-step instructions below and demonstrated in detail in the accompanying video tutorial.
If you have any questions regarding the instructions, don't hesitate to reach out to me. I am here to help!
Have questions? Join the Facebook Group OR my Youtube Community!
I hope this article will be useful for you! If you have any additional questions, feel free to join my Facebook Group or Youtube Community. I created these groups for you to share pictures, ask questions, and help each other out.
SUMMER CHICK: CROCHET A LACY BOLERO WITH SHORT SLEEVES
This BOLERO has a simple pattern and crocheting is easy and fun! I believe you will enjoy crocheting lacy pattern with V-stitches.
The BOLERO is crocheted from the middle part of the bak, in rows, one side to the right and the second side to the left.
If you want to adjust the size, you just change the number of rows and the number of stitches in a row.
SUMMER CHICK: CROCHET A LACY BOLERO WITH SHORT SLEEVES
MATERIALS
What will you need to crochet this CROCHET SUMMER BOLERO?
The BOLERO is crocheted using yarn: ALIZE DIVA FINE, SILKY EFECT
Yarn Details:
100 g / 600 m,
100% poliacrylic
Available at: https://www.vlnika.cz/z24793-prize-diva-fine
You need 1 ball to make this beautiful bolero.
![]()
You'll also need:
Hook: 3.0 mm
Sewing needle
Markers for marking sleeves
Scissors
With these materials on hand, you'll be all set to start crocheting your summer chic bolero!
Difficulty Level: Level 1 – Easy, for beginners
US crochet terms:
SlSt – slip stitch
CH/s – chain/s
SC - single crochet
DC - double crochet
SK - skip
T - turn
ST/s - stitch(es)
REP – repeat
SUMMER CHICK: CROCHET A LACY BOLERO WITH SHORT SLEEVES
PATTERN NOTES
1) The crocheted bolero is designed in women's size S/M, with short sleeves and a length reaching the middle of the back. The bolero has a classic cut, making it perfect to wear over a dress, T-shirt, or tank top.
2) The bolero is crocheted as a simple rectangle, starting from the center and working towards the sides. You can test the width and sleeve length as you crochet and adjust the number of rows accordingly.
3) Chains and double crochets are used in the instructions. The double crochets form a very simple V-stitch pattern that repeats in each row. The pattern repeats every 4 rows.
4) In the instructions below, I chose a mid-back length, but you can also crochet a longer bolero. Adjust the length by starting with a longer or shorter chain, and adjust the width by crocheting more or fewer rows in the body of the bolero.
5) The ch3 at the beginning of a row serves as a replacement for the first double crochet. A ch1 at the beginning does not replace a stitch.
6) The bolero is crocheted in rows back and forth. Each row begins with a ch3 and ends with a dc in the 3rd ch from the beginning of the previous row. Borders are crocheted in circular closed rounds using a mesh pattern, and we do not turn the work when crocheting the borders.
7) MEASUREMET:
width: 42 cm
length: 28 cm
length of sleeve: 10 cm
sleeve width: 36 cm
border: 4 cm
*Measurements are taken from the garment lying flat, before the yarn has stretched out/dropped.
SUMMER CHICK: CROCHET A LACY BOLERO WITH SHORT SLEEVES - CONSTRUCTION
The bolero is crocheted as one large rectangle.
We crochet these parts:
LEFT PART OF THE BOLERO FROM THE CENTER
RIGHT PART OF THE BOLERO FROM THE CENTER
BORDERS AROUND THE SLEEVES
BORDER AROUND THE BOLERO
SUMMER CHICK: CROCHET A LACY BOLERO WITH SHORT SLEEVES
WRITTEN PATTERN
Crochet hook 3.0 mm
ch3 at beg of row = double crochet
work in rows back and forth
Make a foundation chain.
Foundation Chain: 81 chains
The number of chains is a multiple of 8 + 1 chain per symmetry.
Foundation Chain: multiple of 8x10 + 1 ch
THE FIRST PART - RECTANGLE
R1: ch1, 1sc in 2nd chain from hook, 1sc in each chain till end of row, turn (81 sc)
R2: ch3 (1dc), *ch2, skip 3st, (2dc, ch1, 2dc) in next st, skip 3st, ch2, 1dc in next st*, repeat from * to * till end of row, turn (8 repetitions)
R3: ch3 (1dc), *ch2, (2dc, ch1, 2dc) in ch1sp - in v-stitch from previous row, ch2, 1dc in dc from previous row*, repeat from * to * till end of row, turn (8 repetitions)
R4: ch3 (1dc), 1dc in 1st st, *ch2, 1dc in ch1sp - in v-stitch from previous row, ch2, (2dc, ch1, 2dc) in dc from previous row*, repeat from * to * till end of row, finish row with 2dc in last st, turn
R5: ch3 (1dc), 1dc in 1st st, *ch2, 1dc in dc from previous row, ch2, (2dc, ch1, 2dc) in ch1sp - in v-stitch from previous row*, repeat from * to * till end of row, finish row with 2dc in last st, turn
R6: ch3 (1dc), *ch2, (2dc, ch1, 2dc) in dc from previous row, ch2, 1dc in ch1sp - in v-stitch from previous row*, repeat from * to * till end of row, turn (8 repetitions)
R7: ch3 (1dc), *ch2, (2dc, ch1, 2dc) in ch1sp - in v-stitch from previous row, ch2, 1dc in dc from previous row*, repeat from * to * till end of row, turn (8 repetitions)
R8: ch3 (1dc), 1dc in 1st st, *ch2, 1dc in ch1sp - in v-stitch from previous row, ch2, (2dc, ch1, 2dc) in dc from previous row*, repeat from * to * till end of row, finish row with 2dc in last st, turn
R9: ch3 (1dc), 1dc in 1st st, *ch2, 1dc in dc from previous row, ch2, (2dc, ch1, 2dc) in ch1sp - in v-stitch from previous row*, repeat from * to * till end of row, finish row with 2dc in last st, turn
R10 - R36: Repeat R6 - R9
Measurement of the half part of the rectangle: 32 cm x 33 cm
Border around the sleeve end:
R1: ch1, 1sc in 1st st, ch4, *(1sc in next ch2sp, ch4, 1sc in next ch2sp, ch4, 1sc in middle of V-st - in ch1sp, ch4)* repeat from * to * till end of row, finish row with 1sc in last st, turn
R2: ch1, *1sc, picot: ch3 and 1sc in 1st ch, 1sc* in each ch4sp.
Cut the yarn and fasten off.
THE SECOND PART – RECTANGLE
Re-join a new yarn in the corner, on the opposite side of the chain we crocheted at the beginning.
We crochet from the center of the back to the right.
We repeat the same pattern as we crocheted on the opposite side.
ROW R2 - R36
We continue crocheting the border around the sleeve. Cut the yarn and fasten off.
Finishing Instructions:
Sleeves:
1.Fold the rectangle along the longer side.
2.Sew 10 rows from the end, stitch to stitch. This seam will create a "tunnel" that forms a short sleeve.
3.Repeat on the opposite side, sewing 10 rows.
4.Each seam should be approximately 10 cm long.
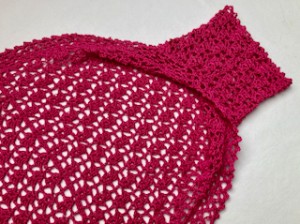
The Border Around the Inner Part of the Bolero:
Rejoin the new yarn at the seam.
Work in closed rounds.
Crochet along the right side; do not turn the work.
R1: ch1, 1sc in 1st dc, *(ch3, 1sc in next dc) * repeat from * to * till end of row, close the round with ch2, 1dc in 1st sc at beg of row.
R2: *(ch4, 1sc in next ch3sp) * repeat from * to * till end of row, close the round with ch2, 1dc in 1st ch at beg of row.
R3: *(ch4, 1sc in next ch4sp) * repeat from * to * till end of row, close the round with ch2, 1dc in 1st ch at beg of row.
R4: *(ch5, 1sc in next ch4sp) * repeat from * to * till end of row, close the round with ch2, 1dc in 1st ch at beg of row.
R5: *(ch5, 1sc do násl ch5 řm) * repeat from * to * till end of row, close the round with ch5 in 1st ch at beg of row
R6: ch1, *2sc, picot: ch3 and 1sc 1st ch, 2sc* in each ch5sp.
Cut the yarn and fasten off.
The beautiful crochet summer bolery with a lacy pattern is now complete! I hope you'll enjoy wearing it not only on summer days but throughout the year as well! I truly believe it will complement you wonderfully.
What’s Next?
Pin this post: Save this tutorial to your Pinterest boards so that you can come back to it later.
Leave a comment: I love to hear your feedback. Tell me in the comments below!
Share on Instagram and Facebook: When you make this project, share it on social media and tag me @sonanebeska. I love to see what you make!
MORE PATTERNS?
Explore More Crochet Patterns
If you love to crochet as much as I do, I think you’ll love these other free crochet DRESSES and TUNICS patterns ❤️
Do you crochet HATS? You may would like to try these popular video tutorials:
You know me, I love making PONCHOS, VESTS and CARDIGANS.
If you do as well, you may would love to try these patterns as well:
♥♥♥
Have fun and let me know what you make. I would love to know how your project turns out.
Please don't forget to like and I really appreciate your comments.
If the pattern did not make sense to you, please don’t hesitate to contact me, I am happy to help :)
If you like this pattern, please follow and share my projects on social networks as a THANK YOU and to help me to create new projects and patterns for you.
Thank you very much once again for your visit and see you soon!
♥♥♥


