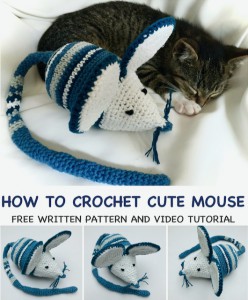
Crochet EASY Amigurumi Mouse
Learn how to crochet this cute Amigurumi mouse with big ears using a quick and easy to follow video tutorial. This would make a great little attraction for your cat if you have one. But this mouse will leave your cheese alone :)
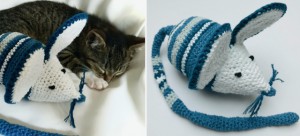
This Amigurumi mouse is super adorable and very easy and quick to make. You can use any color thread or yarn. Crochet this wonderful cute mouse which kids and cats will love. The fun is endless! And I am so addicted to them!
VIDEO TUTORIAL
You can find the step-by-step video tutorials below which will help you along if you prefer to watch video instruction rather than using a written pattern. Don’t forget to subscribe if you like me videos, it’s FREE!![]()
A huge thanks to everyone who want to support my blog and download PDF paid pattern. Thank you very much, I really appreciate it and it helps me create more new video tutorials and patterns for you. Love you!
![]()
This pattern is a simple crochet mouse, it is strung on a basic crochet stitches. If you don't understand any of my instructions, don't worry I am here for you - enter the comments at the end of this post.
Let's start or PIN this idea to your Pinterest boards for later.
![]()
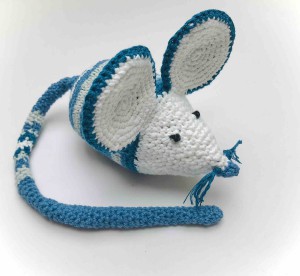
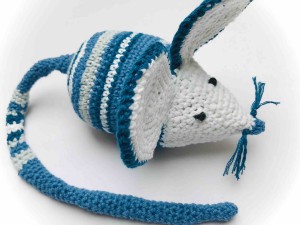
CROCHET AMIGURUMI MOUSE DIRECTIONS
The pattern uses only basic crochet stitches - single crochets and chains.
The mouse is super adorable and very easy and quick to make. You can use any colour thread or yarn.
The pattern was made with yarn: Drops Belle, everyday luxury, 50g, 120m, 53% cotton, 33% viscose, 14% linen, different colours, approx just 1/2 skein
Colour A - blue
Colour B - grey
Colour C - dark blue
Colour D - white
Colour E - black
Crochet hook: 3.00 mm.
You will also need:
sewing needle
toy / polyester stuffing
Difficulty Level: Level 1 – Easy, for beginners
US crochet term:
SlSt – slip stitch
CH/s – chain/s
SC – simple crochet
ST/s - stitch(es)
REP - repeat
Special stitches: sc2tog = decrease by working two sc together
Single Crochet Decrease instruction (sc2tog)
A crochet decrease makes the current row or round that you are working on shorter than the one previous to it.
Insert hook into the first stitch.
Yarn over and draw through the loop.
Do not complete the stitch as normal.
Instead, insert the hook into the next stitch.
Yarn over and draw through the loop.
There should now be three loops on your hook
Yarn over and draw through all three loops on the hook
You should now have two single crochet stitches side-by-side, joined together into one stitch at the top.
Note:
When changing from one colour of yarn to another work the stitch before the change until there are two loops left on the hook. Then use the new colour for the final yarn over hook and pull through.
Every single part of the mouse can be started doing the magic ring.
THE WRITTEN PATTERN
THE BODY
Colour A
Ch1 at the beginning of round don't count as a stitch.
Join the round with a slip stitch worked in the 1st ch from beginning.
Make a magic ring
R1 - R7 = increase rounds
R1: ch1, 7sc in magic ring, sl st (7sc)
R2: ch1, *2sc in each sc from R1 around* rep from * to * till end of round, sl st in ch1 from beg (14 sc)
R3: ch1, *2sc in next st, 1sc in next st* rep from * to * till end of round, sl st in ch1 from beg (21sc)
colour B
R4: ch1, *2sc in next st, 1sc in next 2st* rep from * to * till end of round, sl st in ch1 from beg (28sc)
R5: ch1, *2sc in next st, 1sc in next 3st* rep from * to * till end of round, sl st in ch1 from beg (35sc)
colour C
R6: ch1, *2sc in next st, 1sc in next 4st* rep from * to * till end of round, sl st in ch1 from beg (42sc)
colour D
R7: ch1, *2sc in next st, 1sc in next 5st* rep from * to * till end of round, sl st in ch1 from beg (49sc)
R8 - R23: ch1, 1sc in each sc around, sl st in ch1 from beg (49sc)
R8 - R9 = colour A
R10 - R11 = colour B
R12 = colour A
R13 = colour C
R14 = colour D
R15 = colour C
R16 - R18 = colour A
R19 - R20 = colour B
R21 = colour A
R22 - R23 = colour C
Cut yarns colours A, B, C, fasten off and wave all ends in.
Colour D used for R24 = R37
R24: ch1, *1sc in next 5st, sc2tog* rep from * to * till end of round, sl st in ch1 from beg (42sc)
R25: ch1, 1sc in each st around, sl st in ch1 from beg (42sc)
R26: ch1, *1sc in next 4st, sc2tog* rep from * to * till end of round, sl st in ch1 from beg (35sc)
R27: ch1, 1sc in each st around, sl st in ch1 from beg (35sc)
R28: ch1, *1sc in next 3st, sc2tog* rep from * to * till end of round, sl st in ch1 from beg (28sc)
R29: ch1, 1sc in each st around, sl st in ch1 from beg (28sc)
R30: ch1, 1sc in each st around, sl st in ch1 from beg (28sc)
R31: ch1, *1sc in next 2st, sc2tog* rep from * to * till end of round, sl st in ch1 from beg (21sc)
R32: ch1, 1sc in each st around, sl st in ch1 from beg (21sc)
R33: ch1, 1sc in each st around, sl st in ch1 from beg (21sc)
Stuff the body well.
The exact moment for starting filling the toy depends on every single person. I prefer filling the toy with the work almost finished. It’s a bit more difficult to fill, but more comfortable to crochet. You should make proofs until finding the more suitable moment of filling for you.
R34: ch1, *1sc in next st, sc2tog* rep from * to * till end of round, sl st in ch1 from beg (14sc)
R35: ch1, 1sc in each st around, sl st in ch1 from beg (14sc)
Stuff more if needed before finishing round 36
R36: ch1, *sc2tog* rep from * to * till end of round, sl st in ch1 from beg (7sc)
R37: ch1, 1sc in each st around (7sc)
Cut the yarn and fasten off colour D.
NOSE
colour A
Make a slip knot
R38. ch1, 1sc in each st around
R39 - R40: sc2tog till no st left
Cut the yarn and fasten off.
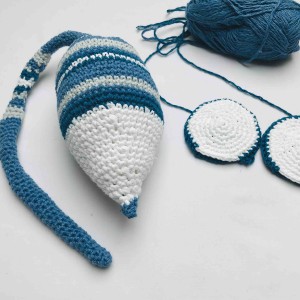
TAIL
This part is worked in spiral rounds, without joining rounds. Do not join rounds.
Colour A
Make a magic ring
R1: ch1, 6sc in magic ring
R2 - R70: 1sc in each sc around (6sc)
R1 - R38 = colour A
R39 - R41 = colour B
R42 - R43 = colour A
R44 = colour B
R45 - 46 = colour C
R47 - R48 = colour D
R49 - R50 = colour C
R51 = colour B
R52 - R53 = colour A
R54 - R56 = colour B
R57 - R70 = colour A
Fasten off with a long tail. Sew the tail to the round R2 of the BODY.
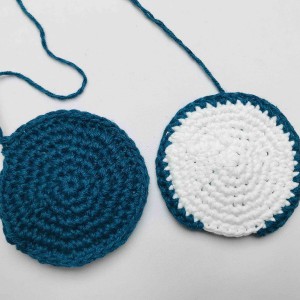
EARS - 4 PARTS
These parts are worked in spiral rounds, without joining rounds. Do not join rounds.
colour C
Make a magic ring
R1: ch1, 7sc in magic ring
R2: 2sc in each st around* rep from * to * till end of round (14sc)
R3: 2sc in next st, 1sc in next sc* rep from * to * till end of round (21sc)
R4: 2sc in next st, 1sc in next 2 st* rep from * to * till end of round (28sc)
R5: 2sc in next st, 1sc in next 3 st * rep from * to * till end of round(35sc)
R6: 2sc in next st, 1sc in next 4 st* rep from * to * till end of round (42sc)
Colour D
R1: ch1, 7sc in magic ring
R2: *2sc in each st around* rep from * to * till end of round (14sc)
R3: *2sc in next st, 1sc in next sc* rep from * to * till end of round (21sc)
R4: *2sc in next st, 1sc in next 2 st * rep from * to * till end of round(28sc)
R5: *2sc in next st, 1sc in next 3 st* rep from * to * till end of round (35sc)
R6: *2sc in next st, 1sc in next 4 st* rep from * to * till end of round (42sc)
Join circle colour C and circle colour D together
Colour C
R7: 1sc in each st around till 6st left.
Cut the yarn and leave a longer tail.
Sew the EAR with colour C on round R23 to the BODY and sew the ear with colour D on roud R24 to the BODY.
Repeat the pattern for the second EAR.
Sew the second EAR 3 stitches apart from the first EAR.
Sew the EAR with colour C on round R23 to the BODY and sew the ear with colour D on roud R24 to the BODY.
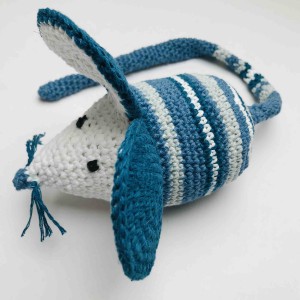
WHISKERS
Pull yarn 3 times through the row R38 of the Body, make a knot on the end on the nose on both side. Cut the yarn 1.8 inch / 3cm
EYES
Colour E - black
Sew the EYES on round R28 to the BODY approximately on the position the middle of the EAR.
The eyes are 5sts apart from each other.
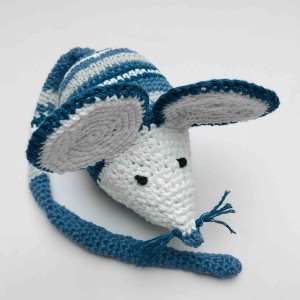
And voila! You made a cute little mouse!
Have fun and let me know what you make. I would love to know how your project turns out.
Please don't forget to like and I really appreciate your comments.
If the pattern did not make sense to you, please don’t hesitate to contact me, I am happy to help :)
If you like this pattern, please follow and share my projects on social networks as a THANK YOU and to help me to create new projects and patterns for you.
If you pin my patterns to your Favorites and share it on social media as a link, I will be able to share a lot more free crochet patterns for you all.
Stay in touch at Facebook, Instagram and Pinterest.
Thank you very much once again for your visit and see you soon!
♥♥♥


