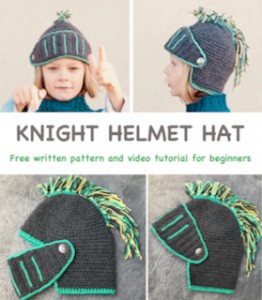
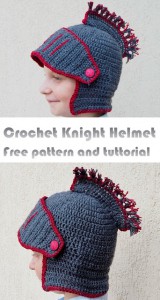
Crochet Halloween Hat Knight Helmet
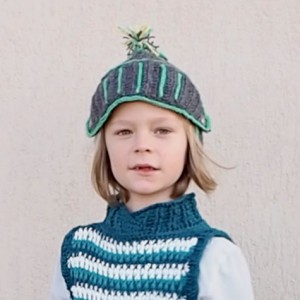
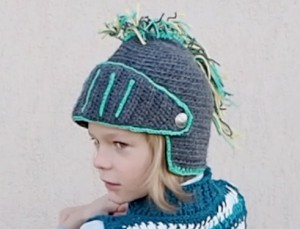
It is hat time again! I love to create many original hats! For Halloween this year, I made one more knight helmet. This knight hat is really big fun to make for any boy or man! With how cold it can get in the fall time, I think this hat will be put to good use after Halloween's over. It works up perfect and there is videos tutorial to help you along the process.
VIDEO TUTORIAL
You can find the step-by-step video tutorials below which will help you along if you prefer to watch video instruction rather than using a written pattern. Don’t forget to subscribe if you like me videos, it’s FREE!![]()
A huge thanks to everyone who want to support my blog and download PDF paid pattern. Thank you very much, I really appreciate it and it helps me create more new video tutorials and patterns for you. Love you!
![]()
Let's start or PIN this idea to your Pinterest boards for later.
![]()
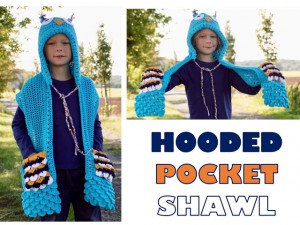
If you like this project, then why not check out some of my other pattern for kids?
You may would like to try this hooded pocket shawl:
Or to crochet EASY Beanies:

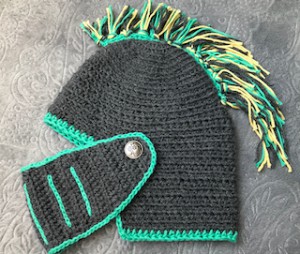
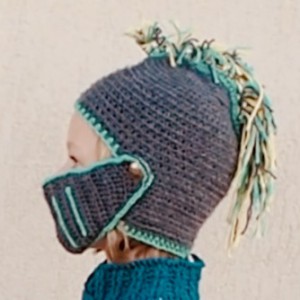
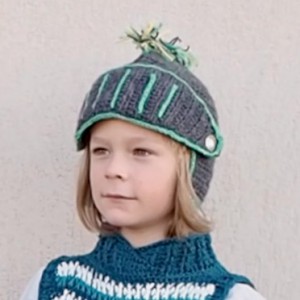
It’s an amazing result and we already tried it - it really works! My favorite part is the mask that flips up and down. I absolutely love the pattern.
This Knight Helmet is made of 3 parts – one is for the hat and one is for the face mask and the top part on the hat. They are connected together.
Size: kids size (4-6 years), this can easily be adapted to a smaller size or bigger size just by reducing or increasing the size of the hat and number of chains and rows for the mask and as well as making less or more chains for the top.
For this kids size you will need:
2 skeins of Red Heart Lisa yarn and some other colors – I used yellow and green (about 1/5 skein).
Red Heart Lisa – 100% acrylic, 50g/1.8oz, 133m/145,45yds
For this pattern you will need 3.5 mm crochet hook
2 buttons = I would recommend silver buttons
Color A = grey
Color B = green
Color C = yellow
Difficulty Level: Level 1 – Easy, for beginners
US crochet term:
SlSt – slip stitch
CH/s – chain/s
SC – single crochet
HDC - half double crochet
DC - double crochet
DEC2HDC - half double crochet 2 together decrease
SK - skip
T - turn
ST/s - stitch(es)
REP - repeat
YO – yarn over

Special technics:
Half Double Crochet (hdc) Increase
To work an increase in hdc at the beginning of a row, work a hdc in the first stitch, rather than the second stitch. This will add a stitch to the row since you normally go into the second stitch.
To work a hdc increase at the end of the row, place two stitches into the turning chain.
The Half Double Crochet Two Together Decrease (hdc2tog)
The half double crochet two together decrease (hdc2tog) is a basic decrease stitch that helps shape your project by removing stitches from your pattern.
When you decrease in crochet, you essentially make two stitches next to each other that are linked together at the top. In half double crochet, this means that you link together 2 side-by-side half double crochet stitches. This is also known as "half double crochet two together" and is abbreviated in crochet patterns as hdc2tog.
Pattern Notes
1) This pattern is for kids size (4-6 years) can easily be adapted to a smaller size or bigger size just by reducing or increasing the size of the hat and number of chains and rows for the mask and as well as making less or more chains for the top. Remember that when making your helmet for man size, you will need more yarn.
Looking for another version of Crochet Knight Helmet? This is Helmet for older boys, 10-11 years old - the pattern is available for free:
2) A Ch 3 at beg of the row counts as dc throughout, a ch 2 at the beg row counts as hdc throughout, and a ch 1 at beg of row counts as sc throughout
3) Finish each round with slip stitch in the 2nd ch from beg
There are 3 parts of this project:
A) The Helmet / Hat
B) The Face Mask
C) The Hat Top

HELMET
Grey yarn. Make a magic circle.
Work in rounds
Round 1: ch2 (those first ch2 will count as a hdc), 11hdc in the ring. sl st in the 2nd ch from beg. (12 hdc in total)
Round 2: ch2, dc in the same st as ch2, then 2dc in each next st around. sl st in the 2nd ch from beg (24hdc)
Round 3: ch2, 2 dc in next st, *1hdc in the next st, 2hdc in the next st* repeat around, sl st in the 2nd ch from beg (36hdc)
Round 4: ch2, 1 hdc in next 2 st, *2hdc in next st, 1hdc in the next 3 st* repeat around, sl st in the 2nd ch from beg (45hdc)
Round 5: ch2, 1 hdc in next 5 st *2 hdc in the next st, 1hdc in the next 6 st* repeat around, sl st in the 2nd ch from beg (54hdc)
Round 6: ch2, 1 hdc in next 6 st, *2hdc in the next st, 1hdc in the next 7 st* repeat around, sl st in the 2nd ch from beg (63hdc)
Round 7: ch2, 1 hdc in each st around, sl st in the 2nd ch from beg (63hdc)
Repeat R7 for next 13 rounds till R20.
Make sure you have 63 stitches around to make it big enough for a kid's head.
Now work in rows
R21: ch2, 1 hdc in next 39 st, turn (40 hdc) (skip 23 hdc)
repeat R21 for next 9 rows, till R30
Make sure you have 40 stitches across to make it big enough for a kid's head.
Cut the yarn. Fasten off.
Ending
change yarn color (color B), I chose the grass green yarn.
Make a slip knot in the corner of the helmet.
Work hdc around the bottom of the helmet.
Work slip st around the sides of helmet.
Work hdc around the forehead of the helmet.
Cut the yarn. Fasten off.
MASK
Color A: Grey yarn.
Make a slip knot, work in rows.
Foundation Chain: Ch8
R1: 1 hdc in the 2nd ch from hook (those first ch2 will count as a hdc), hdc in each next ch, turn (6hdc)
R2: ch2, 1hdc in the same st, 1hdc in next 4 st, 2hdc in the last st, turn (8hdc)
R3: ch2, 1hdc in each st till end of row, turn (8hdc)
R4: ch2, 1hdc in the same st, 1hdc in next 6 st, 2hdc in the last st, turn (10hdc)
R5: ch2, 1hdc in each st till end of row, turn (10hdc)
R6: ch2, 1hdc in the same st, 1hdc in next 8 st, 2hdc in the last st, turn (12hdc)
R7: ch2, 1hdc in each st till end of row, turn (12hdc)
R8: ch2, 1hdc in the same st, 1hdc in next 10 st, 2hdc in the last st, turn (14hdc)
R9: ch2, 1hdc in each st till end of row, turn (14hdc)
R10: ch2, 1hdc in the same st, 1hdc in next 12 st, 2hdc in the last st, turn (16hdc)
R11: ch2, 1hdc in each st till end of row (16hdc)
repeat R11 for next 14 rows, till R25.
Make sure you have 16 sts in each row.
R25: ch2, hdc in each next st, turn (16hdc)
R26: hdc2tog (ch1 joined with 1hdc), 1hdc in next 12 st, hdc2tog, turn (14hdc)
R27: ch2, 1hdc in each st till end of row, turn (14hdc)
R28: hdc2tog (ch1 joined with 1hdc), 1hdc in next 10 st, hdc2tog, turn (12hdc)
R29: ch2, 1hdc in each st till end of row, turn (12hdc)
R30: hdc2tog (ch1 joined with 1hdc), 1hdc in next 8 st, hdc2tog, turn (10hdc)
R31: ch2, 1hdc in each st till end of row, turn (10hdc)
R32: hdc2tog (ch1 joined with 1hdc), 1hdc in next 6 st, hdc2tog, turn (8hdc)
R33: ch2, 1hdc in each st till end of row, turn (8hdc)
R34: hdc2tog (ch1 joined with 1hdc), 1hdc in next 4 st, hdc2tog (6hdc)
Cut the yarn. Fasten off.
Ending
Change yarn colour: color B
I chose the grass green yarn. Work slip stitches around the mask.
Cut the yarn. Fasten off.
Mask's grid lines
Change yarn colour: color B
I chose the grass green yarn.
1st line: Fold the mask in half, find the middle row.
Work slip stitches from the 2nd hdc in the middle row, work 12 slip stitches in that row. Cut the yarn. Fasten off.
2nd and 3rd lines: Skip 3 rows to left and to right from the middle line. Work 11 slip stitches on the left and then on the right side from the middle. (start slip stitching from about 2nd hdc)
Cut the yarns. Fasten off both.
4th and 5th lines: skip 3 rows from 2nd and 3rd line. Work 10 slip stitches on the left and then on the right side (start slip stitching from about 2nd hdc). Cut the yarns. Fasten off both.
ARCH ON THE TOP
Color B: Grass green yarn. Fold the helmet in half, put the forehead on the left side.
count 9 rounds from the top of the helmet to the forehead. Make a slip knot on the 10th round, work slip stitches from this 10th round up to the top and continue slip stitching down from the top down till you reach round 12 approximately.
Turn your work and work 1hdc in each slip stitch (from bottom up to the top and continue from the top to the forehead).
Tassels
Cut strands - you can use 2 colours: color A and B or add more more color and use 3 colors: A + B + C together. I used grey, green and yellow strands.
Gather 6 or 8 strands of yarn about 5 inches in length and using your hook pull a loop through the first stitch on top of the arch. Then pull the ends of the strands through the loop and pull tight. Trim to desired length – do the same at each second stitch on the top.
I made 12 tassels.
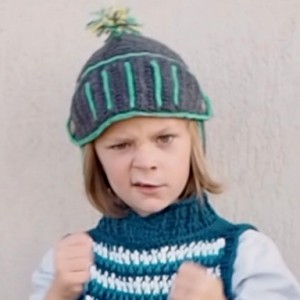
This helmet is fantastic and looks just like the real thing. You will love the results. It makes a great handmade gift idea too - Christmas time is coming :)
Try also this popular crochet knight helmet video tutorial
Have fun and let me know what you make. I would love to know how your project turns out.
Please don't forget to like and I really appreciate your comments.
If the pattern did not make sense to you, please don’t hesitate to contact me, I am happy to help :)
If you like this pattern, please follow and share my projects on social networks as a THANK YOU and to help me to create new projects and patterns for you.
If you pin my patterns to your Favorites and share it on social media as a link, I will be able to share a lot more free crochet patterns for you all.
Stay in touch at Facebook, Instagram and Pinterest.
Thank you very much once again for your visit and see you soon!
♥♥♥


