Crochet Raglan Top Down Pullover Sweater Zebra for kids 1st part
Hello My Crochet Friends!
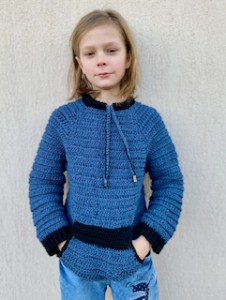
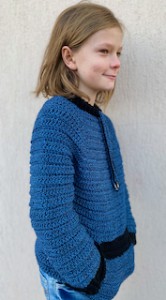
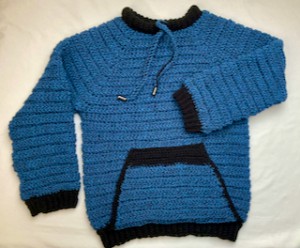
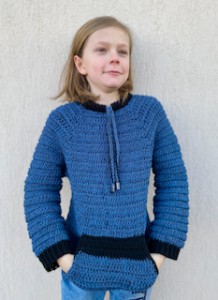
Today I would like to show you my crochet raglan Sweater Zebra.
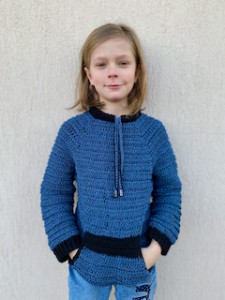
It had been on my mind for a while now to create a crochet sweater, something that could be worn throughout the seasons, something that was truly for everyone, for girls and for boys.
I feel that crochet raglan Sweater Zebra is that perfect everyday crochet SWEATER!
This raglan SWEATER is completely customizable to your specific body measurements! Doesn’t that sound amazing?
In my video tutorial I will be walking you though every step to creating and customizing your very own perfectly fitted crochet raglan SWEATER!
Whether you prefer oversized or more fitted pullover, cropped or long length, this tutorial will give you the knowledge and confidence to make YOUR perfect crochet raglan SWEATER!
This sweater has a Raglan shaping which means the armholes are built into the yoke which makes it an easy level pattern.
Once you get the hang of it, you will be able to whip it up in no time without much counting.
I designed this KIDS crochet raglan SWEATER with Basic Stitch yarn from VLNIKA ZEBRA and I am totally in love with it.
It comes in some great colors and ALWAYS there are 2 colors, 2 strands together.

Have fun!
VIDEO TUTORIAL
You can find the step-by-step video tutorials below which will help you along if you prefer to watch video instruction rather than using a written pattern. Don’t forget to subscribe if you like me videos, it’s FREE!
![]()
This pattern is made for very beginners and with my video tutorials everyone will manage to crochet this amazing pattern. If you don't understand any of my instructions, don't worry I am here for you - enter the comments at the end of this post.
A huge thanks to everyone who want to support my blog and download PDF paid pattern. Thank you very much, I really appreciate it and it helps me create more new video tutorials and patterns for you. Love you!
![]()
If you pin my patterns to your Favorites and share it on social media as a link, I will be able to share a lot more free crochet patterns for you all.
Stay in touch at Facebook, Instagram and Pinterest.
Let's start or PIN this idea to your Pinterest boards for later.
![]()
More Crochets for KIDS? Please check out my collection: https://www.nebeska.eu/en/articles/crochet-patterns-and-tutorials/for-babies-and-kids/
I also created a playlist on my YouTube Channel "For Babies and Kids":
All of the patterns on that list are beautifully designed, and suitable for both beginners and experienced crocheters. They are different levels of difficulties and techniques that you might have never seen before. Just click on them and you can find the free pattern, each of the patterns comes with a video tutorial.
How to CROCHET RAGLAN SWEATER ZEBRA
This pattern is made for beginners - only a basic skill level is required to make it. If you don't understand any of my instructions, don't worry I am here for you.
Have questions? Join the Facebook Group!
I hope this article will be useful for you! If you have any additional questions, feel free to join my Facebook Group. I created this group for you to share pictures, ask questions, and help each other out.
CROCHET RAGLAN SWEATER ZEBRA - DIRECTIONS
So let me now get started and tell you what you will need in order to crochet this CROCHET RAGLAN SWEATER ZEBRA.
This CROCHET RAGLAN SWEATER ZEBRA is very fun and quick to make.
The pattern uses only basic crochet stitch - single and double crochet stitches.
This easy-to-fit make and memorize pattern - there are just 2 rows made with the basic stitches ONLY!
The sweater is worked from top down and grow row by row.
You can easily change the sizing by making the CROCHET RAGLAN SWEATER ZEBRA smaller or bigger just by making less or more rows.

1 sweater / 8 years / boy 140 cm / 4 balls
1 ball
Crochet Hooks: for my sweater, I used a 5.0 mm and 4.5 mm crochet hooks.
Depending on if you crochet tightly or loosely, you may find that you need to go up or down a hook size.
Scissors, Stitch Markers and tapestry needle: you will also need a yarn needle to weave in the ends, and 4 stitch markers to mark the 4 raglan corner stitches.
Difficulty Level: Level 1 – Easy, for beginners
US crochet terms:
SlSt – slip stitch
CH/s – chain/s
SC - single crochet
DC - double crochet
SK - skip
T - turn
ST/s - stitch(es)
REP - repeat
YO – yarn over
Speacial stitches used: BLO = back loop only
CROCHET RAGLAN SWEATER ZEBRA - PATTERN NOTES
1) Crochet Raglan Sweater Sizing
This sweater has been designed for a classic fit with 1 inch positive ease.
The finished measurements are as follows:
2) This crochet raglan sweater is a cozy all-year wardrobe staple!
It is worked from the top down using ZEBRA acrylic yarn, it works up quite quickly, and you can try it on as you go.
3) The pattern is written for 8-9 years old kids. And the entire sweater is crocheted using a single stitch and a double crochet stitch, so it’s a great pattern to try if this is your first crochet sweater or pullover.
4) The pattern is written for a classic fit, but if you would like an oversized fit you can simply crochet a larger size! And you can easily adjust the length of the sweater by working more/less body rounds. I crocheted my sweater in a solid color but you can make any colored and a striped version.
5) A Ch 1 at beg of the row/round DOESN'T count as a stitch, place the first stitch in the first st from previous row
6) All rounds are worked in closed rounds, join at the end the round with a slip stitch on the top of beginning stitch. Turn your work when you finish the round and chain one.
7) The stitch count for each row/round is given in [ ] at the end of the row/round. If no stitch count is given, then the count is the same as the previous round/row.
8) This CROCHET RAGLAN SWEATER ZEBRA is crocheted in rounds/rows, turn your work when you finish the round/row.
How to crochet this ZEBRA Raglan Sweater
This sweater is worked seamlessly from the top down, in a raglan style.
I really love this type of construction, the size is super easy to adjust!
One of my favorite thing about top down crochet sweaters is that you can try them on, and adjust, as you go. For example, if you find that the underarm area is a little tight after you have completed the yoke, you can simply add some more even yoke rounds (i.e. with no increases) before splitting for the sleeves and body.
And if you would like to make your sweater length shorter/longer, you can simply subtract/add some body rounds until you are happy with the length! The exact same applies to the sleeves.
So, this type of construction is really well suited to adjusting as you go
CROCHET RAGLAN SWEATER ZEBRA - RIBBING
A note on ribbing
Once the body has been worked, the final step is to work the ribbing section. This is worked directly into the last body row, joining the ribbing to that last row with a series of slip stitches.
The full written instructions for this technique are in the patterns below. I love this technique to attached single crochet ribbing to a hat very often, so you probably already saw this ribbing edge in my previous video tutorials.
CROCHET RAGLAN SWEATER ZEBRA - CONSTRUCTION
This garment is worked seamlessly from the top down, in a raglan style.
The garment is crocheted in 5 sections as follows:
YOKE – begin with the foundation chain, then work the yoke rounds, close each round with slip stitch and turn your work. Working increases in 4 corners, there are plus 8 stitches after every increase round.
BODY – split the yoke to create the armholes and work the body in the rounds. The same pattern as we used for the Yoke. Finish with round of double crochet stitches and then crochet a ribbing edge.
Each round of Yoke and of Body begins and ends in the middle of the back side of your sweater; the “seam” is not visible at not.
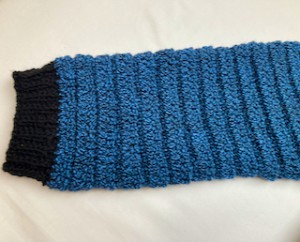
SLEEVES – join yarn at the underarm on each side, and work sleeves in the rounds, decreasing in 4 rounds evenly, then no increase to the wrist. Again, finish each sleeve with nice ribbing edge.
To adjust the length of the sweater body, or the sleeves, simply repeat the last rounds till you are satisfied with the length.
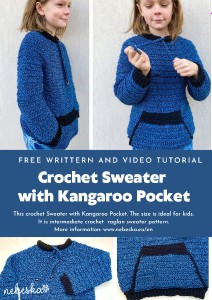
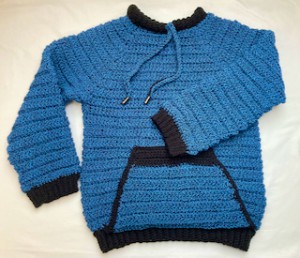
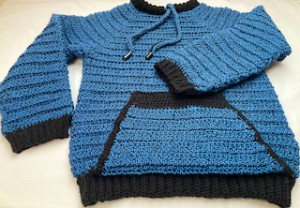
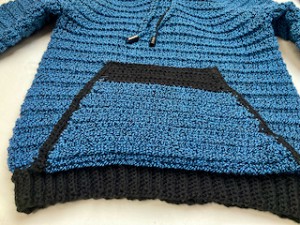
KANGAROO POCKET – work in rows, make decrease at the beginning and at the end on every second row, make decrease on single crochet rows.
If you want to have you kangaroo pocket wider or narrower, just adjust the lenght of the foundation chain, you can simply add or remove chains.
To adjust the length of the kangaroo pocket, simply repeat the last 2 rows till you are satisfied with the length.
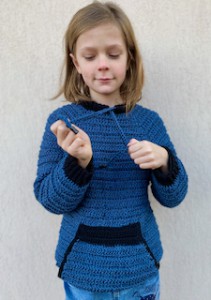
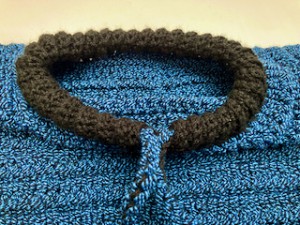
RIBBING EDGES – make nice ribbing edge on the bottom of the sweater body and also on sleeves and around the neckline.
CROCHET RAGLAN SWEATER ZEBRA
WRITTEN PATTERN
YOKE
Yarn Zebra
Crochet Hook 5.0 mm
Begin with the foundation chain, then work the yoke rounds, close each round with slip stitch and turn your work. Working increases in 4 corners, there are plus 8 stitches after every increase round.
Foundation chain 64 chains
Lenght: 53 cm / 20.7 inch
R1: ch1, 1dc in each chain, sl st in 1st st to close round, turn (68 st)
64 stitches are divided into 4 parts:
20 st back part
corner st
14 st for sleeve
corner st
16 st for front part
corner st
14 st for sleeves
R2: ch1, 1sc BLO in next 9 st, 2sc BLO in next st, 1sc in next st, 2sc BLO in next st
1sc BLO in next 12 st, 2sc BLO in next st, 1sc in next st, 2sc BLO in next st
1sc BLO in next 14 st, 2sc BLO in next st, 1sc in next st, 2sc BLO in next st
1sc BLO in next 12 st, 2sc BLO in next st, 1sc in next st, 2sc BLO in next st
1 sc BLO in next 9 st, sl st in 1st st to close round, turn (76 sc)
R3: ch1, 1dc BLO in next 11 st, 3dc in next st,
1dc BLO in next 16 st, 3dc in next st,
1dc BLO in next 18 st, 3dc in next st,
1dc BLO in next 16 st, 3dc in next st,
1dc BLO in next 11 st, sl st in 1st st to close round, turn (84 dc)
R4: ch1, 1sc BLO in next 11 st, 2sc BLO in next st, 1sc in next st, 2sc BLO in next st
1sc BLO in next 16 st, 2sc BLO in next st, 1sc in next st, 2sc BLO in next st
1sc BLO in next 18 st, 2sc BLO in next st, 1sc in next st, 2sc BLO in next st
1sc BLO in next 16 st, 2sc BLO in next st, 1sc in next st, 2sc BLO in next st
1 sc BLO in next 11 st, sl st in 1st st to close round, turn (92 sc)
R5: ch1, 1dc BLO in next 13 st, 3dc in next st,
1dc BLO in next 20 st, 3dc in next st,
1dc BLO in next 22 st, 3dc in next st,
1dc BLO in next 20 st, 3dc in next st,
1dc BLO in next 13 st, sl st in 1st st to close round, turn (100 dc)
R6: ch1, 1sc BLO in next 13 st, 2sc BLO in next st, 1sc in next st, 2sc BLO in next st
1sc BLO in next 20 st, 2sc BLO in next st, 1sc in next st, 2sc BLO in next st
1sc BLO in next 22 st, 2sc BLO in next st, 1sc in next st, 2sc BLO in next st
1sc BLO in next 20 st, 2sc BLO in next st, 1sc in next st, 2sc BLO in next st
1 sc BLO in next 13 st, sl st in 1st st to close round, turn (108 sc)
R7: ch1, 1dc BLO in next 15 st, 3dc in next st,
1dc BLO in next 24 st, 3dc in next st,
1dc BLO in next 26 st, 3dc in next st,
1dc BLO in next 24 st, 3dc in next st,
1dc BLO in next 15 st, sl st in 1st st to close round, turn (116 dc)
R8: ch1, 1sc BLO in next 15 st, 2sc BLO in next st, 1sc in next st, 2sc BLO in next st
1sc BLO in next 24 st, 2sc BLO in next st, 1sc in next st, 2sc BLO in next st
1sc BLO in next 26 st, 2sc BLO in next st, 1sc in next st, 2sc BLO in next st
1sc BLO in next 24 st, 2sc BLO in next st, 1sc in next st, 2sc BLO in next st
1 sc BLO in next 15 st, sl st in 1st st to close round, turn (124 sc)
R9: ch1, 1dc BLO in next 17 st, 3dc in next st,
1dc BLO in next 28 st, 3dc in next st,
1dc BLO in next 30 st, 3dc in next st,
1dc BLO in next 28 st, 3dc in next st,
1dc BLO in next 17 st, sl st in 1st st to close round, turn (132 dc)
R10: ch1, 1sc BLO in next 17 st, 2sc BLO in next st, 1sc in next st, 2sc BLO in next st
1sc BLO in next 28 st, 2sc BLO in next st, 1sc in next st, 2sc BLO in next st
1sc BLO in next 30 st, 2sc BLO in next st, 1sc in next st, 2sc BLO in next st
1sc BLO in next 28 st, 2sc BLO in next st, 1sc in next st, 2sc BLO in next st
1 sc BLO in next 17 st, sl st in 1st st to close round, turn (140 sc)
R11: ch1, 1dc BLO in next 19 st, 3dc in next st,
1dc BLO in next 32 st, 3dc in next st,
1dc BLO in next 34 st, 3dc in next st,
1dc BLO in next 32 st, 3dc in next st,
1dc BLO in next 19 st, sl st in 1st st to close round, turn (148 dc)
R12: ch1, 1sc BLO in next 19 st, 2sc BLO in next st, 1sc in next st, 2sc BLO in next st
1sc BLO in next 32 st, 2sc BLO in next st, 1sc in next st, 2sc BLO in next st
1sc BLO in next 34 st, 2sc BLO in next st, 1sc in next st, 2sc BLO in next st
1sc BLO in next 32 st, 2sc BLO in next st, 1sc in next st, 2sc BLO in next st
1 sc BLO in next 19 st, sl st in 1st st to close round, turn (156 sc)
R13: ch1, 1dc BLO in next 21 st, 3dc in next st,
1dc BLO in next 36 st, 3dc in next st,
1dc BLO in next 38 st, 3dc in next st,
1dc BLO in next 36 st, 3dc in next st,
1dc BLO in next 21 st, sl st in 1st st to close round, turn (164 dc)
R14: ch1, 1sc BLO in next 21 st, 2sc BLO in next st, 1sc in next st, 2sc BLO in next st
1sc BLO in next 36 st, 2sc BLO in next st, 1sc in next st, 2sc BLO in next st
1sc BLO in next 38 st, 2sc BLO in next st, 1sc in next st, 2sc BLO in next st
1sc BLO in next 36 st, 2sc BLO in next st, 1sc in next st, 2sc BLO in next st
1 sc BLO in next 21 st, sl st in 1st st to close round, turn (172 sc)
R15: ch1, 1dc BLO in next 23 st, 3dc in next st,
1dc BLO in next 40 st, 3dc in next st,
1dc BLO in next 42 st, 3dc in next st,
1dc BLO in next 40 st, 3dc in next st,
1dc BLO in next 23 st, sl st in 1st st to close round, turn (180 dc)
R16: ch1, 1sc BLO in next 23 st, 2sc BLO in next st, 1sc in next st, 2sc BLO in next st
1sc BLO in next 40 st, 2sc BLO in next st, 1sc in next st, 2sc BLO in next st
1sc BLO in next 42 st, 2sc BLO in next st, 1sc in next st, 2sc BLO in next st
1sc BLO in next 40 st, 2sc BLO in next st, 1sc in next st, 2sc BLO in next st
1 sc BLO in next 23 st, sl st in 1st st to close round, turn (188 sc)
R17: ch1, 1dc BLO in next 25 st, 3dc in next st,
1dc BLO in next 44 st, 3dc in next st,
1dc BLO in next 46 st, 3dc in next st,
1dc BLO in next 44 st, 3dc in next st,
1dc BLO in next 25 st, sl st in 1st st to close round, turn (196 dc)
SWEATER BODY
R18: ch1, 1sc BLO in next 27 st, ch1, skip 46 st, 1sc BLO in next 50 st, ch1, skip 46 st, 1sc BLO in next 27 st, sl st in 1st st to close round, turn (106 sc)
R19: ch1, 1dc BLO in next 106 st, sl st in 1st st to close round, turn (106 dc)
R20: ch1, 1sc BLO in next 106 st, sl st in 1st st to close round, turn (106 sc)
R21: ch1, 1dc BLO in next 106 st, sl st in 1st st to close round, turn (106 dc)
Repeat R18 – R19.
Make 36 rows in total.
BODY RIBBING
Note: Ribbing is worked at a right angle to the sweater body, and is joined to the sweater body as you go.
As I decided to change colors, I made one more round between the sweater body and ribbing edge. I made also decrease on this first round, I joined every 9th and 10st stitch together.
To create the ribbing edge I used Spagoyarn Eden and 4.5 mm crochet hook.
BOTTOM EDGE - RIBBING
Spagoyarn Eden
4.5 mm crochet hook
R1 (decrease row): ch1, repeat: (1sc in next 8 st, sc2tog) till end of round, sl st in 1st st to close round
Ribbing rows:
R1: ch8, ch1, sc in 2nd ch from hook and in each ch until you reach the R1 decrease row (8 sc), sl st to join to next R1 decrease row st.
R2: sl st to next R1 decrease row st, ch1, turn. Skip ch1 and 2 sl sts, sc BLO in each st across (8 sc), turn.
R3: ch1, sc BLO in each sc (8 sc), sl st to join to next R1 decrease row st.
Repeat R2 and R3 rows until you have worked a ribbing row for each R1 decrease row st.
Cut yarn and fasten off, leaving a long tail for seaming the ribbing sides.
Or join the ribbing sides with slip stitches (8 slip stitches)
SLEEVE
Join yarn in the seam R17
Crochet Hook 5.0 mm
ZEBRA yarn
R1: ch1, 1sc BLO in each st till 2 st left, sc2tog BLO, sl st in 1st st to close round, turn (46 sc)
R2: ch1, 1dc BLO in each st around, sl st in 1st st to close round, turn (46 dc)
R3: ch1, sc2tog BLO, 1sc BLO in each st till 2 st left, sc2tg BLO, sl st in 1st st to close round, turn (44 sc)
R4: ch1, 1dc BLO in each st around, sl st in 1st st to close round, turn (44 dc)
R5: ch1, sc2tog BLO, 1sc BLO in each st till 2 st left, sc2tg BLO, sl st in 1st st to close round, turn (42 sc)
R6: ch1, 1dc BLO in each st around, sl st in 1st st to close round, turn (44 dc)
R7: ch1, sc2tog BLO, 1sc BLO in each st till 2 st left, sc2tg BLO, sl st in 1st st to close round, turn (40 sc)
R6: ch1, 1dc BLO in each st around, sl st in 1st st to close round, turn (40 dc)
R7: ch1, 1sc BLO in each st around, sl st in 1st st to close round, turn (40 sc)
R8: ch1, 1dc BLO in each st around, sl st in 1st st to close round, turn (40 dc)
Repeat R7 and R8, till you are satisfied with the length of your sleeve.
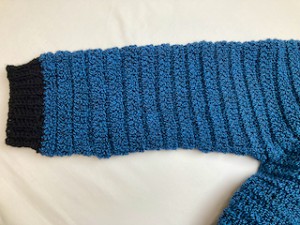
SLEEVE RIBBING
Note: Ribbing is worked at a right angle to sleeve end row, and is joined to the sleeve as you go.
As I decided to change colors, I made one more round between the sleeve and ribbing edge.
I made also decrease on this first round, I joined every 9th and 10st stitch together.
Sleeve Ribbing Edge
Join yarn in the seam
Hook 4.5 mm
EDEN yarn
R1: ch7, ch1, sc in the 2nd ch from crochet hook and in each ch until you reach the sleeve row (7 sc), sl st to join to next sleeve st.
R2: sl st to next sleeve st, ch1, turn. Skip ch1 and 2 sl sts, sc BLO in each sc (7 sc), turn.
ROW 3: ch1, sc BLO in each sc across (7 sc), sl st to join to next sleeve st.
Repeat R2 and R3 rows until you have worked a ribbing row for each sleeve st.
Cut yarn and fasten off, leaving a long tail for seaming the ribbing sides.
Or join the ribbing sides with slip stitches (7 slip stitches)
Repeat the instructions above and make the second sleeve and ribbing edge on the opposite side.
Cut the yarn, weave in the ends.
I hope you’ve enjoyed making this first part of free CROCHET RAGLAN SWEATER ZEBRA crochet pattern.
What’s Next?
Pin this post: Save this tutorial to your Pinterest boards so that you can come back to it later.
Leave a comment: I love to hear your feedback. Tell me in the comments below!
Share on Instagram and Facebook: When you make this project, share it on social media and tag me @sonanebeska. I love to see what you make!
Explore More Crochet Patterns
If you love to crochet as much as I do, I think you’ll love these other free crochet patterns for boys.
MORE PATTERN?
Just click on them and you can find the free pattern, each of the patterns comes with a video tutorial.
You know me, I love making SCOODIES and CARDIGANS for me or for my friends and for my family. If you do as well, you may would love to try these patterns as well. They are different levels of difficulties and techniques that you might have never seen before.
Have fun and let me know what you make. I would love to know how your project turns out.
Please don't forget to like and I really appreciate your comments.
If the pattern did not make sense to you, please don’t hesitate to contact me, I am happy to help :)
If you like this pattern, please follow and share my projects on social networks as a THANK YOU and to help me to create new projects and patterns for you.
If you pin my patterns to your Favorites and share it on social media as a link, I will be able to share a lot more free crochet patterns for you all.
Stay in touch at Facebook, Instagram and Pinterest.
Thank you very much once again for your visit and see you soon!
♥♥♥


