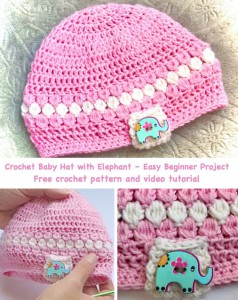
Spring Baby Hat Elephant
Sometimes everyone needs a good, basic hat pattern in their stock and today I am sharing mine pattern for Spring easy and quick Hat for baby girls.
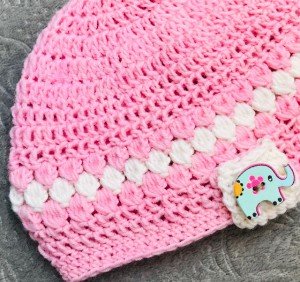
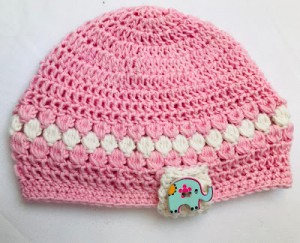
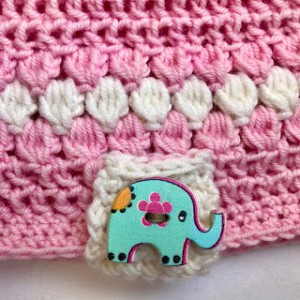
This Hat is made from Merino yarn and it can be embellished with appliques, flowers, buttons or animals! For this Hat I chose funny elephant button.
It works up perfect and there is videos tutorial to help you along the process.
VIDEO TUTORIAL
You can find the step-by-step video tutorials below which will help you along if you prefer to watch video instruction rather than using a written pattern. Don’t forget to subscribe if you like me videos, it’s FREE!![]()
A huge thanks to everyone who want to support my blog and download PDF paid pattern. Thank you very much, I really appreciate it and it helps me create more new video tutorials and patterns for you. Love you!
![]()
If you’re looking for an easy and quick pattern to make and want to crochet cozy and soft Spring beanie, choose this cute pattern with double crochet and single crochet stitches only!
Learn how to crochet this easy and quick beanie with the free pattern bellow. You will love the results. It is fantastic! I hope you love it as much as I do!
Let's start or PIN this idea to your Pinterest boards for later.
![]()
If you like beanies crocheting, you would may love these patterns as well:

Now, before I show you the actual pattern, please also be sure to follow my facebook @nebeskacreative, my instagram @sonanebeska or my youtube channel to receive updates on my latest and newest patterns. If you pin this pattern to your Favorites and share it on social media as a link, I will be able to share a lot more free crochet patterns for you all.
Spring Hat Elephant Directions
Size: 1-1.5 year old size, this can easily be adapted to a smaller size or bigger size just by reducing or increasing the number of stitches in the first row and as well as making less or more rows for the hat.
For this baby size you will need 2 colours.
I used: Merino 160, 160 m / 50g
For this pattern you will need 4.00 mm crochet hook.
A button: Elephant for decoration
Difficulty Level: Level 1 – very easy for ultimate beginners
US crochet term:
SlSt – slip stitch
CH/s – chain/s
SC – simple crochet
DC - half double crochet
ST/s - stitch(es)
REP - repeat
Special Stitches used: puff stitch
DC Puff stitch
The DC puff stitch is a basic crochet stitch. It's easy to learn. I love puff stitches, you can use them to create fabulous texture in your next crochet project!
The puff can be created with a varying number of stitches in the work. To work puff stitch in this version, work as follows:
5DC Puff Stitch instructions:
Yarn over and insert the hook always into the stitch where you are creating your puff stitch. Yarn over again and pull through 2 loops. There will be 2 loops on the hook.
Repeat 4 more times. Each time adds 1 more loop to the hook. There will be 6 loops on the hook for a dc puff stitch. Yarn over and pull through all 6 loops on the hook. Finish with chain one. An extra chain stitch is often used to secure the puff stitch firmly.
Puff stitch = in the same space placed 5dc cluster (5dc together), ch1

Pattern Notes
1) This pattern are for baby 1-1.5 year old size can easily be adapted to a smaller size or bigger size just by reducing or increasing the numbers of stitches and as well as less or more numbers of rows. Remember that when making bigger hat size, you will need more yarn.
2) This Hat is crocheted in rounds from the top down using double crochets and single crochet for the ending.
3) A Ch 3 at beg of the row count as a stitch from round 1 till round 9 and from round 13 till round 14.
A ch3 at beg doesn't count as a stitch from round 10 till round 12, when created puff stitches.
4) The end of each round is attached to the first stitch of the round using a sl st - place a slip stitch in the 3rd chain from beg
5) Instructions between two asterisks should be repeated for the remainder of the round
PATTERN
R1: magic ring, ch 3 (works as a dc), 11 dc, join with sl st in 3rd ch from beg [12 dc]
R2: ch3, 1 dc in same st, 2 dc in each next st st around, join with sl st in 3rd ch from beg [24 dc]
R3: ch 3, 1 dc in same st, 1 dc in next st, *2 dc in next st, 1 dc in next st*, repeat from * to * till end of round, join with sl st in 3rd ch from beg [36 dc]
R4: ch 3, 1 dc in same st, 1 dc in next 2 st, *2 dc in next st, 1 dc in next 2 st*, repeat from * to * till end of round, join with sl st in 3rd ch from beg [48 dc]
R5: ch 3, 1 dc in same st, dc in next 3 st, *2 dc in next st, dc in next 3 st*, repeat from * to * till end of round, join with sl st in 3rd ch from beg [60]
R6: ch 3, 1 dc in same st, dc in next 10 st, *2 dc in next st, dc in next 10 st*, repeat from * to * till end of round, join with sl st in 3rd ch from beg [65]
R7: ch 3, 1 dc in same st, dc in next 11 st, *2 dc in next st, dc in next 11 st*, repeat from * to * till end of round, join with sl st in 3rd ch from beg [70]
R8: ch 3, 1 dc in same st, dc in next 11 st, *2 dc in next st, dc in next 11 st*, repeat from * to * till end of round, join with sl st in 3rd ch from beg [75]
R9: ch 3, 1 dc in each next st around, join with sl st in 3rd ch from beg [75]
R10: ch3, *5dc cluster, ch1, sk 1*, repeat from * to * till end of round, join with sl st in 3rd ch from beg
change colours - use white colour in next round
R11: ch3, 5dc cluster in ch1 sp, ch1, *5dc cluster in next ch1 sp, ch1*, repeat from * to * till end of round, join with sl st in 3rd ch from beg
change colours - use pink colour in next round again
R12: ch3, 5dc cluster in ch1 sp, ch1, *5dc cluster in next ch1 sp, ch1*, repeat from * to * till end of round, join with sl st in 3rd ch from beg
R13: ch 3, *1 dc on top of 5dc cluster, 1dc in ch1 sp* repeat from * to * till end of round, join with sl st in 3rd ch from beg [75]
R14: ch 3, 1 dc in each next st around, join with sl st in 3rd ch from beg [75]
R15-R16: ch 1, 1 sc in each next st around, join with sl st in 1st ch from beg [75]
Fasten off and weave in end
Make a tag
use white colour
start on wrong site of the hat, on the round 15
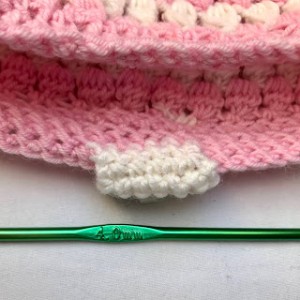
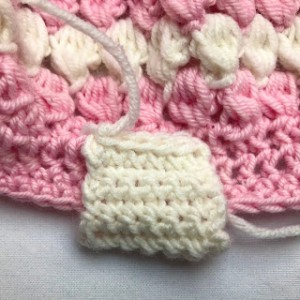
R1: ch1, 1sc in next 5 sc (of the R15 of the Hat), turn (6sc)
R2 - R6: ch1, 1 sc in each st, turn (6sc)
join with the round 13 of the Hat by slip stitching (work on the right side of the Hat
R9: 6 slip stitches
Fasten off and weave in end
Add the some application on the tag.
Measurement:
Crown: 5.5 inch / 14 cm high
Hight: 6 inch / 15 cm high
Width: 7.5 inch / 19 cm width
Have fun and let me know what you make. I would love to know how your project turns out.
Please don't forget to like and I really appreciate your comments.
If the pattern did not make sense to you, please don’t hesitate to contact me, I am happy to help :)
If you like this pattern, please follow and share my projects on social networks as a THANK YOU and to help me to create new projects and patterns for you.
Thank you very much once again for your visit and see you soon!


