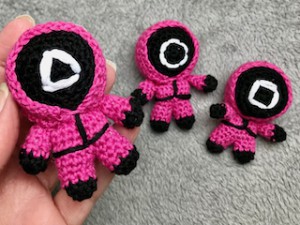
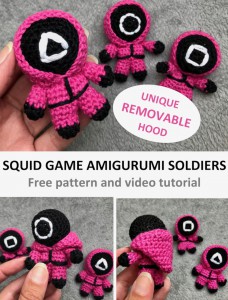
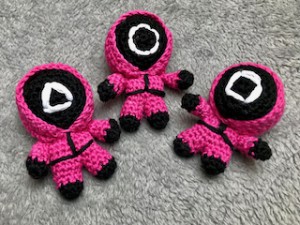
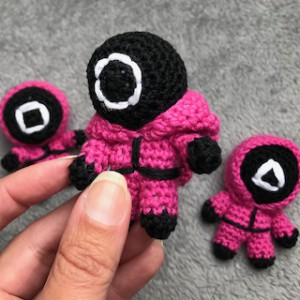
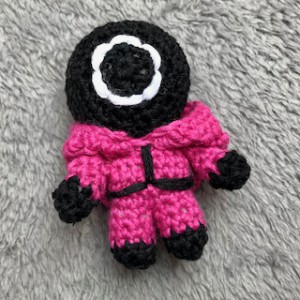
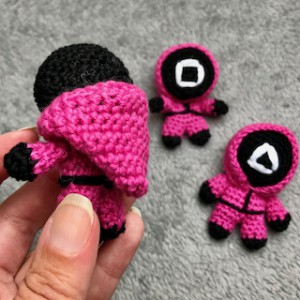
SQUID GAME Soldiers Amigurumi Minifigures
Hello Squid Game Fans! This is a very popular mini version of the Soldier from Squid Game, the horror Netflix series. I guess there are many Squid Game Soldiers patterns. My kids love this design with removable hood, they can pull the hood back and up again.
VIDEO TUTORIAL
You can find the step-by-step video tutorials below which will help you along if you prefer to watch video instruction rather than using a written pattern. Don’t forget to subscribe if you like me videos, it’s FREE!![]()
A huge thanks to everyone who want to support my blog and download PDF paid pattern. Thank you very much, I really appreciate it and it helps me create more new video tutorials and patterns for you. Love you!
![]()
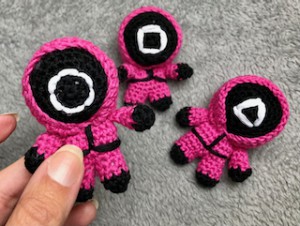
Let's start or PIN this idea to your Pinterest boards for later.
![]()
What about to try these Zombies Heads as well. This pattern is a simple head, it is strung on a basic crochet stitches. You can use any yarn you like - for this project is great to use up scrap yarns!

If you don't understand any of my instructions, don't worry I am here for you - enter the comments at the end of this post.
SQUID GAME SOLDIERS CROCHET DIRECTIONS
You will need: Medium Weight yarn - 3 colors: black, hot pink and white
Crochet hook: 2.5 mm
Stuffing
Yarn and Sewing / Embroidery Needle
Markers
Scissors
This minifigure is very easy to make.
The pattern uses only basic crochet stitches - single crochets and chains.
Difficulty Level: Level 1 – Easy, for beginners
US crochet term:
SlSt – slip stitch
CH/s – chain/s
SC - single crochet
SK - skip
T - turn
ST/s - stitch(es)
REP - repeat
This pattern requires familiarity with stitches used, attaching yarn, changing yarn colors, sewing parts together with a sewing needle and do a little embroidery.
PATTERN NOTES
1) You can make minifigures bigger or smaller with a thicker/thinner yarn or a larger/smaller hook size.
2) There are 5 parts:
HEAD
ARMS
BODY and LEGS
HOOD
3) There is just minimal sewing, you will only sew the arms and head to the body - this is quick and easy to do, there are no tricks.
I know you probably already have Soldiers minifigures :) My kids love them, especially my design with removable hood!
But their favorite worker is Ali - I have to crochet this Amigurumi character as well :)
And what is your favorite character?
THE WRITTEN PATTERN
HEAD
Black yarn
Make a magic ring
Work in spiral rounds
R1: ch1, 6 sc into magic ring (you don’t need to close the round with a slip stitch, just continue crocheting)
R2: 2sc into each st around (12 sc)
R3: repeat 6 times around: 1sc in next st, 2sc in next st (18 sc)
R4: repeat 6 times around: 1sc in next 2 st, 2sc in next st (24 sc)
R5: 1sc in each st around (24sc)
R6 - R10: repeat R5
R11: repeat 6 times around: sc2tog, 1 sc in next 2 st (18 sc)
Stuff the head well
R12: repeat 6 times around: sc2tog, 1 sc in next st (12 sc)
R13: repeat 6 times around: Sc2tog (6sc)
Fasten off. Hide the ends
LEGS
Black yarn
Make a magic ring
R1: ch1, 8 sc into magic ring, sl st to close the round (8 sc)
R2: ch1, 1 sc into each st around, sl st to close the round (8 sc)
Pink Yarn
R3: ch1, 1 sc into each st around (8 sc)
R4 - R6: repeat R3: 1 sc into each st around (8 sc)
Fasten off. Hide the ends
Stuff both legs
BODY
Pink Yarn
Make a slip knot
Bring both legs together
Join both legs with a slip stitch in R6 (any stitch)
R1: ch1, 1 sc into each st around one leg (8 sc) and then continue crocheting the row on the second legs, 1sc in each st around the second leg (8 sc), all together in this row has 16 sc
R2: 1 sc into each st around (16 sc)
R3 - R5: repeat R2
If you want to have your body longer, add more rows.
Fasten off with a long tail for sewing to the hood later.
Stuff the body well
ARMS
Black yarn
Make a magic ring
R1: ch1, 6 sc into magic ring, sl st to close the round (6 sc)
R2: ch1, 1 sc into each st around, sl st to close the round (6 sc)
Pink Yarn
R3: ch1, 1 sc into each st around (6 sc)
R4 - R6: repeat R3: 1 sc into each st around(6 sc)
Fasten off with a long tail for sewing to the body later.
Stuff both arms.
HOOD
Pink yarn
Foundation chain
ch26
R1: ch1, 1sc in each ch till end of row, turn (26 sc)
R2: ch1, 1sc in each st till end of row, turn (26 sc)
R3 - R12: repeat R2
Fold the hood in half along the longer side
Use the working yarn and join the shorter sides together by slip stitches - work on wrong sides, work stitch to stitch till end of row.
Fasten off. Hide the ends.
Turn to the right side
FINISHING INSTRUCTIONS
1 To make the belt, use black yarn. Start hand-sewing from the center-front of the soldier, on row R3 of the body. Make 4 parts - go to the side, from the side to middle back and from back to the second side and then back to the point where you started. Work around the entire round. Finish your sewing with a straight line up to the middle of the neck.
2 Sew two arms to the sides of the body
3 Sew body and head together. Start from the center back of the neck and make sure the center of the head is aligned. Work around the entire neck.
4 Sew the hood on the body. Start at the same point as you started sewing the head, from the center bac of the neck and make sure the hood (the seem) is aligned. Work around.
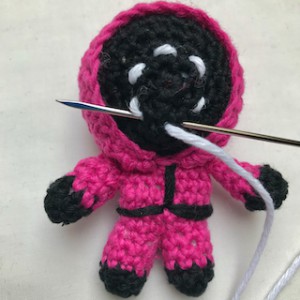
5 Use white yarn and a yarn needle to sew the soldiers symbols (circle, triangle or square) to the head.
You will love the results. It makes a great handmade gift idea too - Christmas time is coming :)
Have you seen this Halloween video tutorial yet?
Have fun and let me know what you make. I would love to know how your project turns out.
Please don't forget to like and I really appreciate your comments.
If the pattern did not make sense to you, please don’t hesitate to contact me, I am happy to help :)
If you like this pattern, please follow and share my projects on social networks as a THANK YOU and to help me to create new projects and patterns for you.
Thank you very much once again for your visit and see you soon!
♥♥♥


