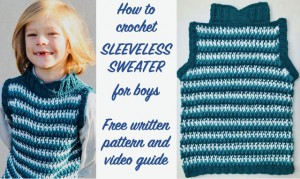
Tricolour vest / sleeveless sweater
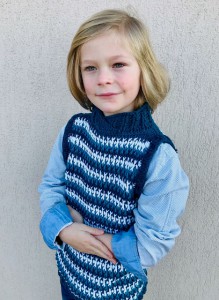
Stay warm and comfortable with the sleeveless crochet sweater! I absolutely love the look and style of sleeveless sweaters. This sleeveless sweater I designed for my son and I couldn’t be more pleased with how it turned out! He is my little gentleman!
VIDEO TUTORIAL
You can find the step-by-step video tutorials below which will help you along if you prefer to watch video instruction rather than using a written pattern. Don’t forget to subscribe if you like me videos, it’s FREE!![]()
This sweater is perfect for all year round wearing, it is extremely comfortable worn over a shirt or a T-shirt.
And the sleeveless sweater is a great option when you want to dress up during the holiday season as well.
A huge thanks to everyone who want to support my blog and download PDF paid pattern. Thank you very much, I really appreciate it and it helps me create more new video tutorials and patterns for you. Love you!
Let's start or PIN this idea to your Pinterest boards for later.

Do you like crocheting for boys? You may would love to see this pattern:
Now, before I show you the actual pattern, please also be sure to follow my facebook @nebeskacreative, my instagram @sonanebeska or my youtube channel to receive updates on my latest and newest patterns. If you pin this pattern to your Favorites and share it on social media as a link, I will be able to share a lot more free crochet patterns for you all.
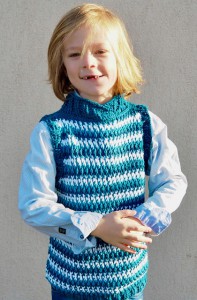
Sleeveless Sweater Directions
This Sweater is made of 2 panels – one is the front panel and one is the back panel. They are hooked together.
Size: Child, this can easily be adapt to a smaller size or bigger size just by reducing or increasing the number of chains and rows for the sweater.
For this child size you will need three colours (I will mark them as A,B,C):
A = 3 skeins of Drop Belle – navy blue – 53% cotton, 33% viscose, 14% linen, 50g/1.8oz, 120m/131yds
B = 2 skeins of Drops Cotton Light - white yarn - 50% cotton, 50% polyester, 50g/1.8oz, 105m/114.83yds
C = 2 skeins of Drops Cotton Light yarn - blue yarn - 50% cotton, 50% polyester, 50g/1.8oz, 105m/114.83yds
For this pattern you will need 4mm and 3.5mm hooks
Difficulty Level: Level 2 – Advanced Beginner, Intermediate
US crochet term:
SlSt – slip stitch
CH/s – chain/s
SC – simple crochet
DC - double crochet
SK - skip
T - turn
ST/s - stitch(es)
REP - repeat
YO – yarn over
Special stitches used: front post double crochet (fpdc) and back post double crochet (bpdc)
Front and back post crochet stitches are used to create wonderful texture in crochet. Instead of making your stitch through the loops at the top of the stitch, you make it around the stitch. Everything else stays the same. The most challenging things about crochet post stitches are knowing where and how to insert the hook. There are front post stitches and back post stitches.
For front post double crochet stitches (fpdc): yarn over, insert your hook from front to back then from back to front around post of stitch indicated, yarn over, pull through stitch, then finish your double crochet as normal, yarn over, pull through 2 lps, yarn over, pull through last 2 lps
For back post double crochet stitches (bpdc): yarn over, you insert your hook from back to front then from front to back around post stitch indicated, yarn over, pull through stitch, then finish your double crochet as normal, yarn over, pull through 2 lps, yarn over, pull through last 2 lps
Pattern Notes
1) Before you start take a measurement of height of your kids body and a chest measurement (please see the final measurement of the sweater below).
2) This pattern is for child size, boy 6 years old, but you can easily adapt to a smaller size or bigger size just by reducing or increasing the number of ch and rows. Remember that when making your sweater bigger you will need more yarn.
3) A Ch 3 at beg of the row counts as dc throughout, a ch 2 at the beg row counts as hdc throughout, and a ch 1 at beg of row counts as sc throughout
4) The sweater is made of 2 panels - front and back panel, the same size, stitched together
There are 4 parts of this project:
A) The front and back panels
B) The armholes borders
C) The bottom border
D) The neckband
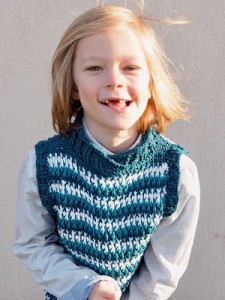
PART A = THE FRONT AND BACK PANELS
Colour A
Pick up the 4mm hook and let’s make a chain.
Ch60
R1: ch3 (counts as a dc), sk ch3 (you just have made), in the 4th ch work dc, 1dc in each ch (60 dc)
Change the colour from A to B
R2: ch3 (counts as a dc), fpdc in the next st, *1dc in next st, 1fpdc in next st* repeat from *to* across to end of row.
You will have 60 stitches in the row.
Turn your work.
R3: ch1 (counts as a sc), 1sc into each st across. Turn. (60 sc)
Change the colour from B to C
R4: ch3 (counts as a dc), 1dc in next st, 1fpdc around the next corresponding st !!! 2rows below !!!, which is a dc from R2, pulling fpdc up to the level of R4 (the current row)
*1dc in next st, 1fpdc around next st 2rows below* repeat from *to* across to end of row, 1dc into the last st
You will have 60 stitches in the row.
Turn your work.
R5: ch1 (counts as a sc), 1sc into each st across. Turn. (60 sc)
Change the colour from C to A
R6: ch3 (counts as a dc), 1fpdc around the next corresponding st !!! 2 rows below !!!, which is a dc from R4, pulling fpdc up to the level of R6 (the current row), 1dc in next st
*1fpdc around next st 2 rows below, 1dc in next st* repeat from *to* across to end of row, 1fpdc around the last st.
You will have 60 stitches in the row.
Turn your work.
R7: ch1 (counts as a sc), 1sc into each st across. Turn. (60 sc)
Change the colour from A to B
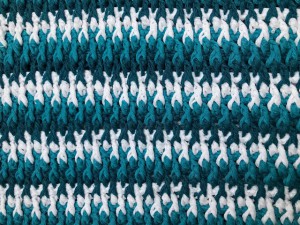
REPEAT R4, R5, R6 and R7 till you have 41 ROWS.
Make sure you have 60 st in each row.
Change the colours EVERY SECOND row.
From R42 till R47 we will make decreasing every second row on both sides.
R42: join together 3 stitches: ch2 (works as a unfinished dc), 1dc and 1fpdc (placed around st 2rows below)
*1dc in next st, 1fpdc placed around next st 2rows below* repeat from *to* till you have 3 st left to end of row.
join together 3 stitches: 1dc and 1fpdc (placed around st 2rows below) and 1dc
You will have 56 stitches in the row.
Turn your work.
R43: ch1 (counts as a sc), 1sc into each st across. Turn. (56 sc)
Change the colour from B to C
R44: join together 3 stitches: ch2 (works as a unfinished dc), 1dc and 1fpdc (placed around st 2rows below)
*1dc in next st, 1fpdc placed around next st 2rows below* repeat from *to* till you have 3 st left to end of row.
join together 3 stitches: 1dc and 1fpdc (placed around st 2rows below) and 1dc
You will have 52 stitches in the row.
Turn your work.
R45: ch1 (counts as a sc), 1sc into each st across. Turn. (52 sc)
Change the colour from C to A
R46: join together 3 stitches: ch2 (works as a unfinished dc), 1dc and 1fpdc (placed around st 2rows below)
*1dc in next st, 1fpdc placed around next st 2rows below* repeat from *to* till you have 3 st left to end of row.
join together 3 st: 1dc and 1fpdc (placed around st 2rows below) and 1dc
You will have 48 stitches in the row.
Turn your work.
R47: ch1 (counts as a sc), 1sc into each st across. Turn. (48 sc)
NO more decreasing from R47.
From R47 till R65 repeat the pattern we used till you have 65 ROWS.
You will make 18 rows - make sure you have 48 st in each row.
Change the colours EVERY SECOND row.
Fasten off your work and hide all loose tails.
REPEAT the pattern to create the second panel. Don't fasten off - we will continue to assemble the panels.
Both panels have the same pattern and the same size.
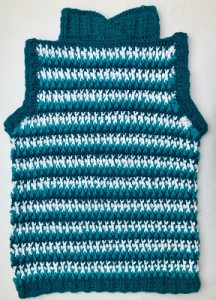
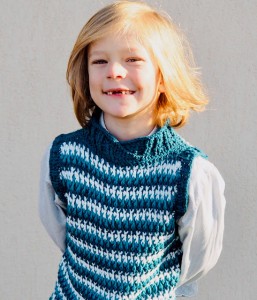
Time to assemble the panels:
Place the front panel on the back panel, so the front panel is matching with the back panel, with the wrong sides insides, the front panel facing you. Make sure colours are aligned.
Start at the upper right corner to join the shoulders, matching st to st, 8 sl st across.
Move by slip stitching to left side, sl st in each st across on the front panel only till there are 8 st left on the front panel.
Join the left shoulder, work sl st in each st on both panel till end of row, there are 8 sl st on the left shoulder as well.
Join the sides - sew sides from bottom up to R42 (where the decreasing started). Sew both sides. Make sure colours are aligned.
PART B = THE ARMHOLES BORDERS
Colour A
Pick up the 3.5mm hook
Work in rounds
R1: right side facing up, join the yarn in side seam at underarm, ch1, sc along armhole edge (I approximately place 3 sc into 2 rows = one colour part), sl st in ch1
R2: ch3 (counts as a dc), 1fpdc in next 2 st, 1bpdc in next 2 st
repeat* 1 fpdc in next 2 st, 1bpdc in next 2 st* from *to* till end of row, sl st in 3rd ch from beg
R3: ch3 (counts as a dc), 1fpdc in next 2 st, 1bpdc in next 2 st
repeat* 1 fpdc in next 2 st, 1bpdc in next 2 st* from *to* till end of row, sl st in 3rd ch from beg.
Make sure you work: in each fpdc from the previous row place 1 fpdc, in each bpdc from the previous row place 1 bpdc.
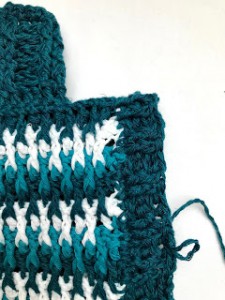
Optionally:
R4: sl st in each st around
Fasten off your work and hide the end.
Repeat around opposite armhole.
PART C = THE BOTTOM BORDER
Colour A
Pick up the 3.5mm hook
Work in rounds
From bottom down
R1: right side facing up, join the yarn in side seam at bottom
ch3 (counts as a dc), 1fpdc in next 2 st, 1bpdc in next 2 st
repeat* 1 fpdc in next 2 st, 1bpdc in next 2 st* from *to* along bottom edge till end of row, sl st in 3rd ch from beg (120 st)
R2: ch3 (counts as a dc), 1fpdc in next 2 st, 1bpdc in next 2 st
repeat* 1 fpdc in next 2 st, 1bpdc in next 2 st* from *to* along bottom edge till end of row, sl st in 3rd ch from beg (120 st)
Make sure you work: in each fpdc from the previous row place 1 fpdc, in each bpdc from the previous row place 1 bpdc.
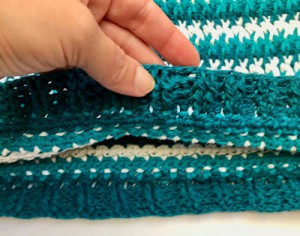
Optionally:
R3: sl st in each st around
PART D = THE NECKBAND
Colour A
Pick up the 3.5mm hook
Work in rows
R1: right side of the front panel facing up, join the yarn in 10 st from the left shoulder seam
ch1 (counts as a sc), 1sc in next st, 1hdc in next 2 st, 1 dc in each st across till the ch1
place a marker to 10 st from the right shoulder seam
continue crocheting in st sl we made when joining the panels, it means crocheting behind the stitches we have made in this R1
1 dc in each st till there are 3 st left to the marker,
1 hdc in next 2 st, 1 sc in next st, 1 sc in the st where the marker is placed. Take the maker out, turn
R2: ch1 (don't count it as a st), 1sc in next 2 st, 1hdc in next 2 st, 1 fpdc in next 2 st, 1 bpdc in next 2 st
repeat* 1 fpdc in next 2 st, 1bpdc in next 2 st* from *to* along neckband edge till there are 5 st left, 1hdc in next 2 st, 1sc in next 2 st, skip last st, turn
R3: ch1 (don't count it as a st), 1sc in next 2 st, 1hdc in next 2 st,
repeat* 1 fpdc in next 2 st, 1bpdc in next 2 st* from *to* along neckband edge, make sure you work in each fpdc from the previous row 1 fpdc, in each bpdc from the previous row place 1 bpdc
till there are 5 st left, 1hdc in next 2 st, 1sc in next 2 st, skip last st, turn
Repeat R3 till you have the desired height of neckband.
I made 8 rows in total.
Optionally:
R9: sl st in each st around
Fasten off your work and hide the end.
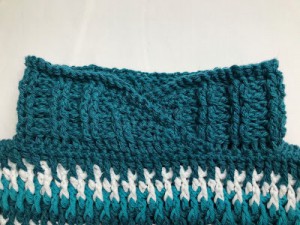
THE FINAL MEASUREMENT:
The sweater hight: 19.69 inch / 50 cm
The part from bottom to armhole hight: 12.99 inch / 33 cm
The neckband hight: 2.36 inch / 6 cm
The top part width: 11.81 inch / 30 cm
The mid/bottom part width: 14 inch / 36 cm
Want a printable copy of this pattern? Why not visit my Etsy shop and purchase the PDF with photo instructions. Not only does it mean you get your own copy of the pattern to print, you also support a small business and help me to keep making free patterns!
Have fun and let me know what you make. I would love to know how your project turns out.
Please don't forget to like and I really appreciate your comments.
If the pattern did not make sense to you, please don’t hesitate to contact me, I am happy to help :)
If you like this pattern, please follow and share my projects on social networks as a THANK YOU and to help me to create new projects and patterns for you.
Thank you very much once again for your visit and see you soon!

