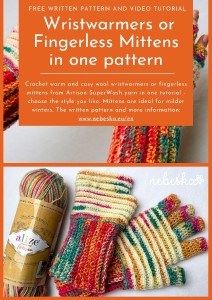
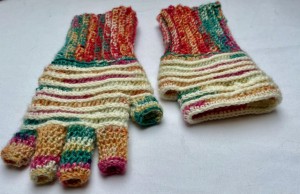
Crochet WristWarmers or Fingerless Mittens Artisan in one pattern
Hello My Crochet Friends!
What do you like more – wrist warmers or fingerless mittens?
In this my new pattern and video tutorial I have an easy solution for both!
I promised you that I would use the leftover Artisan balls for some nice winter thing and as I like to wear fingerless mittens and wristwarmers, I made tutorial for both.
I prepared instructions for both versions - it is easier to crochet wristwarmers and the instructions are perfect for beginners. Those who want to finish crocheting the "fingers" will have to count the stitches a little bit, but I believe that you can easily handle these gloves as well.
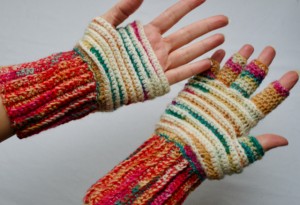
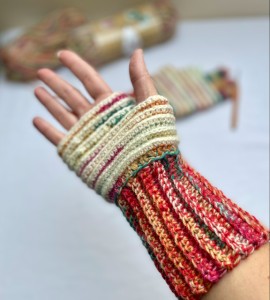
This pattern creates simple and warm crochet wrist warmers suitable for keeping your hands warm during the cooler months from fall to spring.
I crocheted these mittens with Artisan yarn, which I really liked. I have already crocheted great warm woolen socks from this yarn:
and also a beautiful mosaic hat:
And I will give you also the instructions how to crochet really warm mittens, which are perfect for easy to adjust.
When temperatures start to drop, there's nothing more satisfying than wearing sweet cozy mittens!
In this tutorial you'll learn how to crochet your very own pair of simple and nice mittens.
The pattern is available here below for free. It comes with a video tutorial as well.
Let’s get started to make this perfect pattern!
VIDEO TUTORIAL
You can find the step-by-step video tutorials below which will help you along if you prefer to watch video instruction rather than using a written pattern. Don’t forget to subscribe if you like me videos, it’s FREE!
![]()
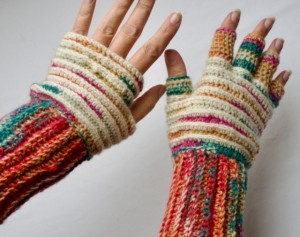
I hope you enjoy these crochet Wrist Warmers and Fingerless Mittens patterns and I hope they keep you busy right through the winter months :) Fingerless mittens enable you to keep your hands and wrists warm, while still being able to type, check your phone, or do whatever else you need to do during the day. They offer the comfort, coziness, and warmth of gloves without the inconvenience of them.
This pattern is made for beginners and with my video tutorials everyone will manage to crochet this amazing pattern. If you don't understand any of my instructions, don't worry I am here for you - enter the comments at the end of this post.
If you pin my patterns to your Favorites and share it on social media as a link, I will be able to share a lot more free crochet patterns for you all.
Stay in touch at Facebook, Instagram and Pinterest.
Let's start or PIN this idea to your Pinterest boards for later.
![]()
MORE PATTERN?
You know me, I love making CROCHET GIFTS for my friends and for my family. If you do as well, you may would love to try these patterns as well. They are different levels of difficulties and techniques that you might have never seen before.
Just click on them and you can find the free pattern, each of the patterns comes with a video tutorial.
You may would like to try these simple and sweet wrist warmers and mittens as well:
How to CROCHET WRISTWARMERS OR COSY FINGERLESS MITTENS ARTISAN
This pattern is made for beginners - only a basic skill level is required to make it. If you don't understand any of my instructions, don't worry I am here for you.
Have questions? Join the Facebook Group!
I hope this article will be useful for you! If you have any additional questions, feel free to join my Facebook Group. I created this group for you to share pictures, ask questions, and help each other out.
This pattern is made for beginners and with my video tutorials everyone will manage to crochet this amazing pattern. If you don't understand any of my instructions, don't worry I am here for you - enter the comments at the end of this post.
CROCHET WRISTWARMERS OR COSY FINGERLESS MITTENS ARTISAN - DIRECTIONS
These wrist warmers and mittens are super easy to make.
The pattern uses only basic crochet stitches – slip stitches, single crochet stitches and half-double stitches crochets.
Crochet hook 4.5 and 2.5 mm.
![]()
The pattern was made with yarn:
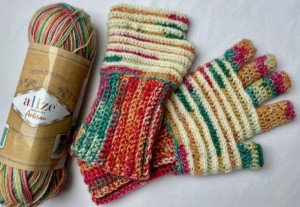
Alize Artisan Superwash
This yarn made from wool-acrylic, so it’s so soft, really affordable, and very easy to care for. Plus, this yarn comes in more than 20 gorgeous colors.
1 ball is perfect for 1 pair of Adult Women Wrist Warmers
For this pattern you will need some stitch markers, scissors and tapestry needle and I would recommend you to use a tape measure.
Difficulty Level: Level 1 – Easy, for Beginners
US crochet term:
SlSt – slip stitch
CH/s – chain/s
SC - single crochet
HDC - half double crochet
SK - skip
T - turn
ST/s - stitch(es)
REP - repeat
YO – yarn over
Special stitches used:
BLO = BACK LOOP ONLY
CROCHET WRISTWARMERS OR COSY FINGERLESS MITTENS ARTISAN
PATTERN NOTES
SIZE
The pattern is easy to adjust to fit different Mittens sizes from kids to Adult sizes
Bellow there is a pattern for Adult woman size "S/M" and they fits perfectly to me and also my teenage daughter.
1) The crochet MITTENS can easily be adapted to a smaller size or bigger size just by reducing or increasing the numbers of stitches and as well as less or more numbers of rows. Remember that when making bigger beanie size, you will need more yarn.
I’ll show you how to make sizes that really fit.
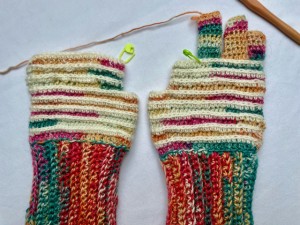
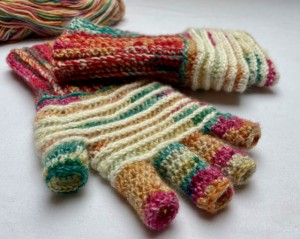
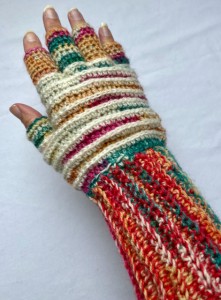
2) The mittens have 3 parts: the bottom ribbing ending, the body of the mittens and the fingers-less part
3) The ribbing ending is crocheted in rows, it is very stretchy and flexible and can be crocheted longer or shorter, wider or narrower, just adjust the length of the foundation chain and the number of rows.
4) the upper part of the mittens - striped part - is crocheted in closed rows, the rows are finished with a slip stitch. When you finish the row, change the color of the yarn.
5) "Fingers" are crocheted in closed rows, the rows are finished with a slip stitch. I crochet with one yarn and the length and width of the "finger" can be adjusted to fit you well.
6) ( ) – the number in brackets indicates the number of stitches in a row after crocheting the row.
7) A ch1 and a ch2 at beg of the row doesn’t count as a stitch throughout.
8) The mittens are crocheted as one piece. From bottom to fingers.
9) Measurement:
wrist circumference: 20 cm / 7.8 inch
ribbing ending is 12 cm / 4.7 inch high and can be folded if necessary.
mittens body: 10 cm / 4 inch
the widest part of the mittens - circumference around the hand incl. thumb: 26 cm / 10 inch
Circumference around the hand in the upper part (without the thumb): 20 cm / 7.8 inch
length of crocheted fingers: thumb 2.5 cm, index finger 4 cm, middle finger 5 cm, ring finger 4 cm, little finger 3 cm
HOW TO CROCHET WRISTWARMERS OR COSY FINGERLESS MITTENS ARTISAN
ADULT WOMAN SMALL SIZE
WRITTEN PATTERN
Make a slip knot and chain foundation chain: 20 chains
Work in rows.
R1: ch1, 1 sc in the second chain from your hook, 1 sc in each st till end of row. Turn (20 sl st)
R2: ch1, 1 sl st in each st, BLO, turn (15 st)
R3 – R32: Repeat rows R2 and R3, until you reach your wrist circumference measurement.
For my hand, adult women small size, I crocheted 32 rows.
Fold the rectangle in half, bring the side together and join sides with slip stitches.
R33: Turn your work, crochet with the same yarn, with the same hook, crochet 1 row of single crochets around. I crocheted a total of 42 sc evenly around.
We have finished the first part of the mitten!
THE BODY OF MITTEN
Crochet with 1 yarn, alternating colors after each completed row
I chose a single color yarn - cream and a multicolor version.
The yarn creates a very interesting pattern.
Crohet Hook 2.5 mm
Work in closed rounds, always close the row with a slip stitch.
Don’t count ch2 at beg as a stitch
Color: B
R1: ch2, 1hdc in 1st st BLO, 1hdc in next 3 st BLO, 2hdc in next st BLO, *1hdc in next 4 st BLO, 2hdc in next st BLO* around till end of round, close the round with a slip st in 1st ch at beg.
Work 50 hdc.
Color: C
R2: ch1, 1hdc in each st around till end of round, sl st in 1st ch at beg.
Work 50 hdc.
Color B:
R3: ch2, 1hdc in 1st st 3rd LOOP, 1hdc in next 8 st 3rd LOOP, 2hdc in next st 3rd LOOP, *1hdc in next 9 st 3rd LOOP, 2hdc in next st 3rd LOOP* around till end of round, close the round with a slip st in 1st ch at beg.
Work 55 hdc.
Color: C
R4: ch1, 1hdc in each st around till end of round, sl st in 1st ch at beg.
Work 55 hdc.
Color B:
R5: ch2, 1hdc in each st around till end of round 3rd LOOP, close the round with a slip st in 2nd ch at beg.
Work 55 hdc.
R6 - R10: repeat R4 - R5
Work 55 hdc in each row.

In the next row we will create a thumb hole.
Color B:
R11: ch2, 1hdc in next 22 st 3rd LOOP, skip 11 st, 1hdc in next 22 st 3rd LOOP, close the round with a slip st in 2nd ch at beg
Work 44 hdc.
Color: C
R12: ch1, 1hdc in each st around till end of round, sl st in 1st ch at beg.
Work 44 hdc.
Color B:
R13: ch2, 1hdc in each st around till end of round 3rd LOOP, close the round with a slip st in 2nd ch at beg.
R14 - R16: Repeat rows R12 - R13
Work 44 hdc.
To create WRISTWARMERS, THE WORK MAY END OR ADD ANOTHER ROW OR TWO HERE. Cut the yarn and sew the loose end.

To create FINGERLESS MITTENS WITH SHORT FINGERS, CONTINUE TO CROCHET WITH THE SAME YARN AND THE SAME HOOK.
LET’S CONTINUE WITH ME!
FINGERS
Yarn: COLOR B
Crochet Hook: 2.5 mm
Work in closed rounds, always close the row with a slip stitch.
Don’t count ch2 at beg as a stitch
The fingers can be crocheted, so how long you want them to be depends on the size of your hand.
The little finger
R1: ch2, 1hdc in 1st st, 1hdc in next 4 st, 1hdc in last 5st, close the round with a slip st in 2nd ch at beg (10 sl).
R2: ch2, 1hdc in each st around till end of round, sl st in 1st ch at beg
R3 - R5: repeat row R2
R6: 1sl st in each st around till end of round, close the round with an invisible join
Cut the yarn and fasten off.
The ring finger
Tie a new yarn in the place where the previous finger ends.
R1: ch2, 1hdc in 1st st, 1hdc in next 4 st, 1hdc in last 5st, close the round with a slip st in 2nd ch at beg (10 sl).
R2: ch2, 1hdc in each st around till end of round, sl st in 1st ch at beg
R3 - R6: repeat row R2
R7: 1sl st in each st around till end of round, close the round with an invisible join
Cut the yarn and fasten off.
The middle finger
Tie a new yarn in the place where the previous finger ends.
R1: ch2, 1hdc in 1st st, 1hdc in next 5 st, 1hdc in last 6st, close the round with a slip st in 2nd ch at beg (12 sl).
R2: ch2, 1hdc in each st around till end of round, sl st in 1st ch at beg
R3 - R8: repeat row R2
R9: 1sl st in each st around till end of round, close the round with an invisible join
Cut the yarn and fasten off.
The index finger
Tie a new yarn in the place where the previous finger ends.
R1: ch2, 1hdc in 1st st, 1hdc in next 5 st, 1hdc in last 6st, close the round with a slip st in 2nd ch at beg (12 sl).
R2: ch2, 1hdc in each st around till end of round, sl st in 1st ch at beg
R3 - R8: repeat row R2
R9: 1sl st in each st around till end of round, close the round with an invisible join
Cut the yarn and fasten off.
The thumb
Re-join the yarn, where we make the thumb hole - a new yarn in the row R16, where we skipped 11 st.
R1: ch2, 1hdc in 1st st, 1hdc in next 11 st, close the round with a slip st in 2nd ch at beg (12 sl).
R2: ch2, 1hdc in each st around till end of round, sl st in 1st ch at beg
R3 - R5: repeat row R2
R6: 1sl st in each st around till end of round, close the round with an invisible join
If you want the thumb to be longer, add more rows, crochet 1hdc in each st around till end of round until you are happy with the length of the thumb.
Cut the yarn and fasten off.
REPEAT THE PATTERN FOR THE SECOND MITTEN, LEFT HAND.
Lay your MITTENS RIGHT SIDE out and smooth down.
You are all done with your amazing CROCHET WRISTWARMERS OR COSY FINGERLESS MITTENS ARTISAN!
I hope you’ve enjoyed making this free WARM AND COSY MITTENS crochet pattern.
You can try also my NECKWARMER AND HAT to create a wonderful winter set:
More Crochet patterns?
For even more crochet patterns, check out my e-book.
CROCHET WITH LOVE AND NEBESKA
I prepared for you the e-book CROCHET WITH LOVE AND NEBESKA, it is a set of more than 60 projects with instructions and video instructions for the whole year 2023!
You can download the e-book as a pdf with links to allow you to better find the guide you need. Or maybe you missed one of the pattern instructions and now it will make you happy, or you are just looking for inspiration and one of my ideas will move you in your next creation!
This e-book is FREE and you can share it with your friends. Due to the size, it is necessary to download CROCHET WITH LOVE AND NEBESKA from the link (it cannot be sent as an e-mail attachment). Click on the ebook link or image and download the e-book CROCHET WITH LOVE AND NEBESKA 2023 for FREE.
https://forms.gle/CyJZqXs4fTWechtE6
All of the patterns on that list of beautifully designed, and suitable for both beginners and experienced crocheters. They are different levels of difficulties and techniques that you might have never seen before. Just click on them and you can find the free pattern, each of the patterns comes with a video tutorial.
What’s Next?
Pin this post: Save this tutorial to your Pinterest boards so that you can come back to it later.
Leave a comment: I love to hear your feedback. Tell me in the comments below!
Share on Instagram and Facebook: When you make this project, share it on social media and tag me @sonanebeska. I love to see what you make!
Have fun and let me know what you make. I would love to know how your project turns out.
Please don't forget to like and I really appreciate your comments.
If the pattern did not make sense to you, please don’t hesitate to contact me, I am happy to help :)
If you like this pattern, please follow and share my projects on social networks as a THANK YOU and to help me to create new projects and patterns for you.
If you pin my patterns to your Favorites and share it on social media as a link, I will be able to share a lot more free crochet patterns for you all.
Stay in touch at Facebook, Instagram and Pinterest.
Thank you very much once again for your visit and see you soon!
♥♥♥


