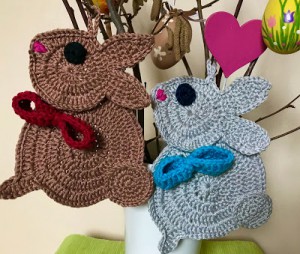
Easter Bunny decoration
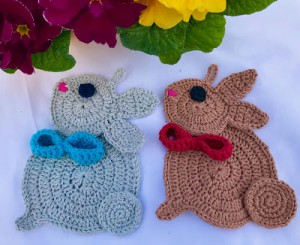
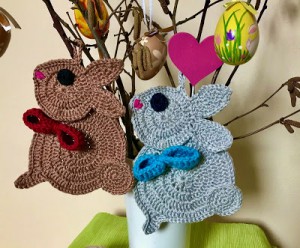
Easter is on its way, I am ready to welcome this wonderful holiday and I thought I would come with some cute Easter Crochet Patterns for you! I started with these adorable Crochet Easter Bunnies. These Easter bunnies ornaments will put your home in the spirit of the season. I hope you love it as much as I do!
VIDEO TUTORIAL
You can find the step-by-step video tutorials below which will help you along if you prefer to watch video instruction rather than using a written pattern. Don’t forget to subscribe if you like me videos, it’s FREE!![]()
A cute crochet bunny will put a smile on anyone's face and making one is a great way to pass get a jump start on the holiday. So if you're looking for something very simple and quick, I would suggest making these cute little Bunnies ornaments. They are perfect and I think you'll be happy with the result.
A huge thanks to everyone who want to support my blog and download PDF paid pattern. Thank you very much, I really appreciate it and it helps me create more new video tutorials and patterns for you. Love you!
![]()
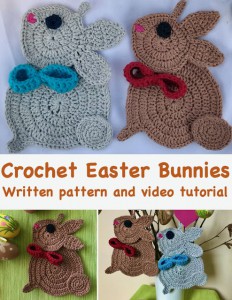
Let's start or PIN this idea to your Pinterest boards for later.
![]()
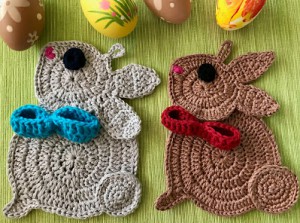
I think crocheting and Easter ornaments and decorations go hand in hand. What do you think?
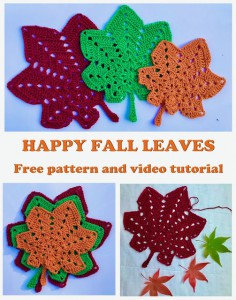
If you like home decoration you would may love to create these Happy Leaves as well:
This pattern is a simple bunny, it is strung on a basic crochet stitches. The same pattern could be used to make an Bunny ornament for other projec. If you don't understand any of my instructions, don't worry I am here for you - enter the comments at the end of this post.
EASTER BUNNY DIRECTIONS
This Bunny is very easy and quick to make.
The pattern uses only basic crochet stitches - double crochets, single crochets and chains.
The pattern was made with YarnArt Begonia: 100% cotton, mercerized cotton, 50g/1.76oz = 169m/185yrds
Crochet hook: 3.00 mm.
Difficulty Level: Level 1 – Easy, for beginners
US crochet term:
SlSt – slip stitch
CH/s – chain/s
DC - double crochet
HDC - half double crochet
SC - single crochet
SK - skip
T - turn
ST/s - stitch(es)
REP - repeat
Special stitches used:
Single Crochet Decrease (sc2tog)
A crochet decrease makes the current row or round that you are working on shorter than the one previous to it.
Insert hook into the first stitch.
Yarn over and draw through the loop.
Do not complete the stitch as normal.
Instead, insert the hook into the next stitch.
Yarn over and draw through the loop.
There should now be three loops on your hook
Yarn over and draw through all three loops on the hook
You should now have two single crochet stitches side-by-side, joined together into one stitch at the top.
PATTERN NOTES
1) A ch3 at beg of the first row counts as a stitch throughout.
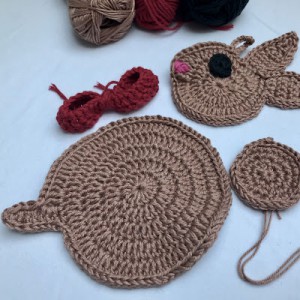
2) The project is crochet as 4 circles. One circle is for a head, one for a body and one for a tail, and a small circle for an eye. These parts are worked in spiral rounds, without joining rounds. Do not join rounds.
3) You can make Bunnies bigger or smaller with a thicker/thinner yarn or a larger/smaller hook size.
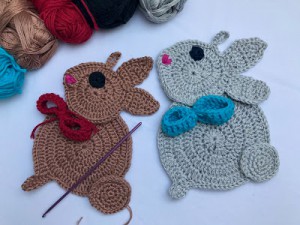
4) You need 4 colours:
colour A = for bunny = brown or shadow
colour B = for eye = black or dark shadow or navy blue etc.
colour C = for nose = pink
colour D = for bow = red, blue, green or any colour you like
There 5 parts:
1) BODY with PAW
2) HEAD with NOSE and 2 EARS
3) EYE
4) TAIL
5) BOW
6) I used 2 strands together to have a bunny thicker
THE WRITTEN PATTERN
1) BODY with PAW
colour A
Make a magic ring.
R1: ch3 (work as a dc), work 13 dc into the magic ring (14dc)
R2: 1hdc and 1dc in the 1st st from R1 (on the top of ch3), 2dc in each next st around (28 st)
R3: rep *2 dc in next 2 st, 1dc in next st* rep from * to * till end of row (45 dc)
R4: rep *2 dc in next st, 1dc in next st* rep from * to * till end of row (66 dc)
R5: rep *2 dc in next st, 1dc in next 2 st* rep from * to * till end of row (88 dc)
Make a paw: ch4, 1hdc in first ch from hook, 1hdc in next ch, 1dc in next 2 ch.
You reach the "body", around last dc in this row place 3 dc.
R6: sk 2st, sl st in each st around till end of row
Cut the yarn, fasten off and wave all ends
2) HEAD with NOSE and 2 EARS
colour A
Make a magic ring.
I would recommend you to leave a longer end (approx. 7.8 inch / 20 cm) and use this end to join the head with the body.
R1: ch3 (works as a dc), work 13 dc into the magic ring (14dc)
R2: 1hdc and 1dc in the 1st st from R1 (on the top of ch3), 2dc in each next st around (28 st)
R3: rep *2 dc in next 2 st, 1dc in next st* rep from * to * 3 time (you will have 20 dc), you are in the middle of R3
1tr in next 4 st
rep *2 dc in next 2 st, 1dc in next st* rep from * to * till end of row
(45 dc in total in R3)
Now make an ear:
R1: 1hdc in next st, 1 sc in next 4 st, turn your work (4sc)
R2: ch1, 1sc in fist st, 2 sc in next st, 1 sc in next 2 st, turn (5sc)
R3: ch1, 1sc in fist st, 2 sc in next st, 1 sc in next 3 st, turn (6sc)
R4: ch1, 1sc in each st, turn (6sc)
R5: ch1, 1sc in each st, turn (6sc)
R6: ch1, 1sc in fist st, sc2tog, 1 sc in next 3 st, turn (5sc)
R7: ch1, 1sc in fist st, sc2tog, 1 sc in next 2 st, turn (4sc)
R8: ch1, 1sc in fist st, sc2tog, 1 sc in next 1 st, turn (3sc)
R9: ch1, 1sc in fist st, sc2tog, turn (2sc)
R10: ch1, sc2tog (1sc)
10 slip stitches in last st of each row, work from top (R10) of ear down (R1)
when you reach circle, "the head", work a sl st and make the second ear, repeat the pattern for Ear:
R1: 1 sc in next 4 st, turn your work (4sc)
R2: ch1, 1sc in fist st, 2 sc in next st, 1 sc in next 2 st, turn (5sc)
R3: ch1, 1sc in fist st, 2 sc in next st, 1 sc in next 3 st, turn (6sc)
R4: ch1, 1sc in each st, turn (6sc)
R5: ch1, 1sc in each st, turn (6sc)
R6: ch1, 1sc in fist st, sc2tog, 1 sc in next 3 st, turn (5sc)
R7: ch1, 1sc in fist st, sc2tog, 1 sc in next 2 st, turn (4sc)
R8: ch1, 1sc in fist st, sc2tog, 1 sc in next 1 st, turn (3sc)
R9: ch1, 1sc in fist st, sc2tog, turn (2sc)
R10: ch1, sc2tog (1sc)
10 slip stitches in last st of each row, work from top (R10) of ear down (R1)
when you reach circle, "the head", work 1 sl st in next 3 st
now make a tag (it is optionally), you can skip this part and keep continue crocheting slip stitch in each st till end of row.
A tag: ch12, sl st in st you started chain
st sl in each st till end of row
NOSE
colour C
With a tapestry needle, embroider the nose on the head, embroider the nose as a triangle shape or heart shape around 4 triple crochet st. Start with the yarn on the top of 4th triple crochet for the bottom of the nose and worked across the 3 triple stitches in the rows above. Wrap yarn several times so the nose puffs out from the head.
3) EYE
Use colour B
Make a magic ring.
R1: ch1 (don't work as a dc), work 8 sc into the magic ring (8 sc)
R2: sl st into each st around (8 sl st)
Cut the yarn, leave a longer end (approx. 7.8 inch / 20 cm) and use this end to join the eye with the head.
Place Eye on Body approx on R2 between "nose" and tag.
Sew the eye on the head.
4) TAIL
Use colour A
Make a magic ring
I would recommend you to leave a longer end (approx. 7.8 inch / 20 cm) and use this end to join the tail with the body.
R1: ch1, 8 sc into the magic ring (8sc)
R2: 2 sc in each st around (16sc)
R3: rep *2sc in next st, 1 sc next st* rep from * to * till end (24sc)
R4: rep *2sc in next st, 1 sc next 2 st* rep from * to * till end (32sc)
R5: st st in each st around (32 sl st)
Cut the yarn, leave a longer end (approx. 7.8 inch / 20 cm) and use this end to join the tail with the body.
5) BOW PATTERN
Use colour D
Make a slip knot, leave a longer end - you will need it to make a bow
ch30, sl st into first ch and create a ring
Make sure the chain is NOT twisted.
R1: ch3, 1dc in each st around till end of row, st sl in 3rd ch from beg (30dc)
R2: ch3, 1dc in each st around till end of row, st sl in 3rd ch from beg (30dc)
Cut the yarn leave a longer end - you will need it to make a bow.
Fold a bow in the middle, right side facing up, the begging/ending is in the middle. Use both ends and wrap the middle part up several times. Tighten the ends as much as you can. Make 2 knots.
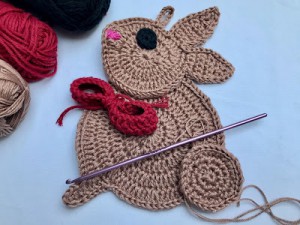
FINISHING with a tapestry needle
Sew the head to the top of the body, start with the yarn on the 4th row of the head, align the tag and the center of the body.
Sew the bow on the body, place a bow under the head, align the middle of the bow and the center of the head.
Sew the tail on the body, start approximately with the yarn on 20th dc of the 5th row of the body, the center of the tail is just on the edge of the body.
Weave in all ends.
You are ready to decorate your home with this adorable easter Bunny!
MEASUREMENT
Body: 4.33 inch / 11 cm, Paw: 0.79 inch / 2 cm
Tail: 1.57 inch / 4 cm
Head: 2.76 inch / 7 cm, Ears: 2 inch / 5 cm
Bow: 3.15 inch / 8 cm
Want a printable copy of this pattern? Why not visit my Etsy shop and purchase the PDF with photo instructions. Not only does it mean you get your own copy of the pattern to print, you also support a small business and help me to keep making free patterns!
Have fun and let me know what you make. I would love to know how your project turns out.
Please don't forget to like and I really appreciate your comments.
If the pattern did not make sense to you, please don’t hesitate to contact me, I am happy to help :)
If you like this pattern, please follow and share my projects on social networks as a THANK YOU and to help me to create new projects and patterns for you.
Thank you very much once again for your visit and see you soon!


