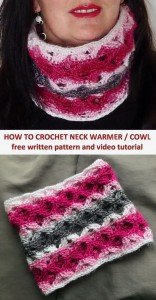
Crochet Cowl - Neck Warmer Waltz
I like crochet cowls, they are so much more practical than scarfs – just slip it over your head and you are warm and cosy straight away with no ends to tuck in. The Neck warmer gives you protection for the winds and makes your neck really safe and warm.

This Neck Warmer is a super luxurious cowl with an awesome pattern will make a great addition to your wardrobe. It is crocheted in a beautiful and relaxing crossed v-shaped stitches in gorgeous and colourful soft yarn, it is both fabulous to make and wear!
The pattern is available here below for free. It comes with a video guide as well.
VIDEO TUTORIAL
You can find the step-by-step video tutorials below which will help you along if you prefer to watch video instruction rather than using a written pattern. Don’t forget to subscribe if you like me videos, it’s FREE!![]()
![]()
Let's start or PIN this idea to your Pinterest boards for later.
![]()
Do you love the Scarfs crocheting? You would may like to try also this pattern for the Hooded Scoodies:


This pattern is made for intermediate crochets - but I think that with my video tutorials everyone will manage to crochet this amazing pattern. If you don't understand any of my instructions, don't worry I am here for you - enter the comments at the end of this post.
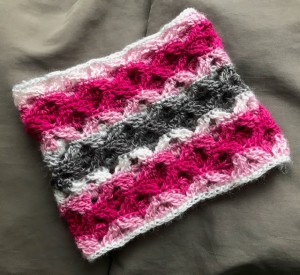
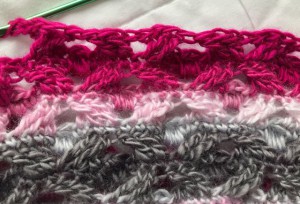
This 3D crochet pattern with crossed stitches looks phenomenally and it is made from just one skein of Waltz Vlna Heb. Wonderful gradients of white, pink, burgundy and grey allows the yarn to do all of the colour changing for you.

I love this wonderful yarn because it is not too thick, just the right thickness to show off some texture. The texture on this scarf is created using crossed triple crochets and the bobbles.
I made this cowl 21 – 22 inches around which is a perfect size for women and teenage girls for a neck warmer. The pattern has a good stretch. You can easily adjust the size to be smaller or wider by reducing the amount of chains.
Let’s get started to make this perfect pattern!
Neck Warmer Waltz Directions
For this women/teenage size you will need:
Waltz Vlna Heb – 100% premium akryl, 100g/3.53 oz, 240m/262.47 yards – 1 skein
The substitution: Red Heart Unforgettable, 100g/250m - 1 skein
The crochet hook 4.0 mm.
Size
Size: bellow there is a pattern for woman size, the head measurement 22 inch / 56 cm, this one fits perfectly to me.
The neck warmer can easily be adapted to a smaller size or bigger size just by making the starting chain longer or shorter.
Difficulty Level: Level 2 – Advanced Beginner / Intermediate
US crochet term:
SlSt – slip stitch
CH/s – chain/s
SC – single crochet
HDC - half double crochet
DC - double crochet
TRC - tripple crochet
SK - skip
T - turn
ST/s - stitch(es)
REP - repeat
YO – yarn over

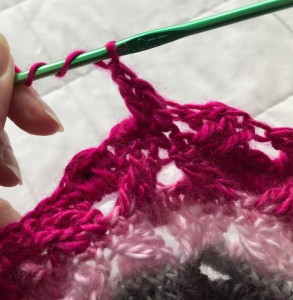
Special stitches used – see video tutorial: a bobble stitch = 5dc cluster
Pattern Notes
1) Before you start take a measurement of your head. Crochet the number of chains until you reach the measurement taken.
2) The direction shown are for woman/teenage size 22 inch head measurement but can be easily converted into bigger size or smaller size – just by making the starting chain longer or shorter.
3) The number of chains when you start has to be a multiple of 8! I started with 80 chains. If you want to make your cowl smaller use 72 ch / bigger use 88 ch etc.
4) A Ch 4 at beg of the row counts as one trc throughout.
5) Cowl is worked in rounds with right side facing at all times
6) Measurement: 22 inch [56cm] circumference – size will fit a teen/adult: 10.63 inch / 27 cm wide and inches 8.66 inch / 22cm high

HOW TO CROCHET NECK WARMER / COWL / WOMAN SIZE
Pick up the 4.0 mm crochet hook and let’s make a slip knock.
Ch80, make a slip stitch to join work. We will work in rounds.
R1: ch1,1 sc into each st around. Sl st into the first ch.
You will have 80 sc in the round.
R2: ch4 (works as a trc), 1 trc in next st (2trc)
Turn your work!
1 trc in 2 stitches which are in front of 2 trc you just have made. (2trc)
Turn your work - the right side facing up again.
The first group of 4 trc stitches is finished - there are 2 pairs of triples.
2 first triples/the first pair you made are placed in front of next 2 triples/the second pair (these are hidden behind 2 trc)
Let's start the second group of 4 trc.
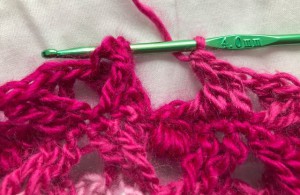
Skip 2 st, 1 trc in next 2 st. 1 trc in the first skipped st, 1tr in the second skipped st (4trc)
The second group of 4 trc stitches is finished - there are 2 pairs of triples.
2 first triples/the first pair you made are placed behind of next 2 triples/the second pair (these are now on front)
THE FIRST "V" IS JUST FINISHED!
REPEAT THIS PATTERN 6 MORE TIMES:
Skip 2st, 1 trc in next 2 st (2trc)
Turn your work!
1 trc in the first skipped st, 1tr in the second skipped st (2trc)
Turn your work - the right side facing up again.
The first group of 4 trc stitches is finished - there are 2 pairs of triples.
2 first triples/the first pair you made are placed in front of next 2 triples/the second pair (these are hidden behind 2 trc)
Skip 2 st, 1 trc in next 2 st. 1 trc in the first skipped st, 1tr in the second skipped st (4trc)
The second group of 4 trc stitches is finished - there are 2 pairs of triples.
2 first triples/the first pair you made are placed behind of next 2 triples/the second pair (these are now on front)
THE SECOND "V" IS JUST FINISHED!
At the end you will have 8 "V" in total around.
Make a sl st into the 4th ch from beg to join.
R3: ch1 (works as a 1sc), 1sc into each next 3 st (4sc),
make a bobble = 5dc cluster, ch1
repeat: *1 sc in next each 8 st, a bobble* repeat from * to * 6 more time till end of the row.
There are 4 st left, work 1 sc in each st left, sl st to join the round.
You will have 8 bobbles in this round.
R4: sl st to next 2 st (as you have to skip 2 st!)
ch4 (works as a trc), 1 trc in next st (2trc).
1 trc in the first skipped st, 1trc in the second skipped st (2trc)
The first group of 4 trc stitches is finished - there are 2 pairs of triples.
2 first triples/the first pair you made are placed behind of next 2 triples/the second pair (these are on front)
skip bobble, skip 2 st, 1 trc in next 2 st (2trc) Turn your work!
1 trc in the first skipped st, 1tr in the second skipped st (2trc)
Turn your work - the right side facing up again.
The second group of 4 trc stitches is finished - there are 2 pairs of triples.
2 first triples/the first pair you made are placed in front of next 2 triples/the second pair (these are hidden behind 2 trc)
THE FIRST "V" IS JUST FINISHED!
REPEAT THIS PATTERN 6 MORE TIMES:
sk 2 st, 1 trc in next 2 st (2trc).
1 trc in the first skipped st, 1trc in the second skipped st (2trc)
The first group of 4 trc stitches is finished - there are 2 pairs of triples.
2 first triples/the first pair you made are placed behind of next 2 triples/the second pair (these are on front)
skip bobble, skip 2 st, 1 trc in next 2 st (2trc) Turn your work!
1 trc in the first skipped st, 1trc in the second skipped st (2trc)
Turn your work - the right side facing up again.
The second group of 4 trc stitches is finished - there are 2 pairs of triples.
2 first triples/the first pair you made are placed in front of next 2 triples/the second pair (these are hidden behind 2 trc)
At the end you will have 8 "V" in total around.
Make a sl st into the 4th ch from beg to join.
R5: ch1 (works as a sc), 1sc into each next 7 st (8sc),
make a bobble = 5dc cluster, ch1
repeat: *1 sc in next each 8 st, a bobble* repeat from * to * 6 more time till end of the row, sl st to join the round.
You will have 8 bobbles in this round.
R6: skip 2 st (2 sl st), ch4 (works as a trc), 1 trc in next st (2trc)
Turn your work!
1 trc in the first skipped st, 1trc in the second skipped st (2trc)
Turn your work - the right side facing up again.
The first group of 4 trc stitches is finished - there are 2 pairs of triples.
2 first triples/the first pair you made are placed in front of next 2 triples/the second pair (these are hidden behind 2 trc)
Skip 2 st, 1 trc in next 2 st. 1 trc in the first skipped st, 1tr in the second skipped st (4trc)
The second group of 4 trc stitches is finished - there are 2 pairs of triples.
2 first triples/the first pair you made are placed behind of next 2 triples/the second pair (these are now on front)
THE FIRST "V" IS JUST FINISHED!
REPEAT THIS PATTERN 6 MORE TIMES: skip bobble, skip 2st, 1 trc in next 2 st (2trc)
Turn your work!
1 trc in the first skipped st, 1tr in the second skipped st (2trc)
Turn your work - the right side facing up again.
The first group of 4 trc stitches is finished - there are 2 pairs of triples.
2 first triples/the first pair you made are placed in front of next 2 triples/the second pair (these are hidden behind 2 trc)
Skip 2 st, 1 trc in next 2 st. 1 trc in the first skipped st, 1tr in the second skipped st (4trc)
The second group of 4 trc stitches is finished - there are 2 pairs of triples.
2 first triples/the first pair you made are placed behind of next 2 triples/the second pair (these are now on front)
THE SECOND "V" IS JUST FINISHED!
At the end you will have 8 "V" in total around.
Make a sl st into the 4th ch from beg to join.
R7 = R3
R8 = R4
R9 = R5
R10 = R6
Repeat the pattern till you have 20 rounds finished.
Cut the yarn, weave in the ends. Lay your neck warmer the right side out and smooth down.

Want a printable copy of this pattern? Why not visit my Etsy shop and purchase the PDF with photo instructions. Not only does it mean you get your own copy of the pattern to print, you also support a small business and help me to keep making free patterns!
Have fun and let me know what you make. I would love to know how your project turns out.
Please don't forget to like and I really appreciate your comments.
If the pattern did not make sense to you, please don’t hesitate to contact me, I am happy to help :)
If you like this pattern, please follow and share my projects on social networks as a THANK YOU and to help me to create new projects and patterns for you.
Thank you very much once again for your visit and see you soon!


