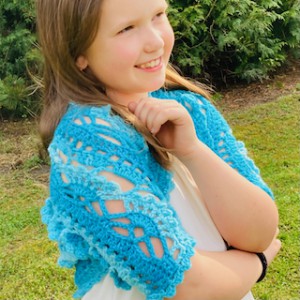
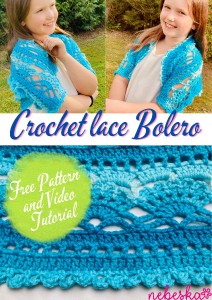
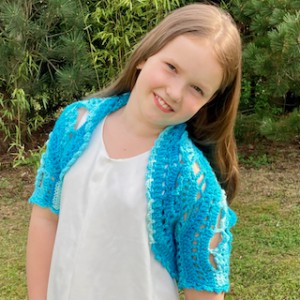
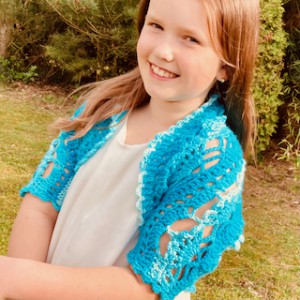
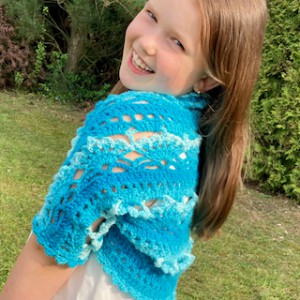
Crochet Lacy Blue Bolero
Hello My Crochet Friends!
You know, sometimes there are cooler afternoons or evenings in the summer, I like to bring a light ponchos or a scarf or a nice shrug with me when we venture out on summer evenings, just in case.
I prepared a nice lacy blue shoulder cosy pattern that would nicely compliment many summer tops and dresses. I wanted this bolery to be really light and airy and have bright colors.
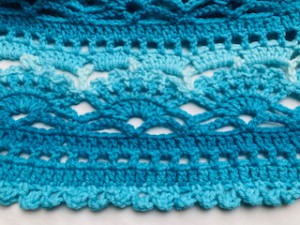
This Lacy summer Bolero is absolutely fabulous and outstanding and will complete your outfits.
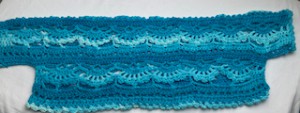
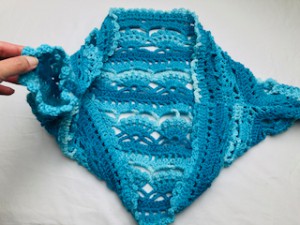
The Bolero is worked in rows, creating an easy rectangle shape with the sleeves, then the arms holes and sleeves are completed at the very end, sewing the corners and sides together. Super easy to wear!
VIDEO TUTORIAL
You can find the step-by-step video tutorials below which will help you along if you prefer to watch video instruction rather than using a written pattern. Don’t forget to subscribe if you like me videos, it’s FREE!
![]()
This pattern is made for beginners - only a basic skill level is required to make it. If you don't understand any of my instructions, don't worry I am here for you - enter the comments at the end of this post.
A huge thanks to everyone who want to support my blog and download PDF paid pattern. Thank you very much, I really appreciate it and it helps me create more new video tutorials and patterns for you. Love you!
![]()
If you pin my patterns to your Favorites and share it on social media as a link, I will be able to share a lot more free crochet patterns for you all.
Stay in touch at Facebook, Instagram and Pinterest.
Let's start or PIN this idea to your Pinterest boards for later.
![]()
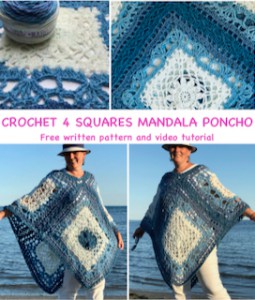
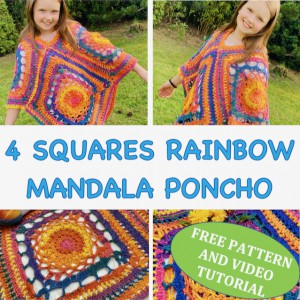
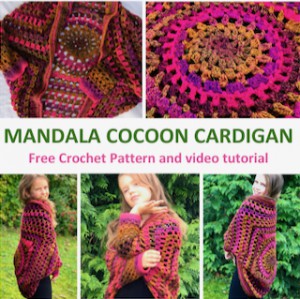
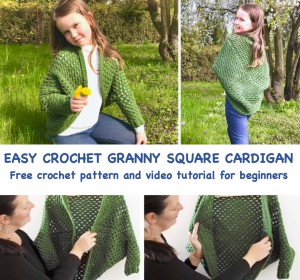
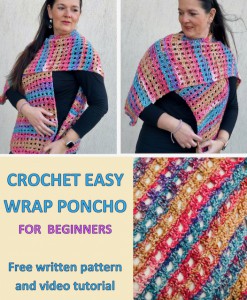
If you’ve been looking for more PONCHOS and SHRUGS patterns for you or for your friends and family, you may will love these patterns. They are different levels of difficulties and techniques that you might have never seen before.
You might like these ones below. Just click on them and you can find the free pattern, each of the patterns comes with a video tutorial.

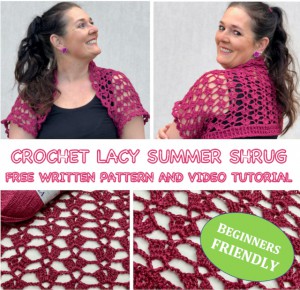
Lovely Lacy Blue Bolero Directions
This lovely Lacy Blue Bolero is easy to make.
The pattern uses only basic crochet stitches - single and double crochets.
This Bolero is crochet from the down top and you just need to measure the width from mid-arm to mid-arm measurement and crochet the foundation chain accordingly.
The direction shown are for XS size but can be easily converted into bigger size or smaller size – just by making the Bolero - the width and the length - according to the measurement of mid-arm to mid-arm width.

The pattern was made with yarn PRYIA Vlnika
For this skirt XS size you will need 1 skein of PRYIA yarn.
![]()
PRYIA: 100% acrylic, 100g / 245m
For this pattern you will need 5 mm crochet hook.
Scissors and tapestry needle
So let me now get started and tell you what you will need in order to crochet this lovely lacy Bolero.
Difficulty Level: Level 1 – Easy, for beginners
US crochet terms:
SlSt – slip stitch
CH/s – chain/s
DTR - double treble
TR - treble
DC - double crochet
SC - single crochet
SK - skip
T - turn
ST/s - stitch(es)
REP - repeat
YO – yarn over
PATTERN NOTES
1) Before you start take a measurement of height of your body and a body measurement (please see the final measurement of the bolero below).
2) This pattern is for GIRLS / XS women size, but you can easily adapt to a smaller size or bigger size just by reducing or increasing the number of rows. Remember that when making your shrug bigger you will need more yarn.
3) A chain at beg of the round DOESN'T count as a stitch
4) The project is made as a one piece, one rectangle. Work back and forth from down and top.
THE WRITTEN PATTERN
Work from down top.
Work in rows, back and forth
Crochet hook 5.00 mm
With your yarn and hook, work in rows, loosely.
Make a slip knot
Make a foundation chain, multiple of 12 + 7.
I have 6 repetitions in my pattern, I started with 79 ch (6x12 + 7)
Measurement: 56 cm / 22 inch
For S /M size chain 91 ch (7x12 + 7) = 7 repetitions
Measurement: 66 cm / 26 inch
For L /XL size chain 103 ch (8x12 + 7) = 8 repetitions
Measurement: 76 cm / 30 inch
For XXL/XXXL size 115 chain (9x12 + 7) = 9 repetitions
Measurement: 86 cm / 34 inch
R1: ch2 (don't count ch2 as a st), 1dc in 3rd ch from hook, 1 dc in each ch till end of row, turn (79 dc)
R2: ch2, 1dc in 1st st, *ch1, sk 1st, 1dc in next st* rep from * to * till end of row, turn
R3: ch2, 1dc in 1st st, 1dc in each st till end of row, turn (79 dc)
SX size: 6 repetitions in next rows.
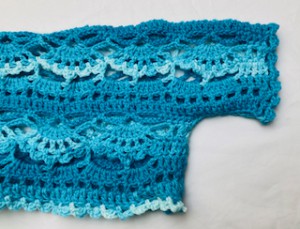
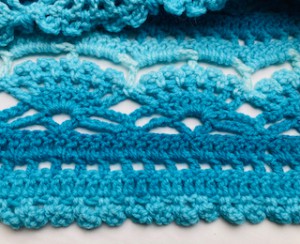
R4: ch1, 1sc in 1st st, 1sc in next 4st, *ch4, sk 4st, (1dc,ch3,1dc) in next st, ch4, sk 4st, 1sc in next 3st* rep from * to * till there are 2st left, work 1sc in each st till end of row, turn
R5: ch1, 1sc in 1st st, 1sc in next 3st, *ch4, sk 4st, 7dc in ch3sp, ch4, sk 1sc, 1sc in next st* rep from * to * till there are 3st left, work 1sc in each st till end of row, turn
R6: ch2, 1dc in 1st st, ch1, sk 1st, 1dc in next st, ch1, skip ch4sp,
*repeat 7 times: (1dc in next dc, ch1), then skip ch4sp, 1sc and ch4sp* rep from * to * till there are 3st left, work 1dc in next, ch1, sk 1st, 1dc in last st, turn
R7: ch1, 1sc in 1st st, 1sc in next 3st, *1sc in ch1sp, repeat 5 times (picot =ch3 and 1dc in 1st ch you just made, 1sc in next ch1sp), 1sc betwen 2dc from R6* rep from * to * till there are 4st left, work 1sc in each st till end of row, turn
in R8 we will make a short SLEEVE by adding 11 chain at the end of the row:
R8: ch2, 1dc in 1st st, 1dc in next 3st, *ch6, skip 2 picots, 1dc on top of 3dc picot, ch6, skip 2 picots, sk 1sc, 1dc in next sc (this is sc between 2 bows)* rep from * to * till there are 3st left, work 1dc in each st till end of row, ch11, turn
We added 10 cm / 4 inch on side
in R9 we will make a short SLEEVE by adding 11 chain at the end of the row
R9: ch2, 1dc 3rd chain from hook, 1dc in next 10 chains, 1dc in next 3st, *6 dc in each ch6sp* rep from * to * till there are 4st left, work 1dc in each st till end of row, ch11, turn
We added 10 cm / 4 inch on side
For XS size: 76 cm / 30 inch
For S /M size: 86 cm / 34 inch
For L /XL size: 96 cm / 38 inch
For XXL/XXXL size: 106 cm / 42 inch
R10: ch2, 1dc in 3rd ch from hook, *ch1, sk 1st, 1dc in next st* rep from * to * till end of row, turn
R11 = R3: ch2, 1dc in 1st st, 1dc in each st till end of row, turn
XS size: 8 repetitions in next rows.
S /M size: 9 repetitions
L /XL size: 10 repetitions
XXL/XXXL size: 11 repetitions
R12 = R4: ch1, 1sc in 1st st, 1sc in next 4st, *ch4, sk 4st, (1dc,ch3,1dc) in next st, ch4, sk 4st, 1sc in next 3st* rep from * to * till there are 2st left, work 1sc in each st till end of row, turn
R13 = R5: ch1, 1sc in 1st st, 1sc in next 3st, *ch4, sk 4st, 7dc in ch3sp, ch4, sk 1sc, 1sc in next st* rep from * to * till there are 3st left, work 1sc in each st till end of row, turn
R14 = R6: ch2, 1dc in 1st st, ch1, sk 1st, 1dc in next st, ch1, skip ch4sp,
*repeat 7 times: (1dc in next dc, ch1), then skip ch4sp, 1sc and ch4sp* rep from * to * till there are 3st left, work 1dc in next, ch1, sk 1st, 1dc in last st, turn
R15 = R7: ch1, 1sc in 1st st, 1sc in next 3st, *1sc in ch1sp, repeat 5 times (picot =ch3 and 1dc in 1st ch you just made, 1sc in next ch1sp), 1sc betwen 2dc from R6* rep from * to * till there are 4st left, work 1sc in each st till end of row, turn
R16 = R8: ch2, 1dc in 1st st, 1dc in next 3st, *ch6, skip 2 picots, 1dc on top of 3dc picot, ch6, skip 2 picots, sk 1sc, 1dc in next sc (this is sc between 2 bows)* rep from * to * till there are 3st left, work 1dc in each st till end of row, turn
R17 = R9: ch2, 1dc in 1st st, 1dc in next 2st, *6 dc in each ch6sp* rep from * to * till there are 4st left, work 1dc in each st till end of row, turn
R18 = R10: ch2, 1dc in 1st st *ch1, sk 1st, 1dc in next st* rep from * to * till end of row, turn
R19 = R11: ch2, 1dc in 1st st, 1dc in each st till end of row, turn
For XS - M: R20 - R26 = repeat R12 - R18
For L - XXL: R20 - R26, R27 - R33: repeat R12 - R18 2times
MAKE ARMHOLES = JOIN ROW 26 AND ROW R8 BY SLIP STITCHES
R27: sl st to join 11 stitches with R8, then work 1dc in 1st st, 1dc in each st till end of row, turn (79 dc)
MAKE ARMHOLES = JOIN ROW 27 AND ROW R8
R28: sl st to join 11 stitches with R8, then continue with the pattern from R4: ch1, 1sc in 1st st, 1sc in next 4st, *ch4, sk 4st, (1dc,ch3,1dc) in next st, ch4, sk 4st, 1sc in next 3st* rep from * to * till there are 2st left, work 1sc in each st till end of row, turn
XS size: 6 repetitions in next rows.
S /M size: 7 repetitions
L /XL size: 8 repetitions
XXL/XXXL size: 9 repetitions
R28 - R35 = R12 - R19
R29: ch1, 1sc in 1st st, 1sc in next 3st, *ch4, sk 4st, 7dc in ch3sp, ch4, sk 1sc, 1sc in next st* rep from * to * till there are 3st left, work 1sc in each st till end of row, turn
R30: ch2, 1dc in 1st st, ch1, sk 1st, 1dc in next st, ch1, skip ch4sp,
*repeat 7 times: (1dc in next dc, ch1), then skip ch4sp, 1sc and ch4sp* rep from * to * till there are 3st left, work 1dc in next, ch1, sk 1st, 1dc in last st, turn
R31: ch1, 1sc in 1st st, 1sc in next 3st, *1sc in ch1sp, repeat 5 times (picot =ch3 and 1dc in 1st ch you just made, 1sc in next ch1sp), 1sc betwen 2dc from R30* rep from * to * till there are 4st left, work 1sc in each st till end of row, turn
R32 = R16 = R8: ch2, 1dc in 1st st, 1dc in next 3st, *ch6, skip 2 picots, 1dc on top of 3dc picot, ch6, skip 2 picots, sk 1sc, 1dc in next sc (this is sc between 2 bows)* rep from * to * till there are 3st left, work 1dc in each st till end of row, turn
R33 = R17 = R9: ch2, 1dc in 1st st, 1dc in next 2st, *6 dc in each ch6sp* rep from * to * till there are 4st left, work 1dc in each st till end of row, turn
R34 = R18 = R10: ch2, 1dc in 1st st *ch1, sk 1st, 1dc in next st* rep from * to * till end of row, turn
R35 = R19 = R11: ch2, 1dc in 1st st, 1dc in each st till end of row, turn
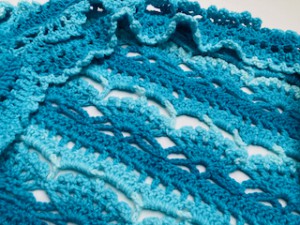
BORDER AROUND THE BOLERO
Do Not Fasten Off.
With the same yarn and the crochet hook
Work with right side facing you
Match the corners - the first and the last row - join the corners together with a slip stitch.
R1: ch1, 1sc in 1st st, *picot: ch3, 1dc in first chain you just created, sk 1st, 1sc in next st* rep from * to * till end of row, then match the corners - the first and the last row - and join the corners with a slip stitch again, continue: *picot: ch3, 1dc in first chain you just created, sk 1st, 1sc in next st* rep from * to * till end of row
Cut the yarn and fasten off.

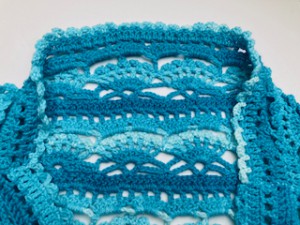
BORDER AROUND ARMHOLES:
Start a new yarn, make a slip knot.
Start in the corner.
Work on the right side of your bolero.
Match the corners - the beginning and the end of the row - join the corners together with a slip stitch.
R1: ch1, 1sc in 1st st, *picot: ch3, 1dc in first chain you just created, sk 1st, 1sc in next st* rep from * to * till end of row
Repeat these instructions for the ARMHOLE on the opposite side.
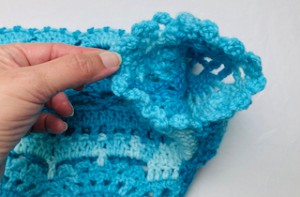
Assemble Sleeves:
Start the new yarn with a longer tail, join yarn on the seam, where we joined the corners already.
Work on the wrong side of your bolero facing you.
Sew the hole on side of the sleeves.
Cut the yarn and fasten off.
Repeat these instructions for the SLEEVE on the opposite side.
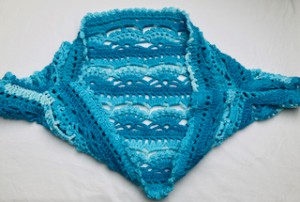
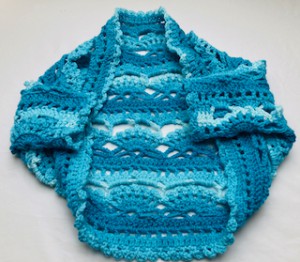
Now that your lovely lacy blue BOLERO is assembled you will hide all loose tails in the wrong side of your work and turn it right side facing you.
My bolero XS size measures 55 cm / 21.5 inches tall and about 75 cm / 29.5 inches long.
The sleeve measures 20 cm 8 inch.
R1 - R8 = 11 cm / 4.5 inch tall
You can easily work this to fit any size you need! The fabric also has a nice stretch to it because of the lacy design. I absolutely love this design and the texture created by the open airy stitches.
Enjoy and wear your lovely lacy BLUE BOLERO on many wonderful summer evenings and in transition period between the Summer and Fall time!
You may would love to try these Wraps and Cardigans as well:
Have fun and let me know what you make. I would love to know how your project turns out.
Please don't forget to like and I really appreciate your comments.
If the pattern did not make sense to you, please don’t hesitate to contact me, I am happy to help :)
If you like this pattern, please follow and share my projects on social networks as a THANK YOU and to help me to create new projects and patterns for you.
If you pin my patterns to your Favorites and share it on social media as a link, I will be able to share a lot more free crochet patterns for you all.
Stay in touch at Facebook, Instagram and Pinterest.
Thank you very much once again for your visit and see you soon!
♥♥♥


