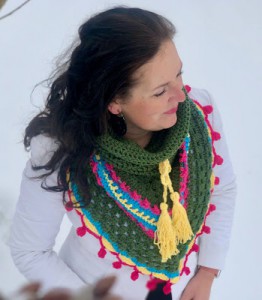
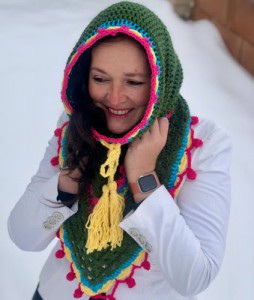
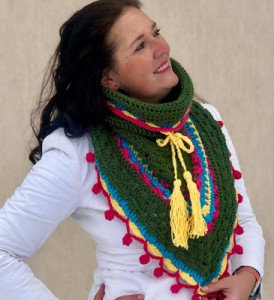
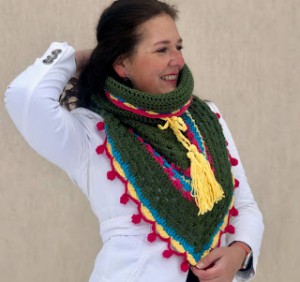
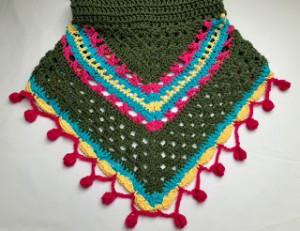
Spring Green Hooded Cowl
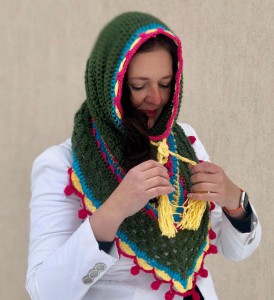
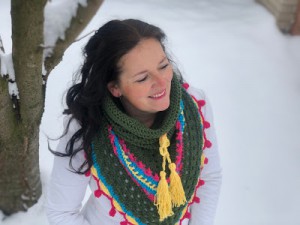
This crocheted Vibrant Hooded Cowl pattern is so practical and fun to make. And it is a perfect from Fall to Spring time – there is still a bit cold in morning, your head will be toasty thanks to the hood. And moreover, this is a trendy wear item. I really love that hooded style on my cowl and I’m so pleased with how it turned out!
The Vibrant Cowl is a free crochet pattern - the pattern is available here below for free. It comes with a video guide as well.
VIDEO TUTORIAL
You can find the step-by-step video tutorials below which will help you along if you prefer to watch video instruction rather than using a written pattern. Don’t forget to subscribe if you like me videos, it’s FREE!![]()
A huge thanks to everyone who want to support my blog and download PDF paid pattern. Thank you very much, I really appreciate it and it helps me create more new video tutorials and patterns for you. Love you!
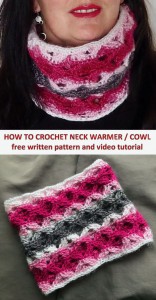
![]()
Let's start or PIN this idea to your Pinterest boards for later.
![]()

This pattern is made for advanced beginners - only a basic skill level is required to make it. If you don't understand any of my instructions, don't worry I am here for you - enter the comments at the end of this post.
The great thing about this my new pattern is: wearing with or without hood - it can be worn wherever you need some warmth.
I have several Cowls, Shawls and Wraps related free crochet patterns. They are different levels of difficulties and techniques that you might have never seen before.


You might like these ones below. Just click on them and you can find the free pattern, each of the patterns comes with a video tutorial.
So let me now get started and tell you what you will need in order to crochet this amazing vibrant Hooded Cowl.
When trying to decide on a yarn for this hooded scarf, I knew I wanted something warm and soft. I chose Red Heart Super Saver Spring Green.
The colour choice was also easy – I picked a spring green colour and add more colours to make it cheerful – it looks so playful now!
It’s still winter time, my friends – let’s grab a cup of coffee, cozy up and let’s get started to make this perfect cowl pattern!
Hooded Cowl Directions
For this M size you will need:
Red Heart Super Saver: 7oz/198g, 364yrds/333m, Spring Green, size 4 medium, 100% acrylic, – 1 skein
For this pattern you will need 5 mm crochet hook.
This Hooded Cowl is made of 2 parts (crocheted as a one part) – one is for the cowl and one is for the hood.
Size: M this can easily be adapted to a smaller size or bigger size just by reducing or increasing the number of rows for the cowl and as well as making less or more rows for the hood.
Difficulty Level: Level 2 – Advanced Beginners
US crochet term:
SlSt – slip stitch
CH/s – chain/s
SC – single crochet
HDC - half double crochet
DC - double crochet
TR - triple crochet
SK - skip
T - turn
ST/s - stitch(es)
REP - repeat
YO – yarn over
Special stitches used: Pom-pom stitch – see in my video tutorial and see below how to make the pom-pom stitch
Pattern Notes
1) Pattern is worked beginning in the centre of the cowl and worked in turned rows to expand the size.
2) Close attention paid to increases at the beginning and end of each row are imperative.
3) Each long side of the triangle (and each row) should always have the same number of stitches
4) The direction shown are for M size but can be easily converted into bigger size or smaller size – just by reducing or increasing the number of rows for the cowl and as well as making less or more rows for the hood.
5) A Ch 3 at beg of the row counts as dc throughout, a ch2 at the beg row counts as hdc throughout, and a ch 1 at beg of row counts as sc throughout
6) Each row starts: ch3 (counts as a dc), 2dc in first st = 3dc in first st
7) Each row ends: 3dc placed in last st
8) In each row, in the middle of cowl, there is a corner pattern: 3dc, ch2, 3dc placed in ch2 space from previous row
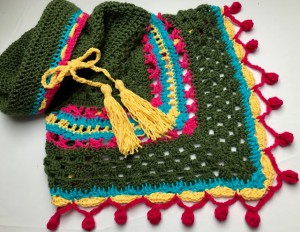
9) I used these colours: A = green spring, B = ping, C = light blue, D = yellow
There are 4 parts of this project:
A) Cowl
B) Hood
C) Drawstring
D) Border with pom-poms
PART A = THE COWL
Pick up the 5mm hook, colour A and let’s make a magic ring
R1: ch3 (those first ch3 will count as a dc in whole my project), 2dc, ch2, 3dc, turn your work
This is the corner pattern (3dc,ch2,3dc) you will use it in this project in each next row.
R2: ch3, 2dc in first st = this is beginning of each next row!
then ch1 and place the corner in ch2 sp = 3dc,ch2,3dc
then ch1 and place 3dc in last st (in 3rd ch from beg of previous row = this is end of each next row!
turn your work
R3: ch3,2dc in first st, ch1, 3dc in next ch1 sp, ch1, in ch2 sp place (3dc,ch2,3dc), ch1, 3dc in next ch1 sp, ch1, 3dc in last st,t
R4: ch3,2dc in first st, ch1, *3dc in next ch1 sp, ch1* rep from * to * till ch2 sp, in ch2 sp place (3dc,ch2,3dc), ch1 *3dc in next ch1 sp, ch1* rep from * to * till last st, 3dc in last st, t
R5 = R4: ch3,2dc in first st, ch1, *3dc in next ch1 sp, ch1* rep from * to * till ch2 sp, in ch2 sp place (3dc,ch2,3dc), ch1 *3dc in next ch1 sp, ch1* rep from * to * till last st, 3dc in last st, t
R6: ch3,2dc in first st, 1dc in each next st till 1 st left to ch2 sp, skip this st in front of ch2 sp, in ch2 sp place (3dc,ch2,3dc), sk 1 st, 1dc in each next st till last st, 3dc in last st, t
R7: colour B
ch3, 2dc in first st, ch1 *sk 3 st, 1tr in next st, ch1, 1tr in second skipped st, ch1 * rep from * to * till ch2 sp, in ch2 sp (3d,ch2,3dc), sk 4 st, * 1tr in next st, ch1, 1tr in second sk st, ch1* rep from * to * till last st, 3dc in last st, t
R8: colour C
ch3,2dc in first st, 1dc in each next st till 1 st left to ch2 sp, skip this st in front of ch2 sp, in ch2 sp place (3dc,ch2,3dc), sk 1 st, 1dc in each next st till last st, 3dc in last st, t
R9: colour D
ch3,2dc in first st, ch1, sk 1 st, * 1dc in next st, ch1, sk 1 st* rep from * to * till 1 st left to ch2 sp, skip this st in front of ch2 sp, in ch2 sp place (3dc,ch2,3dc), sk 1 st, * 1dc in next st, ch1, sk 1 st* rep from * to * till last st, 3dc in last st, t
R10 = R8: colour C
ch3,2dc in first st, 1dc in each next st till 1 st left to ch2 sp, skip this st in front of ch2 sp, in ch2 sp place (3dc,ch2,3dc), sk 1 st, 1dc in each next st till last st, 3dc in last st, t
R11 = R7: colour B
ch3, 2dc in first st, ch1 *sk 3 st, 1tr in next st, ch1, 1tr in second skipped st, ch1 * rep from * to * till ch2 sp, in ch2 sp (3d,ch2,3dc), sk 4 st, * 1tr in next st, ch1, 1tr in second sk st, ch1* rep from * to * till last st, 3dc in last st, t
R12 = 6: colour A
ch3,2dc in first st, 1dc in each next st till 1 st left to ch2 sp, skip this st in front of ch2 sp, in ch2 sp place (3dc,ch2,3dc), sk 1 st, 1dc in each next st till last st, 3dc in last st, t
R13: ch3,2dc in first st, ch1, sk 2 st *3dc in next st, ch1, sk 2 st* rep from * to * till ch2 sp, in ch2 sp place (3dc,ch2,3dc), ch1, sk 3 st *3dc in next st, ch1, sk 2 st* rep from * to * till last st, 3dc in last st, t
R14-R16 = R4
R4: ch3,2dc in first st, ch1, *3dc in next ch1 sp, ch1* rep from * to * till ch2 sp, in ch2 sp place (3dc,ch2,3dc), ch1 *3dc in next ch1 sp, ch1* rep from * to * till last st, 3dc in last st, t
R17 = R8: colour C
ch3,2dc in first st, 1dc in each next st till 1 st left to ch2 sp, skip this st in front of ch2 sp, in ch2 sp place (3dc,ch2,3dc), sk 1 st, 1dc in each next st till last st, 3dc in last st, t
Fasten off your work and hide all loose tails of colours B,C,D.
Don't cut yarn colour A.
THE COWL PART IS DONE:
MEASUREMENT:
short side (from end to the middle corner): 20.47 inch / 52 cm
long side: 24.8 inch / 63 cm
PART B = THE NECK WARMER / HOOD
Still use the 5mm crochet hook.
Colour A
Join your work.
Directions: fold cowl in half, grab both ends, bring them together, matching the end to the end and join by slip stitch to first st R17 and the last st R17.
R1: ch3, place 2dc in each ch3 sp or around dc, join by sl st in 3rd ch from beg
R2: ch3, 1dc in each st around, sl st in 3rd ch from beg
R3-R23 = R2
MEASUREMENT of NECK: 12.6 inch / 32 cm long,
R24: colour B = R2
ch3, 1dc in each st around, sl st in 3rd ch from beg
R25: colour C
ch2, 1hdc in next st, ch1, sk1, *1hdc in next 2 st, ch1, sk 1 st* rep from * to * till end, sl st in 2nd ch from beg
R26: colour C
ch1, 1sc in each st around, sl st in ch1
Fasten off your work and hide all loose tails of colours A, B,C.
PART C DRAWSTRING WITH TASSELS
colour D
Still use the 5mm crochet hook.
ch2, 1sc in first ch, turn your work towards yourself, place 1 sc in just have finished sc, repeat 1 sc in just finished sc till you have desired length of your drawstring. Cut the yarn, leave a longer tail to add a tassel to it.
Pull drawstring through the last row of neck, 2hdc under and 2hdc over.
DYI tassels:
colour D, use some card board about 5 inch long (I used my iphone :))
step1: Start wrapping the yarn around and around the board. Don't worry about the loose tail, just let it hang down, as it will be trimmed off at the end.When you've wrapped enough, trim off leaving a longer tail.
I did about 20 wraps - to have got a nice fat amount wrapped, it's time to tie it off.
Step2: Cut two lengths of yarn 20 inch long each. Wrap around yarns on the top and tie as tight as you can, going around the middle several times, and tying as tight as you can with several knots. Pull wraps out of the cardboard.
Step3: Begin cutting strands on the bottom side through the centre with sharp scissors. Hold onto the top of the strings, and shake out any loose yarn that wants to fall out.
Step4: Cut another strand of yarn 20 inch long. Holding the top string in one hand, smooth out the strands a bit, and grab tightly in the other hand. Tie this tightly around the top section of the tassel about 1 inch down from the top. Wrap and tie several times again, before knotting several times. You can just let the ends of this hang down and become part of the tassel, or thread them onto a yarn needle and hide them back in the centre.
Step5: Smooth all the ends down, trying to pull everything evenly. Wrap your hand around it tightly, and begin trimming small amounts off the uneven ends.
And when you're happy with the shape and the length, you're all done!
MEASUMENT: 40 inch / 102 cm
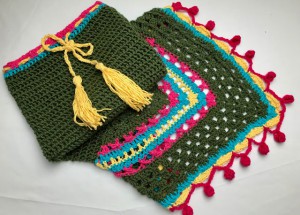
PART D = ENDING BORDER
R1= shelves ending
ch1, rep: sk 2 st, in next st place: 2dc,1hdc,1sc,1hdc,2dc, sk 2 st, sl st in next st, 1sc in next st till corner, 3sc in ch2 sp, rep: ep: sk 2 st, in next st place: 2dc,1hdc,1sc,1hdc,2dc, sk 2 st, sl st in next st, 1sc in next st till end of row
R2: pom-pom ending
Step 1: Ch7 (you can change this to more or less depending on how long chain you want to have
Step 2: 2 parts of pom-pom = 2 x 5 sc‘s cluster stitches
Step3: Ch7 (you can change this to more or less depending on how long chain you want to have, just use the same number as you used for step1)
Step4: 1sc in sc from previous row
Step5: Repeat all of the directions across the row
Step6: 1sc into the last st
THE FINAL SIZE MEASUREMENT:
NECK width: 11.81 inch / 30 cm
NECK length: 13.78 inch / 35 cm
COWL length (middle part): 14.96 inch / 38 cm
Want a printable copy of this pattern? Why not visit my Etsy shop and purchase the PDF with photo instructions. Not only does it mean you get your own copy of the pattern to print, you also support a small business and help me to keep making free patterns!
Have fun and let me know what you make. I would love to know how your project turns out.
Please don't forget to like and I really appreciate your comments.
If the pattern did not make sense to you, please don’t hesitate to contact me, I am happy to help :)
If you like this pattern, please follow and share my projects on social networks as a THANK YOU and to help me to create new projects and patterns for you.
Thank you very much once again for your visit and see you soon!


