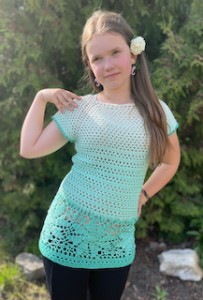
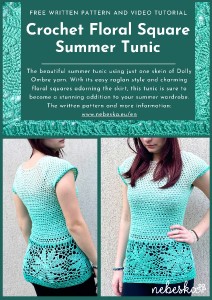
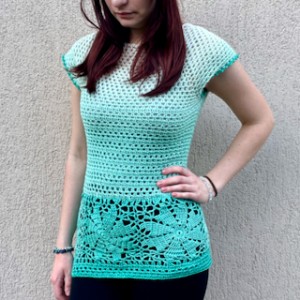
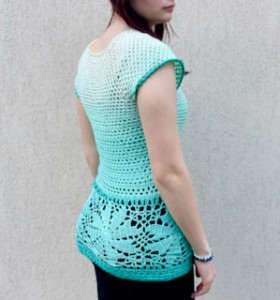
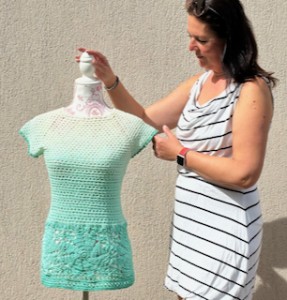
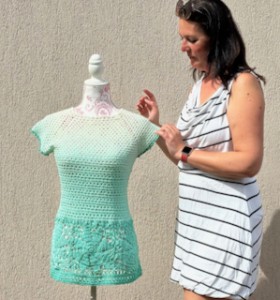
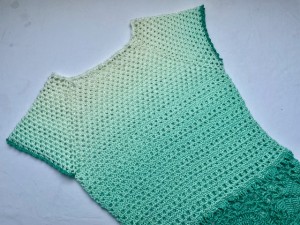
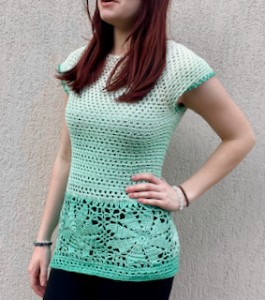
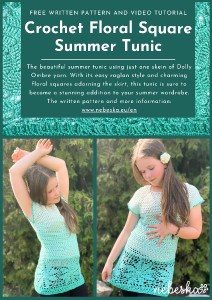
Crochet Summer Raglan style Tunic with Flower Squares
Hello, My Crochet Friends!
The first scorching days of summer have already graced us with their presence, arriving as early as April! So, I wasted no time in diving into summer dresses and tunics, and I've even prepared written and video instructions just for you.
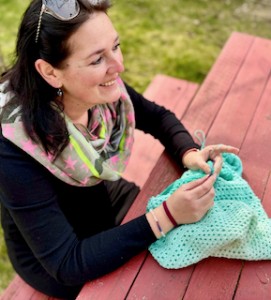
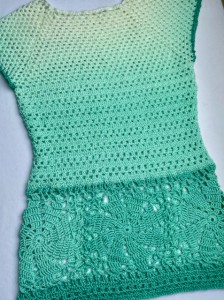
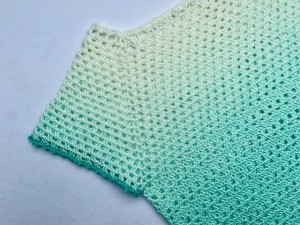
Since February, I've been eyeing the delightful Dolly Ombre yarn, pondering what marvelous creation I could crochet from it. With its gentle, gradient shifts from light to dark, I decided to craft a garment from top to bottom. I began by crocheting a raglan-style rectangle with a wonderfully simple and airy pattern.
This raglan style with its rectangular seat ingeniously incorporates the armholes, making the construction remarkably straightforward. Once you've mastered crocheting the saddle, whipping up the top of the dress becomes a breeze, requiring minimal math skills. And then, voilà, it practically works itself!
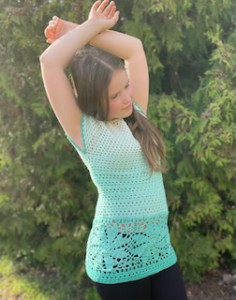
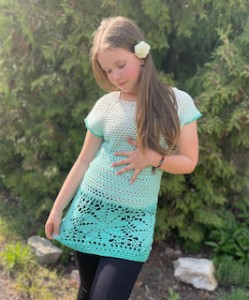
The dress boasts short sleeves, though you can easily adjust them to your preferred length, depending on your style.
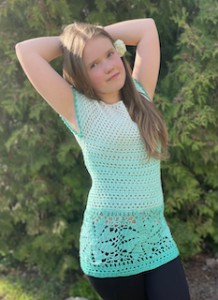
For the body of the dress, I opted for a simple "cube" pattern. As it descends into the skirt, you have the freedom to crochet it with a gentle flare or a more snug fit—flexibility is key! Within the instructions, we'll demonstrate how to decrease and increase stitches accordingly.
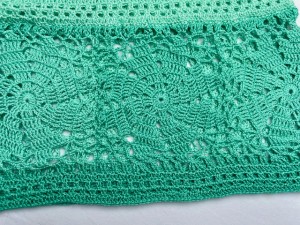
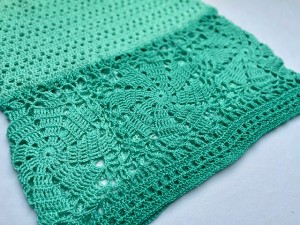
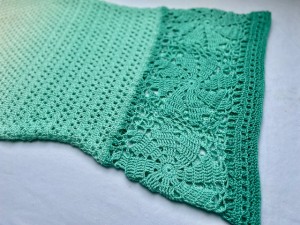
As for the lower portion of the tunic or skirt (depending on your desired length), I chose to incorporate my favorite squares. I envisioned these tunic squares to be quirky, colorful, and intriguing, allowing you to decide whether to feature darker squares at the front or the back.
This tunic boasts such a timeless style that it can be worn all year round—suitable for anyone, in any size. Plus, this raglan tunic is incredibly customizable, tailored precisely to your measurements as you crochet! Even beginners can take a stab at it! Isn't that simply marvelous?
In my video tutorial, I'll guide you through each step of the crochet journey, ensuring you have the tools to customize every aspect and create a fabulous raglan tunic that fits you like a dream.
Whether you prefer a relaxed, oversized look or a more figure-hugging silhouette, this video tutorial empowers you to fashion your perfect summer piece.
I fashioned this dress using Dolly Ombre yarn, which I fell head over heels for upon my first encounter. Its subtle color transitions ignited my excitement, especially as I worked with a chic green hue—I believe these colors injected a fresh twist and style into the finished product!
VIDEO TUTORIALS
You can find the step-by-step video tutorials below which will help you along if you prefer to watch video instruction rather than using a written pattern. Don’t forget to subscribe if you like me videos, it’s FREE!
PART ONE: YOKE
PART TWO: BODY of THE DRESS:
PART THREE: BASIC FLORAL SQUARE:
PART FOUR: JOINING PARTS TOGETHER:
PART FIVE: COMPLETION AND FINISHING:
![]()
If you pin my patterns to your Favorites and share it on social media as a link, I will be able to share a lot more free crochet patterns for you all.
Stay in touch at Facebook, Instagram and Pinterest.
Let's start or PIN this idea to your Pinterest boards for later.
![]()
More Crochet patterns?
For even more crochet patterns, check out my e-book.
CROCHET WITH LOVE AND NEBESKA
I prepared for you the e-book CROCHET WITH LOVE AND NEBESKA, it is a set of more than 60 projects with instructions and video instructions for the whole year 2023!
You can download the e-book as a pdf with links to allow you to better find the guide you need. Or maybe you missed one of the pattern instructions and now it will make you happy, or you are just looking for inspiration and one of my ideas will move you in your next creation!
This e-book is FREE and you can share it with your friends. Due to the size, it is necessary to download CROCHET WITH LOVE AND NEBESKA from the link (it cannot be sent as an e-mail attachment). Click on the ebook link or image and download the e-book CROCHET WITH LOVE AND NEBESKA 2023 for FREE.
https://forms.gle/CyJZqXs4fTWechtE6

All of the patterns on that list of beautifully designed, and suitable for both beginners and experienced crocheters. They are different levels of difficulties and techniques that you might have never seen before. Just click on them and you can find the free pattern, each of the patterns comes with a video tutorial.
CROCHET SUMMER RAGLAN TUNIC WITH FLOWER SQUARES PATTERN
This TUNIC is perfect for beginners, featuring a simple filet pattern of double crochets and chain stitches.
All you need is a basic understanding of crocheting, as everything is clearly explained in the step-by-step instructions below and demonstrated in detail in the accompanying video tutorial.
If you have any questions regarding the instructions, don't hesitate to reach out to me. I am here to help!
Have questions? Join the Facebook Group OR my Youtube Community!
I hope this article will be useful for you! If you have any additional questions, feel free to join my Facebook Group or Youtube Community. I created these groups for you to share pictures, ask questions, and help each other out.
CROCHET SUMMER RAGLAN TUNIC WITH FLOWER SQUARES
This CROCHET SUMMER RAGLAN TUNIC WITH FLOWER SQUARES is not only super fun to make but also fairly quick to crochet.
The top is crafted from the yoke, working from top to bottom in rows, allowing it to blossom swiftly. Now, the skirt might seem a tad intricate with its five squares adorned with floral motifs at the center. Yet fear not, for once you've mastered the first square, the rest simply fall into place as you joyfully repeat the instructions, stitching together four or more squares to create a delightful ensemble.
If you need to adjust the size, simply change the number of rows and stitches in each row. And make more or less squares for the skirt.
CROCHET SUMMER RAGLAN TUNIC WITH FLOWER SQUARES
MATERIALS
What will you need to crochet this CROCHET SUMMER RAGLAN TUNIC WITH FLOWER SQUARES?
The TUNIC is crocheted using yarn: DOLLY OMBRE.
This fine, shiny yarn gradually transitions from light to darker shades, making it perfect for blouses, tops, large scarves, and summer tunics. It's suitable for both crocheting and knitting.

Yarn Details:
DOLLY OMBRE
Available at: https://www.vlnika.cz/z24696-prize-dolly-ombre
250 g / 875 m
100% Microacrylic
You need 1 ball to make this beautiful tunic.
![]()
You'll also need:
Hook: 2.5 and 3.5 mm
Sewing needle
Markers for marking 4 raglan corners
Scissors
With these materials on hand, you'll be all set to start crocheting your stylish crop top!
Difficulty Level: Level 1 – Easy, for beginners
US crochet terms:
SlSt – slip stitch
CH/s – chain/s
SC - single crochet
DC - double crochet
SK - skip
T - turn
ST/s - stitch(es)
REP – repeat
CROCHET SUMMER RAGLAN TUNIC WITH FLOWER SQUARES
PATTERN NOTES
1)This Crocheted Raglan TUNIC is designed in women's size XS / S.
2)The TUNIC is crocheted in a simple raglan style from top to bottom, allowing you to try on the fit as you crochet and adjust the size accordingly.
3)The instructions use chain stitches and double crochets to create a simple fillet pattern on the yoke and the body of the tunic. If you're new to crocheting raglan tops, you'll find this pattern easy to follow.
4)While the tutorial demonstrates a body fit, you can easily achieve a classic style by crocheting a size up. Additionally, you can adjust the length of the tunic by crocheting more rows in the "body" section after joining the front and back pieces.
5) A Ch 3 at beg of the row counts as a stitch, start every row with ch3 on the yoke and the body. A ch4 at beg of the row counts as a stitch.
6)This tunic is crocheted in rows, expanding by one repetition in each of the 4 parts. Rows are joined with slip stitches after completing each row.
7) The skirt is crocheted from 5 squares crocheted together. For the larger size I recommend 6 squares, for the smaller size I recommend 4 squares!
8) If you want a longer skirt, repeat the last 3 rows of the pattern until the desired length.
How to crochet this summer tunic:
This top is worked seamlessly from the top down, in a raglan style.
I really love this type of construction, the size is super easy to adjust!
This summer tunic is crocheted from top to bottom in a raglan style with a rectangular yoke.
One of the great things about top-down crochet raglans is that you can try them on as you go and adjust the size to your liking. For instance, if you find the underarm area too tight after completing the yoke, simply add a few more closed yoke rows before dividing into the sleeves and body of the top.
Similarly, if you want to change the length of the top or sleeves, you can easily do so by subtracting or adding rows until you're satisfied. This type of raglan construction is perfect for beginners looking to try simple patterns.
CROCHET SUMMER RAGLAN TUNIC WITH FLOWER SQUARES - CONSTRUCTION
The top consists of the following parts:
YOKE – Begin with the foundation chain to create a neckline around the neck. Crochet in rows, gradually widening the neckline on the front parts into a clamshell.
Keep crocheting on the right side without turning the work. The yoke expandc at 4 corners, with each addition causing the back part and sleeves to expand by one repetition / pattern repeat.
BODY OF THE TUNIC – We will begin by dividing the yoke to create the armholes, then proceed to crochet down the rows without further expansion. The pattern we employ for the body is akin to that of the yoke, albeit slightly denser.
To adjust the length of the top's body or the sleeves, simply repeat the last rows until you reach your desired length.
The body of the dress tapers slightly at the waist before flaring out at the hips. It should be finalized with a series of double crochet stitches, with the total number divisible by 39. 39 stitches are required for 1 square. In my instructions, I utilize 5x39 columns, totaling 195 double crochets.
SKIRT – The skirt comprises 5 squares, each crocheted from the center starting with a magic circle. These squares are then worked into a circular shape before being attached to the body of the dress.
BORDERS – The border is crocheted around the squares in the lower part of the dress. It follows the same pattern as the body of the dress. You can adjust its length as needed or expand it if necessary.
Finally, the dress is finished with a hem featuring picots, which is crocheted around both sleeves.
CROCHET SUMMER RAGLAN TUNIC WITH FLOWER SQUARES
WRITTEN PATTERN
YOKE
Crochet hook 3.0 mm and 2.5 mm
Start with a crochet hook 3.0 mm
ch3 at beg of row = double crochet
work in rows, don’t turn your work
close the round with a slip stitch
Make a foundation chain. Divide the chain into 4 parts and 4 corners
Foundation Chain: 122 chains
Front part 34 (3x11 + 1) + Sleeve 25 (3x8 + 1) + Back part 34 (3x11 + 1) + Sleeve 25 (3x8 + 1) + 4 chains to make 4 corners
R1: ch1, 1sc in each chain, close round with a slip stitch in 1st chain (122 st)
We divide the chain into 4 parts by placing markers on the stitches: 35, 61, 96 and 122.
11 repetitions to make front panel
corner st
8 repetitions to make sleeve
corner st
11 repetitions to make back panel
corner st
8 repetitions to make sleeve
corner st
R2: ch3, *ch2, skip 2st, 1dcin next st* repeat from * to * (11x) till you reach the marker,
corner: ch1, (1dc, ch2, 1dc) in next st, ch1,
1dc in next st, *ch2, skip 2st, 1dc in next st* repeat from * to * (8x) till you reach the marker,
corner: ch1, (1dc, ch2, 1dc) in next st, ch1,
1dc, *ch2, skip 2st, 1dc in next st* repeat from * to * (11x) till you reach the marker,
corner: ch1, (1dc, ch2, 1dc) in next st, ch1,
1dc in next st, *ch2, skip 2st, 1dc in next st* repeat from * to * (8x) till you reach the marker
corner: ch1, (1dc, ch2, 1dc) in next st, ch1
close the round with a slip stitch in 3rd ch from beg of row
R3: sl st in next st, ch3, 1dc in ch2sp, ch1 *2dc in ch2sp, ch1* repeat from * to * (11x) till you reach the corner st,
corner: ch2, (1dc, ch2, 1dc) in corner ch2sp, ch2,
2dc in next ch2sp, *ch1, 2dc in next ch2sp* repeat from * to * (8x) till you reach the corner st,
corner: ch2, (1dc, ch2, 1dc) in corner ch2sp, ch2,
2dc in next ch2sp, *ch1, 2dc in next ch2sp* repeat from * to * (11x) till you reach the corner st,
corner: ch2, (1dc, ch2, 1dc) in corner ch2sp, ch2,
2dc in next ch2sp, *ch1, 2dc in next ch2sp* repeat from * to * (8x) till you reach the corner st,
corner: ch2, (1dc, ch2, 1dc) in corner ch2sp, ch2,
close the round with a slip stitch in 3rd ch from beg of row
R4: sl st in next st, ch3, 1dc in ch2sp, ch1, *2dc in next ch1sp, ch1* repeat from * to * (10x) till you reach the corner st, 2dc in next ch2sp,
corner: ch2, (1dc, ch2, 1dc) in corner ch2sp, ch2,
2dc in next ch2sp, ch1, *2dc in next ch1sp, ch1* repeat from * to * (7x) till you reach the corner st, 2dc in ch2sp,
corner: ch2, (1dc, ch2, 1dc) in corner ch2sp, ch2,
2dc in next ch2sp, ch1, *2dc in next ch1sp, ch1* repeat from * to * (10x) till you reach the corner st, 2dc in ch2sp,
corner: ch2, (1dc, ch2, 1dc) in corner ch2sp, ch2,
2dc in next ch2sp, ch1, *2dc in next ch1sp, ch1* repeat from * to * (7x) till you reach the corner st, 2dc in ch2sp,
corner: ch2, (1dc, ch2, 1dc) in corner ch2sp, ch2,
2dc in next ch2sp, ch1, close the round with a slip stitch in 3rd ch from beg of row
R5: sl st in next st, ch3, 1dc in ch1sp, ch1, *2dc in next ch1sp, ch1* repeat from * to * (10x) till you reach the corner st, 2dc in ch2sp,
corner: ch2, (1dc, ch2, 1dc) in corner ch2sp, ch2,
2dc in next ch2sp, ch1, *2dc in next ch1sp, ch1* repeat from * to * (8x) till you reach the corner st, 2dc in ch2sp,
corner: ch2, (1dc, ch2, 1dc) in corner ch2sp, ch2,
2dc in next ch2sp, ch1, *2dc in next ch1sp, ch1* repeat from * to * (11x) till you reach the corner st, 2dc in ch2sp,
corner: ch2, (1dc, ch2, 1dc) in corner ch2sp, ch2,
2dc in next ch2sp, ch1, *2dc in next ch1sp, ch1* repeat from * to * (8x) till you reach the corner st, 2dc in ch2sp,
corner: ch2, (1dc, ch2, 1dc) in corner ch2sp, ch2,
2dc in next ch2sp, ch1, *2dc in next ch1sp, ch1* close the round with a slip stitch in 3rd ch from beg of row
R6: sl st in next st, ch3, 1dc in ch1sp, ch1, *2dc in next ch1sp, ch1* repeat from * to * (10x) till you reach the corner st, 2dc in ch2sp,
corner: ch2, (1dc, ch2, 1dc) in corner ch2sp, ch2,
2dc in next ch2sp, ch1, *2dc in next ch1sp, ch1* repeat from * to * (9x) till you reach the corner st, 2dc in ch2sp,
corner: ch2, (1dc, ch2, 1dc) in corner ch2sp, ch2,
2dc in next ch2sp, ch1, *2dc in next ch1sp, ch1* repeat from * to * (12x) till you reach the corner st, 2dc in ch2sp,
corner: ch2, (1dc, ch2, 1dc) in corner ch2sp, ch2,
2dc in next ch2sp, ch1, *2dc in next ch1sp, ch1* repeat from * to * (9x) till you reach the corner st, 2dc in ch2sp,
corner: ch2, (1dc, ch2, 1dc) in corner ch2sp, ch2,
2dc in next ch2sp, ch1, *2dc in next ch1sp, ch1*, repeat from * to * till you reach beg of row, close the round with a slip stitch in 3rd ch from beg of row
R7 - R20: Repeat row R6
R21: ch3, work 1dc in each stitch and in each chain space till you reach the corner st, 1dc in corner dc st.
Join front and back part together: insert your hook in corner ch2sp on the front panel and also in ch2sp on the back panel, in both ch2spaces make only 1dc.
Turn your work. Work on the back panel and make 1dc in corner dc, then work 1dc in each stitch and in each chain space till you reach next corner. Work 1dc in corner dc.
Join front and back part together: insert your hook in corner ch2sp on the front panel and also in ch2sp on the back panel, in both ch2spaces make only 1dc.
Turn your work. Work on the front panel and make 1dc in corner dc, then work 1dc in each stitch and in each chain space till you reach beg of row.
Close the round with a slip stitch in 3rd ch from beg of row.

Measurement:
Width of the front and back panel: 40 cm (circumference 80 cm)
Width of sleeve: 16 cm (circumference 32 cm)
Armhole: 21 cm
Neckline circumference: 60 cm (6 + 18 + 6 + 6 + 18 + 6)
THE BODY OF THE TUNIC
R1: sl st in next 2st to reach the position of ch1sp, which is one row below
ch3, 1dc in same st, ch1, skip 2st, *2dc in next st, ch1, skip 2st* repeat from * to * till you reach beg of row, close the round with a slip stitch in 3rd ch from beg of row.
R2: sl st in next 2st to start in ch2sp
ch3, 1dc in chsp, ch1, skip 2st, *2dc in next chsp, ch1, skip 2st* repeat from * to * till you reach beg of row, close the round with a slip stitch in 3rd ch from beg of row.
R3: ch3, 1dc in next st, 1dc in chsp, work till end of row: 1dc in each st and in each chsp. Close the round with a slip stitch in 3rd ch from beg of row.
R4: sl st in next 2st to reach the position of ch1sp, which is one row below
ch3, 1dc in same st, ch1, skip 2st, *2dc in next st, ch1, skip 2st* repeat from * to * till you reach beg of row, close the round with a slip stitch in 3rd ch from beg of row.
R5: sl st in next 2st to start in ch2sp
ch3, 1dc in chsp, ch1, skip 2st, *2dc in next chsp, ch1, skip 2st* repeat from * to * till you reach beg of row, close the round with a slip stitch in 3rd ch from beg of row.
R6: ch3, 1dc in next st, 1dc in chsp, work 1dc in each st and in each chsp till you reach the side of the body of the tunic (the side between front and back panel) and let’s DECREASE.
1 ds in next chsp, dc2tog, 1dc in next chsp, dc2tog, 1dc in next chsp, dc2tog, 1dc in next chsp,
Then work 1dc in each st and in each chsp till you reach the oposite side of the body of the tunic (the side between front and back panel) and let’s DECREASE 3 times again.
1 ds in next chsp, dc2tog, 1dc in next chsp, dc2tog, 1dc in next chsp, dc2tog, 1dc in next chsp,
We decreased 3times on each side, 6 times in total. We have now 6 stitches less
If you decrease faster, make sure that the number of sl is always divisible by 3.
R7 - R22 repeat rows R4 - R6
Finish the body of the tunic with R22 and 168 stitches.
INCREASE
We need to increase by 27 stitches to have 195 stitches.
Let’s increase in every 6th stich except the last stitch in row R23.
We will make 5 squares on the skirt part of the tunic and each square has 39 stitches. This is the reason we need (5x39st) 195 stitches once we finish row R23.
R23: ch3, 1dc in next st, 1dc in chsp, 1dc in next 2st, 2dc in next chsp, *1dc in next 2st, 1dc in chsp, 1dc in next 2st, 2dc in next chsp* repeat from * to * till you reach beg of row, close the round with a slip stitch in 3rd ch from beg of row.
Close the round with a slip stitch in 3rd ch from beg of row.
SQUARE
Crochet hook 2.5 mm
Start with a magic ring
R1: ch3, 15 dc in magic ring, close the round with a slip stitch in 3rd ch from beg of row. (16 dc)
R2: ch4 (tr), tr in next st, *((tr, ch2, tr) in next st, tr in next st )* repeat from * to * till you reach beg of row, tr in 1st st, ch2, close the round with a slip stitch in 4th ch from beg of row.
R3: ch4 (tr), tr in next 2st, tr in násl 2 řo, ch3, *(tr in next 3st, tr in násl 2 řo, ch3)* repeat from * to * till you reach beg of row, close the round with a slip stitch in 4th ch from beg of row.
R4: ch4 (tr), tr in next 4st, 2tr in next chsp, ch4, repeat (tr in next 5st, 2tr in next chsp, ch5), close the round with a slip stitch in 4th ch from beg of row.
R5: ch4 (tr), tr in next 6st, 2tr in next chsp, ch5, repeat (tr in next 7st, 2tr in next chsp, ch5), close the round with a slip stitch in 4th ch from beg of row.
R6: ch4 (tr), tr in next 4st, ch5, 1sc in 1st ch of next chps, ch5, tr in next 5st, ch5,
corner: tr in 1st ch of next chps, ch3, (tr, ch5, tr) in 2nd ch of next chps, ch3, tr in 3rd ch in same chsp, ch5,
Repeat 3 times around:
tr in next 5st, ch5, 1sc in 1st ch of next chsp, ch5, tr in next 5st, ch5,
corner: tr in 1st ch of next chsp, ch3, (tr, ch5, tr) in 2nd ch of next chps, ch3, tr in 3rd ch in same chsp, ch5,
close the round with a slip stitch in 4th ch from beg of row.
R7: ch4 (tr), tr in next 2st, ch5, 1sc in 3rd ch of next chsp, ch5, 1sc in 3rd ch of next chsp, ch5, tr in next 3st, ch5,
corner: 1sc in 4th ch of next chsp, ch5, skip ch3sp, tr in 2nd ch of next chsp, ch3, (tr, ch9, tr) in 3rd ch of same chsp, ch3, tr in 4th ch of same chsp, skip ch3sp, ch5, 1sc in 2nd ch of next chsp, ch5,
Repeat 3 times around:
tr in next 3st, ch5, 1sc in 3rd ch of next chsp, ch5, 1sc in 3rd ch of next chsp, ch5, tr in next 3st, ch5,
corner: 1sc in 4th ch of next chsp, ch5, skip ch3sp, tr in 2nd ch of next chsp, ch3, (tr, ch9, tr) in 3rd ch of same chsp, ch3, tr in 4th ch of same chsp, skip ch3sp, ch5, 1sc in 2nd ch of next chsp, ch5,
close the round with a slip stitch in 4th ch from beg of row.
LET’S JOIN SQUARES TOGETHER
Work with the same yarn.
Crochet hook 2.5 mm
To join, use slip stitch crochets by inserting the hook into the same place as the chain on the already crocheted square (A), rather than make the middle chain st of the chain.
Assuming you've already completed one SQUARE (A) and are now working on SQUARE (B):
Crochet SQUARE B up to row 6, then continue straight, joining it with square A as you crochet row 7:
R7: ch4 (tr), tr in next 2st, ch5, 1sc in 3rd ch of next chsp, ch5, 1sc in 3rd ch of next chsp, ch5, tr in next 3st, ch5,
corner: 1sc in 4th ch of next chsp, ch5, skip ch3sp, tr in 2nd ch of next chsp, ch3, (tr, ch9, tr) in 3rd ch of same chsp, ch3, tr in 4th ch of same chsp, skip ch3sp, ch5, 1sc in 2nd ch of next chsp, ch5,
tr in next 3st, ch5, 1sc in 3rd ch of next chsp, ch5, 1sc in 3rd ch of next chsp, ch5, tr in next 3st, ch5,
Corner: 1sc in 4th ch of next chsp, skip ch3sp, ch5, tr in 2nd ch of next chsp, ch3, tr in 3rd ch of same chsp,
Join squares from corner to corner stitches:
ch4 and instead of the 5th chain, we crochet a JOIN: 1sl st in 5th ch on square A, and finish with ch4, tr in same 3rd ch in same chsp, ch1 and instead of the 2nd chain, we crochet a JOIN: 1sl st in 2nd ch on square A, finish with ch1, tr in 4th ch of same chsp, ch2 and instead of 3rd ch we crochet a JOIN: 1sl st in 3rd ch on square A, finish with ch2, 1sc in 2nd ch of next chsp, skip ch3sp, ch2 and instead of 3rd ch we crochet a JOIN: 1sl st in 3rd ch on square A, finish with ch2,
tr in next 3st, ch2 and instead of 3rd ch we crochet a JOIN: 1sl st in 3rd ch on square A, finish with ch2, 1sc in 3rd ch of next chsp, ch2 and instead of 3rd ch we crochet a JOIN: 1sl st in 3rd ch on square A, finish with ch2, 1sc in 3rd ch of next chsp, ch2 and instead of 3rd ch we crochet a JOIN: 1sl st in 3rd ch on square A, finish with ch2,
tr in next 3st, ch2 and instead of 3rd ch we crochet a JOIN: 1sl st in 3rd ch on square A, finish with ch2, 1sc in 2nd ch, ch2 and instead of 3rd ch we crochet a JOIN: 1sl st in 3rd ch on square A, finish with ch2, tr in 2nd ch, ch1 and instead of the 2nd chain, we crochet a JOIN: 1sl st in 2nd ch on square A, finish with ch1, tr in same 3rd ch of same chsp, ch4 and instead of 5th ch we crochet a JOIN: 1sl st in 5th ch on square A, finish ch4, tr in 4th ch of same chsp, skip ch3sp, ch5, 1sc in 2nd ch of next chsp, ch5,
Repeat 2 times around:
tr in next 3st, ch5, 1sc in 3rd ch of next chsp, ch5, 1sc in 3rd ch of next chsp, ch5, tr in next 3st, ch5,
corner: 1sc in 4th ch of next chsp, ch5, skip ch3sp, tr in 2nd ch of next chsp, ch3, (tr, ch9, tr) in 3rd ch of same chsp, ch3, tr in 4th ch of same chsp, skip ch3sp, ch5, 1sc in 2nd ch of next chsp, ch5,
close the round with a slip stitch in 4th ch from beg of row.
WE JOIN A TOTAL OF 5 SQUARES TOGETHER, WE HAVE CREATED A CIRCLE WHICH WE WILL JOIN THEN WITH THE BOTTOM PART OF THE BODY OF THE TUNIC.
Attach the strip of squares to the body of the tunic, ensuring that the squares are aligned. If you have 5 squares like mine, position the center of the middle SQUARE with the center of the front part of the tunic—meaning, align the center of the square with the center of the front part. I suggest securing the squares to the corner stitches using markers."
JOIN SQUARES TO THE BODY OF THE TUNIC
Re-join a new yarn
Work on the wrong side!
Crochet hook 2.5 mm
We will join with slip stitches into double crochet stitches in the last row of the body of the tunic R23.
We start crocheting from the corner of the square.
We have ch9 in the corner.
Insert your crochet hook in 6th ch from beg of ch9sp and work ch4 (tr), join with sl st in 1st dc in R3, tr in 6th ch same chsp, sl st in 2nd dc in R23, 1sl st in 3.dc in R23, tr in 2nd ch of next chsp, sl st in 4th dc in R23, tr in same ch2 same chsp, sl st in 5th dc in R23, sl st in 6th dc in R23, tr in 3rd ch of next chsp, sl st in 7th dc in R23, tr in same 3rd ch of same chsp, sl st in 8th dc in R23, sl st in 9th dc in R23, tr in 3rd ch of next chsp, sl st in 10th dc in R23, tr in same 3rd ch of same chsp, 1sl st in 11th dc in R23, 1sl st in 12th dc in R23, tr in 4th ch of same chsp, sl st in 13th dc in R23, tr in same 4th ch of same chsp, sl st in 14th dc in R23, sl st in 15th dc in R23, tr in 3rd ch of next chsp, sl st in 16th dc in R23, tr in same 3rd ch of same chsp, sl st in 17th dc in R23, sl st in 18th dc in R23, tr in 3rd ch of next chsp, sl st in 19th dc in R23, tr in same 3rd ch of same chsp, sl st in 20th dc in R23, sl st in 21st dc in R23, tr in 3rd ch of next chsp, sl st in 22nd dc in R23, tr in same 3rd ch of same chsp, sl st in 23rd dc in R23, sl st in 24th dc in R23, tr in 2nd ch of next chsp, sl st in 25th dc in R23, tr in same 2nd ch of same chsp, sl st in 26th dc in R23, sl st in 27th dc in R23, tr in 3rd ch of next chsp, sl st in 28th dc in R23, tr in same 3rd ch of same chsp, sl st in 29th dc in R23, sl st in 30th dc in R23, tr in 3rd ch of next chsp, sl st in 31st dc in R23, tr in same 3rd ch of same chsp, sl st in 32nd dc in R23, sl st in 33rd dc in R23, tr in 2nd ch of next chsp, sl st in 34th dc in R23, tr in same 2nd ch of same chsp, sl st in 35th dc in R23, sl st in 36th dc in R23, tr in 4th ch of next chsp, sl st in 37th dc in R23, tr in same 4th ch of same chsp, sl st in 38th dc in R23, sl st in 39th dc in R23.
Repeat the instructions and join the square with the following 39 stitches on the body of the tunic in row R23.
Join all 5 squares like this. Close the row with a slip stitch. Cut the yarn and fasten off.
BOTTOM EDGE OF THE TUNIC
Re-join a new yarn
Crochet hook 2.5 mm
Work in last row of already joined squares.
Start crocheting from the corner stitch of the square.
We have ch9 space in the corner.
Insert crochet hook in 6th ch from beg of ch9sp and work ch4 (tr), tr in in 6th ch same chsp, ch1, 2tr in 2nd ch of next chsp, ch1, 2tr in 3rd ch of next chsp, ch1, 2tr in 3rd ch of next chsp, ch1, 2tr in 4th ch of same chsp, ch1, 2tr in 3rd ch of next chsp, ch1, 2tr in 3rd ch of next chsp, ch1, 2tr in 3rd ch of next chsp, ch1, 2tr in 2nd ch of next chsp, ch1, 2tr in 3rd ch of next chsp, ch1, 2tr in 3rd ch of next chsp, ch1, 2tr in 2nd ch of next chsp, ch1, 2tr in 4th ch of next chsp, ch1
Repeat the instruction and crochet the bottom edge around the other 4 squares.
Crochet 39 double crochets around each square (always repeat 2tr and ch).
Close the round with a sl st in 4th ch from beg of row.
In total, we crocheted 195 stitches around.
Continue to crochet the next rows with a 3.5 mm hook as follows:
R2: ch3 (dc), 1dc in each dc and in in each chsp.
Close the round with a sl st in the 3rd ch from the beginning of the row.
In total, we crocheted 195 stitches around.
R3: sl st in next 2st to reach the position of ch1sp, which is one row below
ch3, 1dc in same st, ch1, skip 2st, *2dc in next st, ch1, skip 2st* repeat from * to * till you reach beg of row, close the round with a slip stitch in 3rd ch from beg of row.
R4: sl st in next 2st to start in ch2sp
ch3, 1dc in chsp, ch1, skip 2st, *2dc in next chsp, ch1, skip 2st* repeat from * to * till you reach beg of row, close the round with a slip stitch in 3rd ch from beg of row.
R5: ch3, 1dc in next st, 1dc in chsp, repeat till end of row: 1dc in each st and in each chsp. Close the round with a slip stitch in 3rd ch from beg of row (195 sl)
Cut the yarn and fasten off.
PICOTS BORDER AROUND THE SLEEVES
Re-join a new yarn.
Crochet hook 3.5 mm
R1: Crochet a row with single crochet stitches around. Start from the seam, crochet 1 sc in each ch and 1 sc in each sl around. Close the round with a slip stitch in 1st ch from beg of row.
R2: sl st in next 2st to reach the position of ch1sp, which is one row below
ch3, sl st in same sc, where we start the chain, 1sl st in next 3st, * ch3, sl st in same sc, 1sl st in next 3st * repeat from * to * till you reach beg of row. Close the round with a slip stitch in 1st ch from beg of row.
Cut the yarn and fasten off.
Repeat the instruction and crochet the PICOT border on the opposite side as well.
HURRAH! THE FABULOUS CROCHET SUMMER RAGLAN TUNIC WITH FLOWER SQUARES IS FINISHED! ENJOY THIS TUNIC NOT ONLY ON SUMMER DAYS BUT ANYTIME OF THE YEAR!
What’s Next?
Pin this post: Save this tutorial to your Pinterest boards so that you can come back to it later.
Leave a comment: I love to hear your feedback. Tell me in the comments below!
Share on Instagram and Facebook: When you make this project, share it on social media and tag me @sonanebeska. I love to see what you make!
MORE PATTERNS?
Do you crochet HATS? You may would like to try these popular video tutorials:
You know me, I love making PONCHOS, VESTS and CARDIGANS.
If you do as well, you may would love to try these patterns as well:
Explore More Crochet Patterns
If you love to crochet as much as I do, I think you’ll love these other free crochet DRESSES and TUNICS patterns ❤️
♥♥♥
Have fun and let me know what you make. I would love to know how your project turns out.
Please don't forget to like and I really appreciate your comments.
If the pattern did not make sense to you, please don’t hesitate to contact me, I am happy to help :)
If you like this pattern, please follow and share my projects on social networks as a THANK YOU and to help me to create new projects and patterns for you.
Thank you very much once again for your visit and see you soon!
♥♥♥


