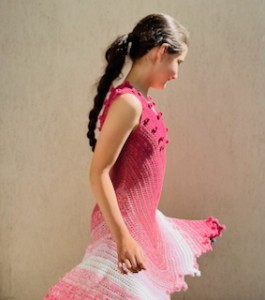
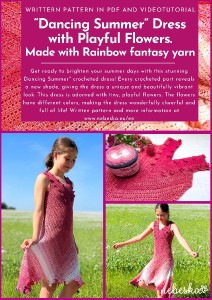
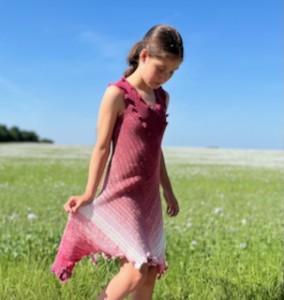
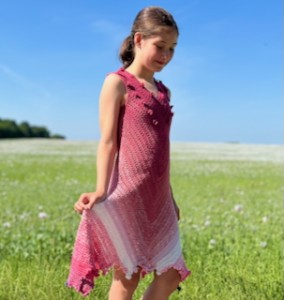
Dancing Summer Dress with Playful Flowers. Perfect for dancing, joy, and every sunny day
Hey everyone! Welcome to my Blog! Your support is what directly allows me to keep creating more free video tutorials and patterns for our amazing crochet community!
Want to contribute? Here are three ways you can show your support:
-
Tip me: https://paypal.me/nebeskacrochetlove
-
Buy patterns: https://payhip.com/NebeskaCrochetwithLove
-
Become a Patron and unlock even more content: https://herohero.co/crochetwithlove
Thanks a million, my crochet friends! Wishing you joy and color through yarn.
I truly believe in the magic of creativity.
----
A beautiful day to all my dear talented friends!
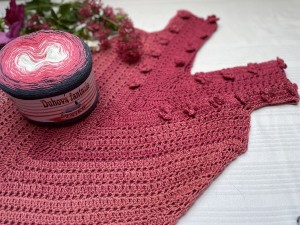
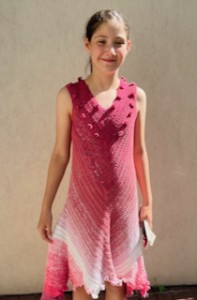
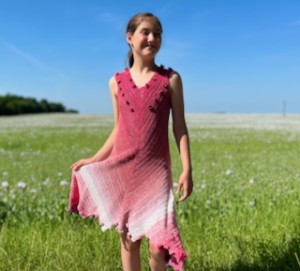
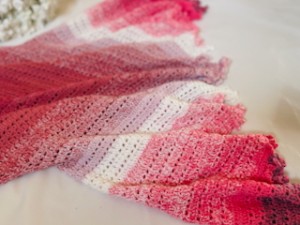
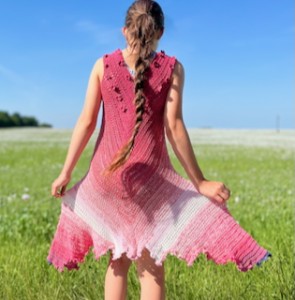
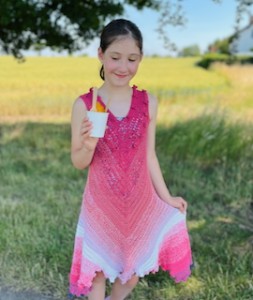
Get ready to brighten your summer days with this stunning "Rainbow Fantasy" crocheted dress! Its magic lies in the seamless color transitions. Every crocheted part reveals a new shade, giving the dress a unique and beautifully vibrant look.
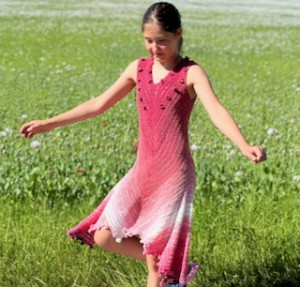
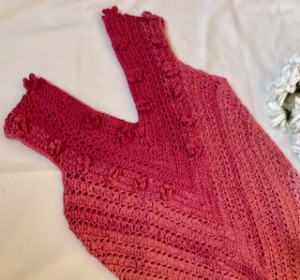
This dress is adorned with tiny, playful flowers – you'll find them subtly placed around the neckline on the yoke and along the entire bottom part of the skirt. And the best part? The flowers have different colors, making the dress wonderfully cheerful and full of life!
With its cotton and acrylic blend, the dress is light, airy, and perfectly breathable, ideal for hot summer days. Although primarily designed for a girl's size 130 cm, the pattern is versatile and easily adaptable for smaller children's or even women's sizes. Dive into crocheting and let the summer mood and the magic of changing colors carry you away!
Video tutorials on HeroHero: https://herohero.co/crochetwithlove
Crocheting this dress with flowers is suitable for confident beginners. The construction and fit allow you to easily adjust the size and length.
Are you ready to crochet your unique summer piece for your wardrobe?
Download the pattern HERE today and start creating!
"RAINBOW FANTASY" DRESS WITH PLAYFUL FLOWERS
Perfect for dancing, joy, and every sunny day
DRESS CONSTRUCTION OVERVIEW AND PATERN NOTES
-
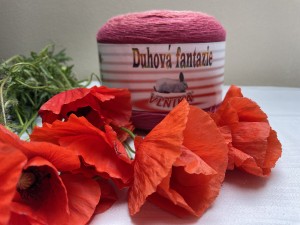
Seamless Color Transitions: The pattern is designed to beautifully showcase the changing colors of "Duhová fantazie" yarn, highlighting their unique flow.
-
Playful Floral Details: Includes instructions for crocheting cheerful little flowers, strategically placed on the yoke and along the entire bottom of the skirt, adding a whimsical and colorful touch to the dress.
-
Lightweight & Airy Design: Perfect for summer wear due to the breathable cotton and acrylic blend.
-
Customizable Sizing: Easily adjustable to achieve the perfect length and width, from smaller children's to women's sizes.
-
Skill Development Project: Ideal for confident beginners and intermediate crocheters to master techniques such as increasing, decreasing, and crocheting stitches together.
Yarn: Duhová fantazie (4-ply, cotton and acrylic blend)
Skill Level: Confident Beginner to Intermediate
Finished Size: Girl's size 130 cm. Customizable to any size (children's or women's).
Skill Level: Confident Beginner to Intermediate
Pattern Includes:
- Written pattern
- Detailed row-by-row instructions
- Stitch and technique descriptions for both patterns
- Helpful photographs to guide you through every step
The crocheting project has four parts.
-
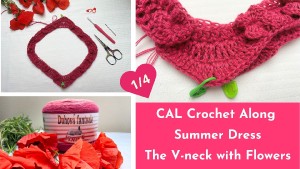
In the first part, you'll get familiar with the basic stitch pattern and learn to crochet the flowers. We'll start crocheting the V-neck yoke, showing you how to adjust the size and increase stitches for a perfect fit.
-
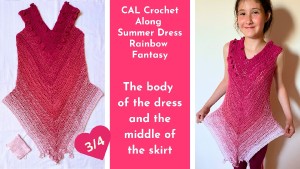
In the second part, we'll crochet the dress yoke, create the armholes, and begin crocheting the body of the dress. We'll explain how to regularly increase or decrease stitches so the dress body fits either snugly or loosely. We'll simply explore how to achieve the best fit.

-
In the third part, we'll learn to crochet the skirt, focusing on the stitch pattern for the individual skirt panels. We'll show you how to arrange the flowers around the bottom part and how to widen the skirt using panels to achieve the perfect shape.
-
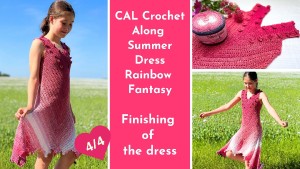
In the final part, we'll show you how to complete the entire dress, how to embellish it with a border, and how to harmonize the colors. Once we weave in the last thread, we'll simply admire our masterpiece! I believe the "Dancing Summer" dress will bring you much joy.
And once again, we'll have a WhatsApp group where we share photos, advise each other, support each other, and simply have fun! We're a super team! Will you join us?
The Video tutorials and also the written pattern is on HeroHero:
https://herohero.co/crochetwithlove
A huge thanks to everyone who want to support my blog and download PDF paid pattern. Thank you very much, I really appreciate it and it helps me create more new video tutorials and patterns for you. Love you!
![]()
If you pin my patterns to your Favorites and share it on social media as a link, I will be able to share a lot more free crochet patterns for you all.
Stay in touch at Facebook, Instagram and Pinterest.
Let's start or PIN this idea to your Pinterest boards for later.
![]()
US crochet terms:
SlSt – slip stitch
CH/s – chain/s
SC - single crochet
DC - double crochet
SK - skip
T - turn
ST/s - stitch(es)
REP - repeat
YO – yarn over
"RAINBOW FANTASY" DRESS WITH PLAYFUL FLOWERS
Perfect for dancing, joy, and every sunny day
DRESS CONSTRUCTION OVERVIEW AND PATERN NOTES
- This crocheted dress is constructed top-down, starting with a V-neck yoke that seamlessly expands into the dress body and then into a flowing skirt. The design incorporates elements for size and texture adjustments, such as floral details.
- SIZE: This pattern is designed for a girl's size 130 cm. However, it can be easily adjusted for a smaller child's size or a larger adult size. You can also make the dress wider by repeating the increase rows more times or by adding more stitches per row, or conversely, make it narrower by decreasing stitches.
- V-Neck Yoke: The dress begins with a crocheted V-neck yoke, forming the upper part of the dress (neckline and shoulders). This yoke is crocheted in closed rounds. During the yoke's creation, increases are strategically placed to achieve the desired shape and size for the shoulders and upper chest.
- Dividing for Sleeves and Body: After the yoke is completed, the work is divided. A section of stitches is left unworked for the armholes, while the remaining stitches form the base for the dress body. This transitions the piece from a circular yoke to a tubular body shape.
- Dress Body: The dress body is also crocheted in closed rounds, flowing smoothly from the yoke. This section typically continues without significant increases to maintain a straight silhouette until the point where the skirt begins.
- Transition to Skirt and Increases: At a specific point (here, after R8 of the yoke/skirt base, meaning the overall dress yoke), significant increases begin to form the skirt. These increases are symmetrical at the front and back to give the skirt volume.
- Circular Skirt Base: The initial rows of the skirt (R1-R8 of the skirt section) are crocheted in closed rounds to create a stable and expanding foundation. Here, 12 stitches are added in each round, indicating a smooth and even increase.
- Dividing the Skirt into Side Panels: After achieving the desired length and width for the skirt's "yoke" (after R8 with 416 stitches), the work is divided. At this stage, the skirt is worked in individual side panels, crocheted back and forth in rows.
- Crocheting Side Panels with Decreases: Each side panel is worked separately in rows, back and forth. A key element here is the tapering achieved by skipping 18 stitches at the beginning and 18 stitches at the end of each new side panel. This gradually narrows the panels downwards, creating a cascading or shaped effect.
- Alternating Stitch Types: Within the side panels, rows of double crochet (dc) and half double crochet (hdc) are alternated, contributing to the fabric's texture and structure.
- Floral Details: Floral details are integrated into the skirt's structure, specifically in the preparation rows (Skirt R7) and then crocheted into (Skirt R8). These details add a decorative element to the dress and are strategically placed.
- Gradual Reduction of Side Panels: Each subsequent side panel (Side 2, 3, 4, 5) is smaller than the previous one due to the mentioned tapering at the beginning and end, creating a progressive narrowing of the skirt and a distinct silhouette.
- Crocheting in Closed Rounds: Used for the yoke and the initial part of the skirt. Each round is joined at the end with a slip stitch (sl st) to the first stitch of the round.
- Crocheting in Rows (Back and Forth): Used for the skirt's side panels. The work is turned after completing each row, and crocheting continues in the opposite direction.
- Increases: Performed by crocheting multiple stitches into one stitch or space. Here, specifically 2dc into next st, (1dc and 1 tr) into next st, etc. Increases are used to add volume and width, such as in the yoke and at the beginning of the skirt.
- Using Markers: It's crucial to use stitch markers to mark the center front and back, as well as to indicate the start and end points of the tapered sections of the side panels. This helps maintain symmetry and the correct stitch count.
- Regular Stitch Count Checks: After completing each row, verify your stitch count to ensure it matches the pattern. Errors in stitch count are difficult to correct in later rows.
- Gauge Swatch: Before starting the entire project, it's always a good idea to crochet a small gauge swatch with your chosen yarn and hook to check your tension and ensure the sizing matches the pattern.
- Read Ahead: Read the entire pattern through before you begin crocheting to get a complete understanding of the overall construction and sequence of steps.
How to Decrease / Crochet Stitches Together
- Basic Principle: Decreasing means joining two or more stitches from the previous row into a single stitch in the current row.
- Example: Half Double Crochet 2 Together (hdc2tog):Instructions:
- Yarn over.
- Insert hook into the first stitch, yarn over and pull up a loop (3 loops on hook).
- Yarn over.
- Insert hook into the next stitch, yarn over and pull up a loop (5 loops on hook).
- Yarn over and pull through all 5 loops on hook. Result: Two half double crochet stitches from the previous row are now joined into one.
How to Increase / Add Stitches
- Basic Principle: Increasing means adding new stitches to a row to make the work wider.
- Example from Pattern:
- 2dc into next st: Crochet two double crochet stitches into one stitch.
- 2 dtr into next 2 sts: Crochet two double treble crochet stitches into one stitch, and another two double treble crochet stitches into the next stitch.
- Flower: A crocheted detail; instructions are described separately in the pattern.
Crocheting in Closed Rounds: Used for the yoke and the initial part of the skirt. This ensures a seamless construction. Each round is joined at the end with a slip stitch (sl st) to the first stitch of the round.
Crocheting in Rows (Back and Forth): Used for the upper body of the dress and for the skirt's side panels. The work is turned after completing each row, and crocheting continues in the opposite direction.
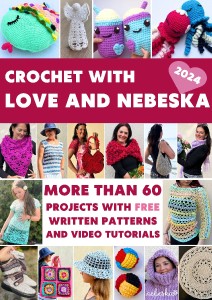
For even more crochet patterns, check out my e-book.
More pattern? CROCHET WITH LOVE AND NEBESKA
I'm thrilled to present my 2024 e-book, CROCHET WITH LOVE AND NEBESKA!
Inside, you'll discover over 60 projects with patterns and video tutorials to inspire you all year long.
You can download the e-book as a PDF, complete with clickable links to easily find the patterns you're looking for. Perhaps you missed a pattern and are now happy to find it here.
Or maybe you're just looking for inspiration for your next project – I hope my ideas spark your creativity! The e-book is FREE and you can share it with your friends.
Have questions? Join the Facebook Group OR my Youtube Community!
I hope this article will be useful for you! If you have any additional questions, feel free to join my Facebook Group or Youtube Community. I created these groups for you to share pictures, ask questions, and help each other out.
What’s Next?
Pin this post: Save this tutorial to your Pinterest boards so that you can come back to it later.
Leave a comment: I love to hear your feedback. Tell me in the comments below!
Share on Instagram and Facebook: When you make this project, share it on social media and tag me @sonanebeska. I love to see what you make!
Explore More Crochet Patterns
MOST POPULAR VIDEO TUTORIALS
All of the patterns on that list are beautifully designed, and suitable for both beginners and experienced crocheters. They are different levels of difficulties and techniques that you might have never seen before. Just click on them and you can find the free pattern, each of the patterns comes with a video tutorial.
Have fun and let me know what you make. I would love to know how your project turns out.
Please don't forget to like and I really appreciate your comments.
If the pattern did not make sense to you, please don’t hesitate to contact me, I am happy to help :)
If you like this pattern, please follow and share my projects on social networks as a THANK YOU and to help me to create new projects and patterns for you.
If you pin my patterns to your Favorites and share it on social media as a link, I will be able to share a lot more free crochet patterns for you all.
Stay in touch at Facebook, Instagram and Pinterest.
Thank you very much once again for your visit and see you soon!
♥♥♥


