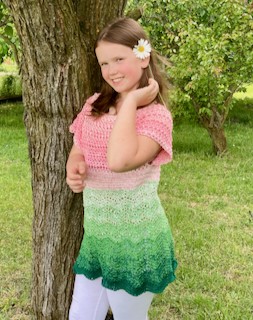
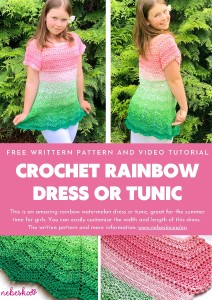
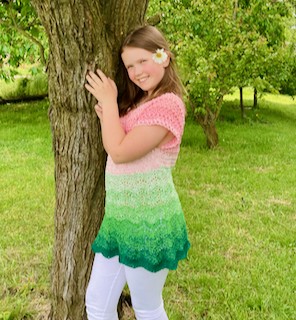
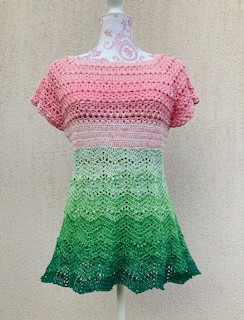
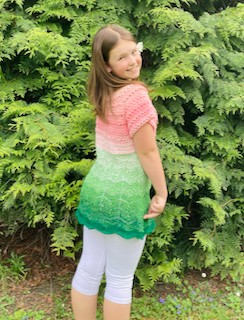
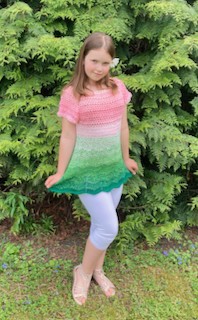
How to Crochet Rainbow Summer Dress Tunic Watermelon - PART 2 CHEVRON SKIRT
Hello My Crochet Friends!
I'm so glad you liked the first part of the Crochet Watermelon Rainbow Dress - Tunic Tutorial!
Today I have the second part for you and the written instructions are again available for free!

I will show how you can make the dress narrower at the waist part, how to crochet a chevron pattern on the skirt, which I completed with chain spaces and puff stitches.
The skirt is growing and widening gradually - you can expand it more or less, depending on how wide, curved or flowing you want the dress or tunic to be.
Crochet the dress as long as you like, I crocheted all the way to the end of the ball :)
I believe even beginners can follow the instructions and make this amazing watermelon rainbow dress or tunic. The entire dress is only one piece as its crocheted in the round from the neck down and there isn’t any extra seaming to join the dress together.
The dress can be easily adjusted to your size and will certainly bring you a lot of joy and pleasant experiences.
The pattern is available here below for free. It comes with a video guide as well.
VIDEO TUTORIAL
You can find the step-by-step video tutorials below which will help you along if you prefer to watch video instruction rather than using a written pattern.
THE FIRST PART:
THE SECOND PART:
THE THIRD PART:
Don’t forget to subscribe if you like me videos, it’s FREE!
![]()
This pattern is made for beginners - NO crocheting skill level is required to make it. If you don't understand any of my instructions, don't worry I am here for you.
Have questions? Join the Facebook Group OR my Youtube Community!
I hope this article will be useful for you! If you have any additional questions, feel free to join my Facebook Group or Youtube Community. I created these groups for you to share pictures, ask questions, and help each other out.
A huge thanks to everyone who want to support my blog and download PDF paid pattern. Thank you very much, I really appreciate it and it helps me create more new video tutorials and patterns for you. Love you!
![]()
Stay in touch at Facebook, Instagram and Pinterest.
Let's start or PIN this idea to your Pinterest boards for later. If you pin my patterns to your Favorites and share it on social media as a link, I will be able to share a lot more free crochet patterns for you all.
![]()
So let me now get started and tell you what you will need in order to crochet this amazing RAINBOW SUMMER DRESS TUNIC WATERMELON Pattern.
This pattern is made for advanced beginners.If you don't understand any of my instructions, don't worry I am here for you - enter the comments at the end of this post.

If you’re looking for a cute summer dress tunic for the spring and summer or something more suited to special occasions, this is a perfect choice.
CROCHET RAINBOW SUMMER DRESS TUNIC WATERMELON DIRECTIONS
The pattern uses only basic crochet stitches - single and double crochets, trebles and chains.
This dress is crochet from the top down.
The direction shown are for TEENAGE GIRLS SIZE OR XS women size, 150 cm, but can be easily converted into bigger size or smaller size.
It is a highly adaptable pattern that you can easily make in any size.
Work in rounds from the top to bottom.
Yarn: RAINBOW SPAGOYARN
https://www.vlnika.cz/z20256-prize-rainbow-spago
250g / 100 m, 55% cotton + 45 acryl, 1 skein
![]()
For this pattern you will need 3.0 mm crochet hook.
Scissors and tapestry needle
4 STITCH markers
Difficulty Level: Level 2 – Easy, for ADVANCED beginners
US crochet term:
SlSt – slip stitch
CH/s – chain/s
SC – simple crochet
HDC - half double crochet
DC - double crochet
TR - treble
DC2TOG = double crochet 2 stitches together
SK - skip
T - turn
ST/s - stitch(es)
REP - repeat
Special stitches:
Special stitches:
DC2TOG = double crochet 2 stitches together

Pattern Notes
1) Before you start take a neckline circumference and a bust circumference measurement.
I started with 40 loops chains for neckline.
2) This pattern is for teenage girls size or XS women size but you can changed to bigger size by making more or less chains of the foundation chain. Remember that when making your dress bigger you will need more yarn.
3) This dress is created from the top and down so the body and skirt length/width are customizable.
I suggest trying on the dress at the end of the ‘YOKE’, ‘WAIST’ and ‘SKIRT’ instructions. You can add or remove rounds after each stage to customize fit.
4) The dress is perfectly symmetrical.
5) The entire dress is only one piece as its crocheted in the round from the neck down and there isn’t any extra seaming to join the dress together. Since this is a neck down crochet pattern, it’s very easy to alter so that this dress can fit your body.
6) Instructions between two asterisks should be repeated for the remainder of the round
7) Measurement:
Neckline: 65 cm / 23.5 inch
Bust: 88 cm / 34 inch
Armhole depth: 22 cm / 8.6 inch
Sleeve circumference: 38 cm / 15 inch
Waist: 76 cm / 30 inch
Skirt length: 33 cm / 13 inch
Bottom border: 120 cm / 47 inch
Dress length: 67 cm / 26 inch
*Measurements are taken from the garment lying flat, before the yarn has stretched out/dropped.
I suggest trying on the top. The corners markers should meet underneath your arms on both sides. The top should fit over your bust.

HOW TO CROCHET RAINBOW SUMMER DRESS TUNIC WATERMELON DIRECTIONS
THE WRITTEN PATTERN
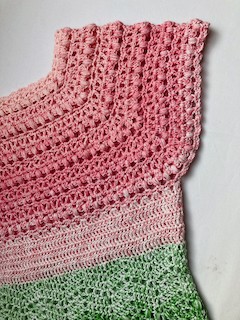
PART 2: BODY / WAIST
R2 – R8: make decrease dc2tog evenly, I made decrease 12 times in each row.
Ch3(1dc), *1dc in next 8 st, dc2tog*, repeat from * to * till end of row, close the round with sl st in 3rd ch at the beg of round. Turn.
Make decrease dc2tog evenly, I made decrease 12 times in each row.
If you want to make your dress wider make no decrease or less decreases.
If you want to make your dress narrower make more decreases.
If you want to make your dress longer, repeat row R2, if you want to have your dress shorter make less rows.

PART 3: SKIRT
Pick up the 3.0 mm crochet hook.
SKIRT PART
Continue crocheting with the same yarn and the samec rochet hook.
Make sure the number of stitches in the row is a multiple of 12.
Work in closed rounds, close the round with a slip st.
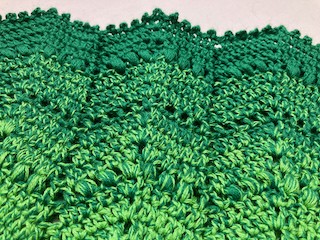
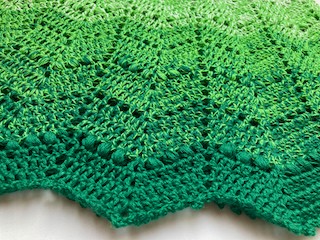
R1: ch1, *(1sc, 1hdc in next 2st, 1dc in next 2st, 1tr in next st, 1dc in next 2st, 1hdc in next st, 1sc in next 2 st)* repeat from * to * till end of row, close the row wit sl st in 1st at the beg of round.
R2: ch2, *(1dc in next 5st, (1dc, ch1, 1dc) in next st, 1dc in next 5 st, skip 1 st)* repeat from * to * till end of row, close the row wit sl st in 1st at the beg of round.
R3: sl st in 1st st, ch2 *(1dc in next 5st, (1dc, ch1, 1dc) in ch1sp, 1dc in next 5 st, skip 2 st)* repeat from * to * till end of row, close the row wit sl st in 1st at the beg of round.
R4: ch1-spaces stitch
sl st in 1st st, ch2 *(1dc in next st, ch1, sk 1st, 1dc in next st, ch1, sk 1st, 1dc in next st, ch1, 1dc in ch1sp, ch1, 1dc in next st, ch1, sk 1st, 1dc in next st, ch1, sk 1st, 1dc in next st, skip 2 st)* repeat from * to * till end of row, close the row wit sl st in 1st at the beg of round.
R5: sl st in 1st st, ch2 *(1dc in ch1sp, 1dc in next st, 1dc in ch1sp, 1dc in next st, 2dc in ch1sp, ch1, 2dc in ch1sp, 1dc in next st, 1dc in ch1sp, 1dc in next st, 1dc in ch1sp, skip 2 st)* repeat from * to * till end of row, close the row wit sl st in 1st at the beg of round.
R6: ch2, *(1dc in next 5st, (1dc, ch1, 1dc) in ch1sp, 1dc in next 5 st, skip 2 st)* repeat from * to * till end of row, close the row wit sl st in 1st at the beg of round.
R7: ch2, *(1dc in next 5st, (1dc, ch1, 1dc) in ch1sp, 1dc in next 5 st, skip 2 st)* repeat from * to * till end of row, close the row wit sl st in 1st at the beg of round.
R8: puff stitch
sl st in 1st st, ch2 *(1dc in next st, ch1, sk 1st, 1puff st in next st, ch1, sk 1st, 1puff st in next st, ch1, 1dc in ch1sp, ch1, 1puff st in next st, ch1, sk 1st, 1puff st in next st, ch1, sk 1st, 1dc in next st, skip 2 st)* repeat from * to * till end of row, close the row wit sl st in 1st at the beg of round.
R9: sl st in 1st st, ch2 *(1dc in ch1sp, 1dc in puff st, 1dc in ch1sp, 1dc in puff st, 2dc in ch1sp, ch1, 2dc in ch1sp, 1dc in puff st, 1dc in ch1sp, 1dc in puff st, 1dc in ch1sp, skip 2 st)* repeat from * to * till end of row, close the row wit sl st in 1st at the beg of round.
R10: increase row
ch2, *(1dc in next 5st, (2dc, ch1, 2dc) in ch1sp, 1dc in next 5 st, skip 2 st)* repeat from * to * till end of row, close the row wit sl st in 1st at the beg of round.
R11: ch2, *(1dc in next 6st, (1dc, ch1, 1dc) in ch1sp, 1dc in next 6 st, skip 2 st)* repeat from * to * till end of row, close the row wit sl st in 1st at the beg of round.
R12: ch1-spaces stitch
sl st in 1st st, ch2 *(1dc in next st, ch1, sk 1st, 1dc in next st, ch1, sk 1st, 1dc in next st, ch1, sk 1st, 1dc in next st, ch1 (middle space), 1dc in next st, ch1, sk 1st, 1dc in next st, ch1, sk 1st, 1dc in next st, ch1, sk 1st, 1dc in next st, skip 2 st)* repeat from * to * till end of row, close the row wit sl st in 1st at the beg of round.
R13: sl st in 1st st, ch2 *(1dc in ch1sp, 1dc in next st, 1dc in ch1sp, 1dc in next st, 1dc in ch1sp, 1dc in next st, (1dc, ch1, 1dc) in mid ch1sp, 1dc in next st, 1dc in ch1sp, 1dc in next st, 1dc in ch1sp, 1dc in next st, 1dc in ch1sp, skip 2 st)* repeat from * to * till end of row, close the row wit sl st in 1st at the beg of round.
R14: ch2, *(1dc in next 6st, (1dc, ch1, 1dc) in ch1sp, 1dc in next 6st, skip 2 st)* repeat from * to * till end of row, close the row wit sl st in 1st at the beg of round.
R15: ch2, *(1dc in next 6st, (1dc, ch1, 1dc) in ch1sp, 1dc in next 6st, skip 2 st)* repeat from * to * till end of row, close the row wit sl st in 1st at the beg of round.
R16: puff stitch
sl st in 1st st, ch2 *(1dc in next st, ch1, sk 1st, 1puff st in next st, ch1, sk 1st, 1puff st in next st, ch1, sk 1st, 1dc in next st, ch1 (middle space), 1dc in next st, ch1, sk 1st, 1puff st in next st, ch1, sk 1st, 1puff st in next st, ch1, sk 1st, 1dc in next st, skip 2 st)* repeat from * to * till end of row, close the row wit sl st in 1st at the beg of round.
R17: sl st in 1st st, ch2 *(1dc in ch1sp, 1dc in puff st, 1dc in ch1sp, 1dc in puff st, 1dc in ch1sp, 1dc in next st, (1dc, ch1, 1dc) in mid ch1sp, 1dc in next st, 1dc in ch1sp, 1dc in puff st, 1dc in ch1sp, 1dc in puff st, 1dc in ch1sp, skip 2 st)* repeat from * to * till end of row, close the row wit sl st in 1st at the beg of round.
R18: increase row
ch2, *(1dc in next 6st, (2dc, ch1, 2dc) in ch1sp, 1dc in next 6 st, skip 2 st)* repeat from * to * till end of row, close the row wit sl st in 1st at the beg of round.
R19: ch2, *(1dc in next 7st, (1dc, ch1, 1dc) in ch1sp, 1dc in next 7 st, skip 2 st)* repeat from * to * till end of row, close the row wit sl st in 1st at the beg of round.
R20: ch1-spaces stitch
sl st in 1st st, ch2 *(1dc in next st, ch1, sk 1st, 1dc in next st, ch1, sk 1st, 1dc in next st, ch1, sk 1st, 1dc in next st, ch1, 1dc in ch1sp, ch1, 1dc in next st, ch1, sk 1st, 1dc in next st, ch1, sk 1st, 1dc in next st, ch1, sk 1st, 1dc in next st, skip 2 st)* repeat from * to * till end of row, close the row wit sl st in 1st at the beg of round.
R21: sl st in 1st st, ch2 *(1dc in ch1sp, 1dc in next st, 1dc in ch1sp, 1dc in next st, 1dc in ch1sp, 1dc in next st, 2dc in ch1sp, ch1, 2dc in ch1sp, 1dc in next st, 1dc in ch1sp, 1dc in next st, 1dc in ch1sp, 1dc in next st, 1dc in ch1sp, skip 2 st)* repeat from * to * till end of row, close the row wit sl st in 1st at the beg of round.
R22: ch2, *(1dc in next 7st, (1dc, ch1, 1dc) in ch1sp, 1dc in next 7st, skip 2 st)* repeat from * to * till end of row, close the row wit sl st in 1st at the beg of round.
R23: ch2, *(1dc in next 7st, (1dc, ch1, 1dc) in ch1sp, 1dc in next 7st, skip 2 st)* repeat from * to * till end of row, close the row wit sl st in 1st at the beg of round.
R24: puff stitch
sl st in 1st st, ch2 *(1dc in next st, ch1, sk 1st, 1puff st in next st, ch1, sk 1st, 1puff st in next st, ch1, sk 1st, 1puff st in next st, ch1, 1dc in ch1sp, ch1, 1puff st in next st, ch1, sk 1st, 1puff st in next st, ch1, sk 1st, 1puff st in next st, ch1, sk 1st, 1dc in next st, skip 2 st)* repeat from * to * till end of row, close the row wit sl st in 1st at the beg of round.
R25: sl st in 1st st, ch2 *(1dc in ch1sp, 1dc in puff st, 1dc in ch1sp, 1dc in puff st, 1dc in ch1sp, 1dc in puff st, 2dc in ch1sp, ch1, 2dc in ch1sp, 1dc in puff st, 1dc in ch1sp, 1dc in puff st, 1dc in ch1sp, 1dc in puff st, 1dc in ch1sp, skip 2 st)* repeat from * to * till end of row, close the row wit sl st in 1st at the beg of round.
R26: increase row
ch2, *(1dc in next 7st, (2dc, ch1, 2dc) in ch1sp, 1dc in next 7st, skip 2 st)* repeat from * to * till end of row, close the row wit sl st in 1st at the beg of round.
R27: ch2, *(1dc in next 8st, (1dc, ch1, 1dc) in ch1sp, 1dc in next 8st, skip 2 st)* repeat from * to * till end of row, close the row wit sl st in 1st at the beg of round.
R28: ch1-spaces stitch
sl st in 1st st, ch2 *(1dc in next st, ch1, sk 1st, 1dc in next st, ch1, sk 1st, 1dc in next st, ch1, sk 1st, 1dc in next st, ch1, sk 1st, 1dc in next st, ch1 (middle space), 1dc in next st, ch1, sk 1st, 1dc in next st, ch1, sk 1st, 1dc in next st, ch1, sk 1st, 1dc in next st, ch1, sk 1st, 1dc in next st, skip 2 st)* repeat from * to * till end of row, close the row wit sl st in 1st at the beg of round.
R29: sl st in 1st st, ch2 *(1dc in ch1sp, 1dc in next st, 1dc in ch1sp, 1dc in next st, 1dc in ch1sp, 1dc in next st, 1dc in ch1sp, 1dc in next st, (1dc, ch1, 1dc) in mid ch1sp, 1dc in next st, 1dc in ch1sp, 1dc in next st, 1dc in ch1sp, 1dc in next st, 1dc in ch1sp, 1dc in next st, 1dc in ch1sp, skip 2 st)* repeat from * to * till end of row, close the row wit sl st in 1st at the beg of round.
R30: ch2, *(1dc in next 8st, (1dc, ch1, 1dc) in ch1sp, 1dc in next 8st, skip 2 st)* repeat from * to * till end of row, close the row wit sl st in 1st at the beg of round.
R31: ch2, *(1dc in next 8st, (1dc, ch1, 1dc) in ch1sp, 1dc in next 8st, skip 2 st)* repeat from * to * till end of row, close the row wit sl st in 1st at the beg of round.
R32: puff stitch
sl st in 1st st, ch2 *(1dc in next st, ch1, sk 1st, 1puff st in next st, ch1, sk 1st, 1puff st in next st, ch1, sk 1st, 1puff st in next st, ch1, sk 1st, 1dc in next st, ch1 (middle space), 1dc in next st, ch1, sk 1st, 1puff st in next st, ch1, sk 1st, 1puff st in next st, ch1, sk 1st, 1puff st in next st, ch1, sk 1st, 1dc in next st, skip 2 st)* repeat from * to * till end of row, close the row wit sl st in 1st at the beg of round.

R33: sl st in 1st st, ch2 *(1dc in ch1sp, 1dc in puff st, 1dc in ch1sp, 1dc in puff st, 1dc in ch1sp, 1dc in puff st, 1dc in ch1sp, 1dc in next st, (1dc, ch1, 1dc) in mid ch1sp, 1dc in next st, 1dc in ch1sp, 1dc in puff st, 1dc in ch1sp, 1dc in puff st, 1dc in ch1sp, 1dc in puff st, 1dc in ch1sp, skip 2 st)* repeat from * to * till end of row, close the row wit sl st in 1st at the beg of round.
R34: ch2, *(1dc in next 8st, (1dc, ch1, 1dc) in ch1sp, 1dc in next 8st, skip 2 st)* repeat from * to * till end of row, close the row wit sl st in 1st at the beg of round.
R35: ch2, *(1dc in next 8st, (1dc, ch1, 1dc) in ch1sp, 1dc in next 8st, skip 2 st)* repeat from * to * till end of row, close the row wit sl st in 1st at the beg of round.
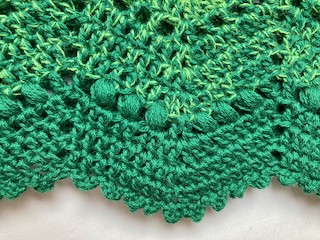
R36: picots
sl st in 1st st, ch2 *(1sc in next st, ch3, 1sl st in same st, sk 1st, 1sc in next st, ch3, sl st in same st, sk 1st, 1sc in next st, ch3, 1sl st in same st, sk 1st, 1sc in next st, ch3, 1sl st in same st, sk 1st, (1sc, ch3, 1sc) in mid ch1sp, sk 1st, 1sc in next st, ch3, sl st in same st, sk 1st, 1sc in next st, ch3, 1sl st in same st, sk 1st, 1sc in next st, ch3, 1sl st in same st, sk 1st, 1sc in next st, ch3, 1sl st in same st, skip 2 st)* repeat from * to * till end of row, close the row wit sl st in 1st sc at the beg of round.

End off yarn, weave in ends. Turn your dress the right side out and smooth down.
You are all done with your amazing SUMMER RAINBOW WATERMELON DRESS!
This DRESS OR TUNIC is a great for spring and summer time.
I am happy to showed you how to crochet this perfect SUMMER DRESS that really fits!
I love this wonderful RAINBOW yarn color WATERMELON and the texture with airy and puff stitches.
What’s Next?
Pin this post: Save this tutorial to your Pinterest boards so that you can come back to it later.
Leave a comment: I love to hear your feedback. Tell me in the comments below!
Share on Instagram and Facebook: When you make this project, share it on social media and tag me @sonanebeska. I love to see what you make!
You know me, I love Summer dresses and Tops If you do as well, you may would love to try these patterns as well:
Explore More Crochet Summer Hats Patterns
If you love to crochet as much as I do, I think you’ll love these other free crochet patterns. ❤️
MORE PATTERNS?I think you’ll love these other free crochet patterns as well ❤️
♥♥♥
Have fun and let me know what you make. I would love to know how your project turns out.
Please don't forget to like and I really appreciate your comments.
If the pattern did not make sense to you, please don’t hesitate to contact me, I am happy to help :)
If you like this pattern, please follow and share my projects on social networks as a THANK YOU and to help me to create new projects and patterns for you.
Thank you very much once again for your visit and see you soon!
♥♥♥


