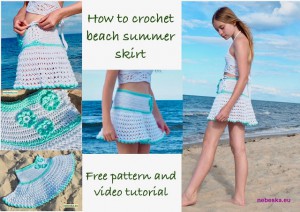
Summer Beach Crochet Skirt Usedom
This Beach Summer Skirt is a perfect for hot summer days and it is an amazing piece of your vacation wardrobe. I call it Beach Summer Skirt Usedom as the island in the Baltic sea where we spent our vacation. As I promised, I am here with a pattern for this simple but pretty beach skirt. The pattern is surprisingly easy.
The pattern is available here below for free. It comes with a video guide as well.
VIDEO TUTORIAL
You can find the step-by-step video tutorials below which will help you along if you prefer to watch video instruction rather than using a written pattern. Don’t forget to subscribe if you like me videos, it’s FREE!![]()
A huge thanks to everyone who want to support my blog and download PDF paid pattern. Thank you very much, I really appreciate it and it helps me create more new video tutorials and patterns for you. Love you!
![]()
Let's start or PIN this idea to your Pinterest boards for later.
![]()
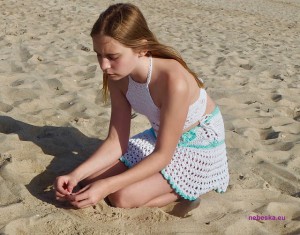
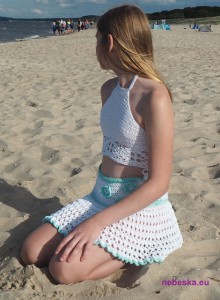
I made this Beach skirt for to coordinate with my daughter Eliska Summer Crop Top from my previous blog. Let me remind you:
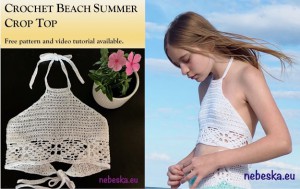
I thank her for modelling me.
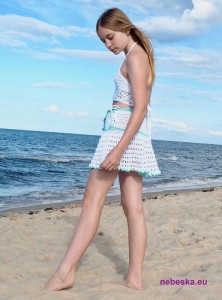
I think she looks awesome wearing the skirt. Actually, it made many people around us say “Oh wow”!
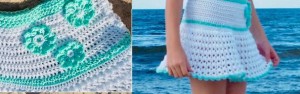
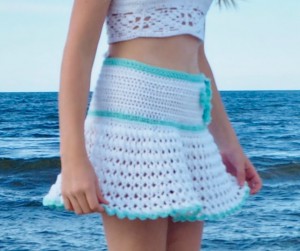
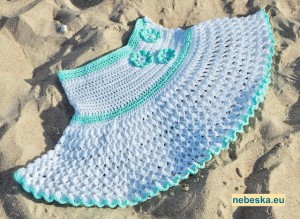
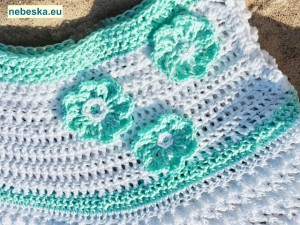
I love how the “V” pattern looks and I hope you are going to love it as well. It looks great especially in the design for the circle skirts pattern. Since it is a skirt especially made for summer, I finished off the pattern with a stripe and stays making the skirt quite entertaining. What you think of this skirt? Will you make it for the summer?
Beach Summer Skirt USEDOM Directions
This Beach skirt USEDOM is easy to make and can be completed in a few days.
This skirt is crochet from the middle down and then from the middle up. You just need to measure the hip circumference and crochet a foundation chain circle accordingly.
Its simplicity makes the project come alive very quickly. The pattern uses only basic crochet stitches as well as front post stitches. I like front post stitches since they are fun stitches and add lots of texture to your project.
The direction shown are for XS size but can be easily converted into bigger size – just by making the first foundation circle according to the circumference of your hips.
The pattern was made with Scarlet yarn (white colour).
For this top XS size you will need 1,5-2 skeins of Scarlet yarn and 1 skein of Camilla yarn (green colour).
Yarn white: Scarlet, (100% cotton), 100g = 290m, 1mm
Yarn green: Camilla (100% cotton), 50g = 125m, 1 mm
For this pattern you will need 3 hooks – I used 3, 3.5 and 4 (or you can use 3.5, 4 and 4.5 etc.)
Difficulty Level:
Level 1 – Easy, for beginners
US crochet term:
SlSt – slip stitch
CH/s – chain/s
SC – simple crochet
HDC – half double crochet
DC - double crochet
SK - skip
T - turn
ST/s - stitch(es)
REP - repeat
DEC – decreasing
FP – front post
FPDC – front post double crochet
Pattern Notes
Before you start take a hip measurement. I started with 160 chains for 84 cm / 33 inch.
The measurement for the waist was 56 cm / 22 inch.
This pattern is for size XS but you can easily changed to bigger size by making bigger foundation chain.
Please note: A Ch 3 at beg of the row counts as dc throughout, a ch 2 at the beg row counts as hdc throughout, and a ch 1 at beg of row counts as sc throughout
There are 3 parts of to the skirt:
A) The bottom part - from the foundation circle down
B) The upper part - from the foundation circle up
C) The closure – with zigzag string – adjust size for the perfect fit
All parts are skirt pieces are crocheted together (no sewing)
This pattern is made for beginners - only a basic skill level is required to make it. If you don't understand any of my instructions, don't worry I am here for you - enter the comments at the end of this post.
INSTRUCTIONS FOR BEACH SUMMER SKIRT USEDOM
PART A = THE BOTTOM PART
Pick up the 3mm hook and make a foundation chain circle 160
(please see instructions for adjustment for size)
1st round: ch3, 159 DC in each ch, sl st
2nd round: “V” pattern: ch3, ch3, 1DC in the same st, sk 1 st,
repeat V = *1DC, ch3, 1DC in the same st, sk 1 st* sl st into 3rd ch from beg
80 Vs in total at the end
3rd round: ch3, 1DC, ch1, 2 DC, 1 FPDC into the first V
repeat into each V = *1 FPDC, 2DC, ch1, 2DC, 1FPDC* till you reach beg – now 1FPDC! Into the first DC from the previous row
Wonderful! You know the pattern! You can continue till you have a required length
4th round: 2 sl st into 1st and 2nd st from the previous row – we need to reach the middle of V.
ch3, ch3, 1DC into V
repeat V into each V = *1DC, ch3, 1DC in the same V* till end of row, sl st into 3rd ch from beg
5th round = 3rd round: ch3, 1DC, ch1, 2 DC, 1 FPDC into the first V
repeat into each V = *1 FPDC, 2DC, ch1, 2DC, 1FPDC* till you reach beg – now 1FPDC into the first DC from the previous row
6th row = 4th row
Now change your hook to 3.5 mm and crochet with it round 7 till 12, still you have 80 V in one round
7th round = 3rd round
8th round = 4th round
9th round = 3rd round
10th round = 4th round
11th round = 3rd round
12th round = 4th round
Now change your hook from 3.5 to 4 mm and crochet with it round 13 till 16, still you have 80 V in one round
13th round = 3rd round
14th round = 4th round
15th round = 3rd round
16th round = 4th round
You are doing great! Only the last row is left to have bottom part ready! Change the colour, I used green yarn.
17th row = 2sl st, into V place ch2, 2HDC, continue HDC into each st till you reach next V, place 3HDC into V, rep *HDC into each st till you reach next V, place 3HDC into V* sl st
Fasten off.
PART B = THE UPPER PART
Use hook 3 mm and start with the green colour (or any other colour you chose for 17th round)
1st row: ch2, 159 HDC, turn
2nd row = decreasing: ch3, into each st: 1DC, dec 2DC, rep * 1DC, 1DC, dec 2DC* till end of row, turn
3rd row = change colour to white yarn, make decreasing: ch3, into each st: 1 DC, 1 DC, 1 DC, dec 2DC, rep * 1DC, 1DC, 1DC, 1DC, dec 2DC* till end of row, turn
4th row – 12th row: ch3, 1DC into each st till end of row, turn
13th – 15th row: ch2, 1HDC into each st till end of row, turn
16th – 17th row = green colour, ch2, 1HDC into each st till end of row, turn
18th – 19th row = green colour, ch1, 1SC into each st till end of row
That it is! Weave the end. Now you know how to crochet a wonderful Summer Beach skirt!
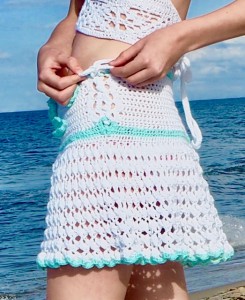
PART C = Closure
You can finish the skirt with buttons or put zipper there.
I decided to crochet a closure with string for the summer skirt. The string is pull zigzag through the loops. This system is great to adjust size for the perfect fit!
Let’s start with the left side from the bottom up. Use green and white colour and hook 3 mm
1st row: green colour 1sc into next each 5 st, when you reach white colour change yarn from green to white, rep * 1sc into next each 5 * till you reach green colour, change yarn from white to green colour, 1sc into next each 5 st
You will have approximately 36 SC, turn
2nd row: start with green colour, sc, ch4, sk 4 sc
change to white colour and rep *sc, ch4, sk 4 st * till you reach green, sc, ch4, sk 4 st sc
you will have 7 “arcs”, 2 green one at the beg and at the end
3nd row: start with green colour and put 6 sc into art, change the colour to white and rep * 6 sc into each arc * till you reach green colour and finish the last arch with 6 sc
you have 7 finished “arcs”
We are almost done! Just make a foundation chain 130 – 140 ch, turn, 1 sc into each ch, fasten off.
You can put some decorations on your skirt. As I made the beach skirt for a girl – I crochet 3 flowers there for sweet and fresh look.
Congratulations! Now you have your wonderful beach skirt ready to be worn! Are you ready for “Oh wow” faces! Enjoy!
THE FINAL XS/S SIZE:
Waist = 56 cm / 22 inch
Part B length = 16 cm / 6,3 inch
Hips = 84 cm / 33 inch
Part A length = 22 cm / 8,7 inch
Want a printable copy of this pattern? Why not visit my Etsy shop and purchase the PDF with photo instructions. Not only does it mean you get your own copy of the pattern to print, you also support a small business and help me to keep making free patterns!
Have fun and let me know what you make. I would love to know how your project turns out.
Please don't forget to like and I really appreciate your comments.
If the pattern did not make sense to you, please don’t hesitate to contact me, I am happy to help :)
If you like this pattern, please follow and share my projects on social networks as a THANK YOU and to help me to create new projects and patterns for you.
Thank you very much once again for your visit and see you soon!


