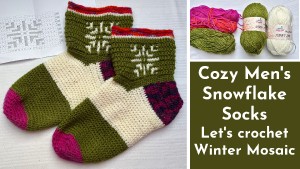
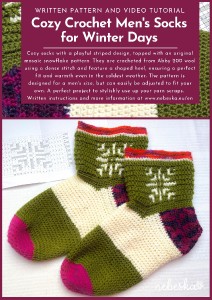
Cozy Crochet Men's Socks for Winter Days
Hey everyone! Welcome to my Blog! Your support is what directly allows me to keep creating more free video tutorials and patterns for our amazing crochet community!
Want to contribute? Here are three ways you can show your support:
-
Tip me: https://paypal.me/nebeskacrochetlove
-
Buy patterns: https://payhip.com/NebeskaCrochetwithLove
-
Become a Patron and unlock even more content: https://herohero.co/crochetwithlove
Thanks a million, my crochet friends! Wishing you joy and color through yarn.
I truly believe in the magic of creativity.
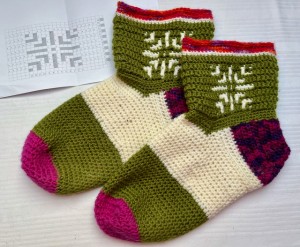
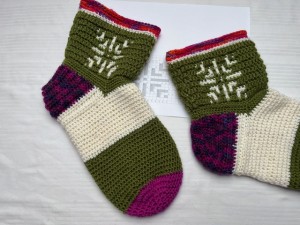
Looking for something that will truly keep you warm even in the depths of winter? These striped crocheted socks are designed for maximum thermal comfort and style. Thanks to the combination of quality materials and a dense half double crochet pattern, they are the perfect companion for winter evenings by the fireplace or frosty walks.
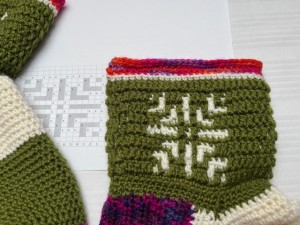
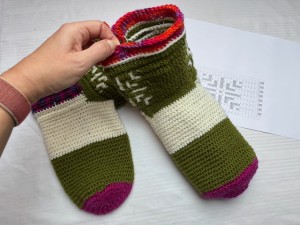
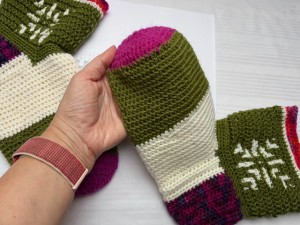
The classic striped design is complemented by an original mosaic snowflake pattern, giving the socks a unique winter character. It’s not just about design – great attention has been paid to the anatomically shaped heel, which ensures the sock fits firmly and never pinches. Quite simply, these are the "comfort-first" socks you won't want to take off all winter. True "woolen" socks from the heart that turn every step into a warm embrace.
What makes these socks special?
* Maximum Thermal Comfort: A dense knit that seals out the cold.
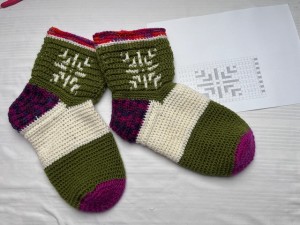
* Stylish Stripes: A timeless look that suits every man.
* Winter Mosaic: An original snowflake detail that catches the eye.
* Quality Fit: Shaped heel and instep for comfort without compromise.

Why you will love these socks:
* Truly Warm: The dense half double crochet pattern creates a cozy layer that keeps the frost away from your feet.
* Perfect Fit: Thanks to the anatomically shaped heel and gradual narrowing at the ankle, the sock fits perfectly without bunching or slipping.
* Original Mosaic Detail: The snowflake motif gives the socks a modern, handcrafted look.
* Comfort in Every Step: A carefully crafted instep and flat heel seam guarantee that nothing will press against you in your shoes.
* Playful Striped Design: Alternating colors makes the crocheting process fun, resulting in stylish socks full of "hygge" vibes.
* Honest Handmade Work: Every stitch passed through your hands, making them a personal and valuable gift that lasts.
What’s included in the pattern?
* Clear Step-by-Step Instructions: From the first loop on the toe to the final invisible join.
* Anatomical Shaping Technique: Detailed description of how to shape the heel so the sock perfectly follows the foot.
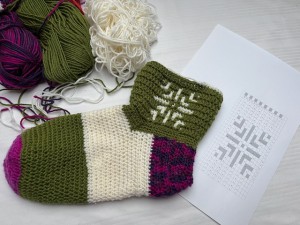
* Mosaic Crochet Masterclass: Instructions on how to crochet the winter snowflake motif directly into the fabric using colorwork.
* Clear Stitch Counts: Accurate breakdowns for every round, ensuring you never get lost.
* Photo Tutorial: Detailed photos of key steps to guide you through the entire process.
* Mosaic Chart: A clear and easy-to-read grid for the snowflake pattern.
* Inspirational Gallery: Views of the finished product from various angles to keep you motivated.
* Practical Tips and Tricks: How to avoid holes in the corners, how to achieve an invisible join, and how to keep the edge stretchy.
* Sizing Adjustment Guide: Advice on how to easily scale the sock up or down to fit every family member.

Size: EU 44/46 (US Men's 10.5 – 12), classic fit, wide toe.
Width across instep / Circumference: 28 cm (11")
Length from toe (rounds): 20 cm (7.9")
Heel length (rows): 10 cm (4")
Total length from toe to heel: 30 cm (11.8")
Mosaic pattern height: 14 cm (5.5")
Ankle circumference: 29 cm (11.4")
Note: Measurements are taken from the garment laid flat, before the yarn stretches or settles with wear.
Ready to crochet your new favorite piece? Prepare your four yarn colors and hook. Happy crocheting!
Video tutorials on HeroHero: https://herohero.co/crochetwithlove
Do you like mosaic? Try Crocheting these Slippers! They are perfect for beginners.
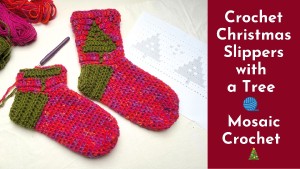
The construction and fit allow you to easily adjust the size and length.
Are you ready to enjoy the Cosy Socks with Snowflake?
Download the pattern today and let your creativity shine with color!
Download the pattern HERE today and start creating!
Design and Materials:
Material: Abby 200 yarn
Composition: 75% Wool + 25% Nylon
Yardage/Weight: 100 g / 200 m
Sock yarn that is slightly thicker. It is durable and treated against shrinking/felting (anti-felting finish).
Consumption for men's size: 3 skeins
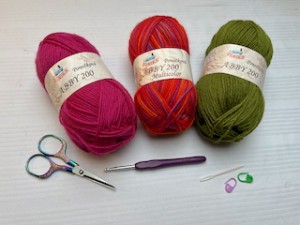
Hook: 3.0 mm
Additional Tools
- Scissors
- Yarn needle
- Stitch markers
The Video tutorials and also the written pattern is on HeroHero:
https://herohero.co/crochetwithlove
A huge thanks to everyone who want to support my blog and download PDF paid pattern. Thank you very much, I really appreciate it and it helps me create more new video tutorials and patterns for you. Love you!
![]()
If you pin my patterns to your Favorites and share it on social media as a link, I will be able to share a lot more free crochet patterns for you all.
Stay in touch at Facebook, Instagram and Pinterest.
Let's start or PIN this idea to your Pinterest boards for later.
![]()
Pattern Instructions
The pattern below is designed for a men's size.
Yarn Requirements for Men's Size 44/46
To create the snowflake mosaic pattern, you will need a total of 2.5 skeins of Abby 200 (100g each):
Color A: (e.g., Dark Pink)
Color B: (e.g., Green)
Color C: (e.g., White)
Color D: (e.g., Pink-Purple Multicolor)
Color E: (e.g., Orange Multicolor)
The size can be easily adjusted for children or adults by changing the number of stitches and rounds. Please refer to the instructions below for guidance on how to adjust the size.
Construction
These socks are crocheted in a simple, classic ankle-high style. They are perfect for wearing at home during cold days.
Method
The socks are worked from the toe up towards the instep and then to the heel. The heel is rounded to fit the shape of the foot. Finally, the upper part (the leg of the sock) is crocheted onto the foot up to ankle height.
Technical Details
The socks are worked in continuous spiral rounds up to the instep. From there, the heel is worked in rows, back and forth.
The upper part (the leg) is worked using the mosaic crochet technique. These rounds are joined with a slip stitch. To change colors, complete the final slip stitch of the round with the new color.
Stitches Used
This pattern uses basic crochet stitches:
sl st: slip stitch
sc: single crochet
hdc: half double crochet
mdc: mosaic double crochet
Customization
I have used a classic fit for this pattern. If you prefer shorter or longer socks, you can easily adjust the size. The length can be modified by adding or removing rounds in the "body" (foot section) of the sock.
I crocheted these socks using a single strand of yarn so they can be worn inside shoes. However, you can also use a double strand to create thick, slipper-style socks. Feel free to make them striped or choose any color combination you like!
Tips and Recommendations
Gauge and Tension are Key
When making socks, it is crucial that the fabric isn't too loose or too stiff, so they hold their shape well. Using a thicker sock yarn and a 3.0 mm hook, make sure your stitches are firm and tight. This prevents the socks from stretching out too much after a few wears.
Mosaic in the Round
Carrying the Yarn: If you do not cut the yarn (recommended), leave the unused color hanging loosely on the inside of the sock. When switching back to that color, pull it up to the height of the current round carefully. Make sure not to pull too tight, as this would shorten the edge and distort the fabric.
Heel and Toe
The Heel: I used an "L-shaped heel" technique. Ensure that the points where the heel reconnects to the body of the sock (after sewing) are firm and gap-free. When working the single crochet border around these areas, pick up enough stitches to close any potential holes.
Instep Mosaic: Because the mosaic technique can be less stretchy and may "pull" the fabric, be careful that the sock isn't too tight over the instep. If it feels too snug, consider adding a few extra stitches or working a round or two of plain sc (single crochet) without the mosaic pattern to add more give.
Further Tips for Mosaic Crochet
Mosaic Crochet Technique
Mosaic crochet is a visually stunning technique worked in joined rounds. It requires precise alternating of two colors in each round.
Basic Principles
Color Alternating: Each round is worked with only one color. Colors alternate every round (e.g., R1 Color A, R2 Color B, R3 Color A, etc.). Change the color at the slip stitch at the beginning/end of the round.
Yarn Handling: Do not cut the yarn. Leave the current color at the end of the round and pick it up again when it’s time to use it.
Stitch Placement: To create the pattern, stitches are worked either into the back loop of the previous round or into the front loop of a stitch in the round below.
Invisible Join: Always tighten the yarn ends when joining at the end of each round to keep the seam neat and avoid gaps.
Reading the Chart
Direction: Read the chart from right to left for each individual round.
Colors in the Chart: Ignore the colors shown in the individual squares of the chart; they only represent what the final pattern will look like. You do not change yarn colors within a single round.
Symbol Key
To interpret the symbols in the chart, use the following rules:
Empty Square (blsc): An empty square means work a Back Loop Single Crochet (blsc) into the back loop of the stitch from the previous round.
Square with an "X" (fldc): A square marked with an X means work a Front Loop Double Crochet (fldc) into the front loop of the stitch two rounds below (the same color round).
Mosaic Double Crochet (DC into Front Loop one Row Below):
This stitch is worked into the Front Loop of a stitch of the same color, located one row below (e.g., in R3 with Color A, the DC is worked into R1 with Color A). This completely covers the stitches in the intermediate row.
Summary of Mosaic Stitches:
If the pattern calls for SC, work it into the Back Loop.
If the pattern calls for DC, work it into the Front Loop one row below.
Working with the Yarn
Do Not Pull the Yarn: When pulling the unused yarn (the one left from the previous row) up to the current row, ensure you do not pull it too tight.
If you pull it too tight, the edge of the sock would shrink and become distorted. It should be loose but not slack.
Reading the Chart
Chart is a Mirror Image: Remember that the mosaic chart shows you how the pattern should look from the outside. When you crochet a Double Crochet into the Front Loop, you are inserting the hook into a loop that has the same color as your current color, which corresponds to the square with a cross in the chart.
Ensuring a Clean Edge (Joined Rounds)
Closing Rounds: Since you are crocheting in joined rounds, always end the row with a Slip Stitch (Sl St) into the first stitch of the row. Make sure to pull the Sl St tight. Otherwise, a noticeable seam or "step" will form at the join.
Visual Check
Check After a Few Rows: The mosaic pattern only becomes visible after crocheting a few rows (at least three to four), as the pattern is formed by overlapping stitches. Regularly check if the pattern matches the chart so you don't have to undo a large amount of work.

For even more crochet patterns, check out my e-book.
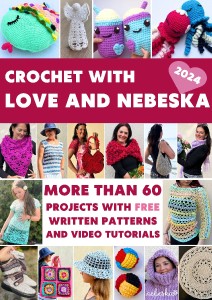
More pattern? CROCHET WITH LOVE AND NEBESKA
I'm thrilled to present my 2024 e-book, CROCHET WITH LOVE AND NEBESKA!
Inside, you'll discover over 60 projects with patterns and video tutorials to inspire you all year long.
You can download the e-book as a PDF, complete with clickable links to easily find the patterns you're looking for. Perhaps you missed a pattern and are now happy to find it here.
Or maybe you're just looking for inspiration for your next project – I hope my ideas spark your creativity! The e-book is FREE and you can share it with your friends.
Have questions? Join the Facebook Group OR my Youtube Community!
I hope this article will be useful for you! If you have any additional questions, feel free to join my Facebook Group or Youtube Community. I created these groups for you to share pictures, ask questions, and help each other out.
What’s Next?
Pin this post: Save this tutorial to your Pinterest boards so that you can come back to it later.
Leave a comment: I love to hear your feedback. Tell me in the comments below!
Share on Instagram and Facebook: When you make this project, share it on social media and tag me @sonanebeska. I love to see what you make!
Explore More Crochet Patterns
MOST POPULAR VIDEO TUTORIALS
All of the patterns on that list are beautifully designed, and suitable for both beginners and experienced crocheters. They are different levels of difficulties and techniques that you might have never seen before. Just click on them and you can find the free pattern, each of the patterns comes with a video tutorial.
Have fun and let me know what you make. I would love to know how your project turns out.
Please don't forget to like and I really appreciate your comments.
If the pattern did not make sense to you, please don’t hesitate to contact me, I am happy to help :)
If you like this pattern, please follow and share my projects on social networks as a THANK YOU and to help me to create new projects and patterns for you.


