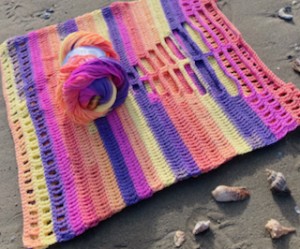
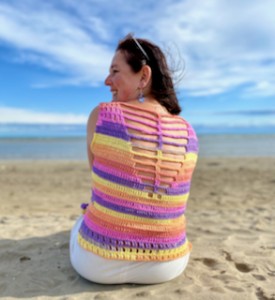
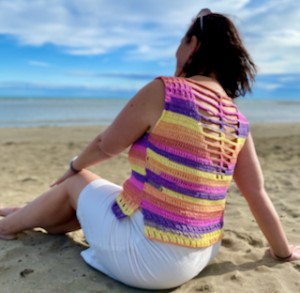
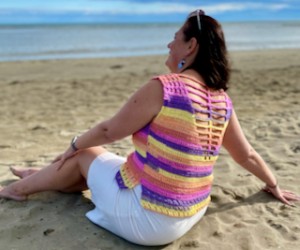
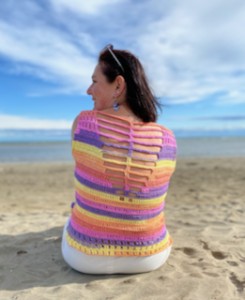
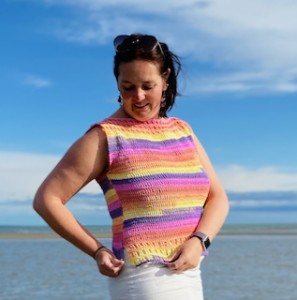
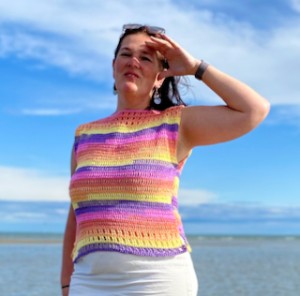
Crochet Colorful Top for beginners with V-neck on back
Hello my crochet friends!
Who likes to crochet simple summer tops, tunics, sweaters or beach covers?
With summer approaching, I am really enjoying these crocheted summer models.
Today I have a tutorial for a simple crochet top in gorgeous bright summer colors!
The instructions are prepared for complete beginners, the top is crocheted in two identical parts and whoever wants can crochet an interesting and sexy V-neck on the back part.
The crocheted top can be easily adjusted to any size, this one is crocheted in women's size M.
I'm using basic double crochets in the pattern - trebles and single crochets and chains, no shaping, if you're worried about increasing or decreasing, don't worry - this tutorial is super easy! And if you wouldn't dare to use a v-neck, you simply crochet 2 identical parts and crochet them together.
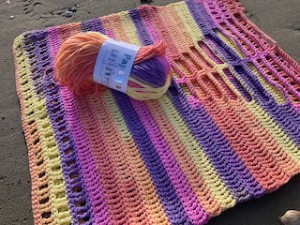
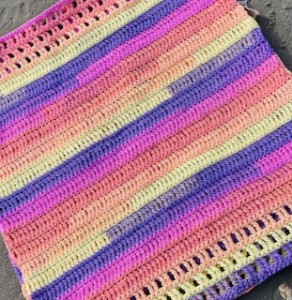
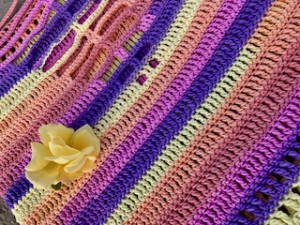
This crocheted top is made from the wonderful PAPATYA COTONISH yarn - a very soft premium acrylic yarn with many cheerful colors.
I hope we have a wonderful summer time ahead, so let's get started!
VIDEO TUTORIAL
You can find the step-by-step video tutorials below which will help you along if you prefer to watch video instruction rather than using a written pattern. Don’t forget to subscribe if you like me videos, it’s FREE!
![]()
This pattern is made for very beginners and with my video tutorials everyone will manage to crochet this amazing pattern. If you don't understand any of my instructions, don't worry I am here for you - enter the comments at the end of this post.
A huge thanks to everyone who want to support my blog and download PDF paid pattern. Thank you very much, I really appreciate it and it helps me create more new video tutorials and patterns for you. Love you!
![]()
If you pin my patterns to your Favorites and share it on social media as a link, I will be able to share a lot more free crochet patterns for you all.
Stay in touch at Facebook, Instagram and Pinterest.
Let's start or PIN this idea to your Pinterest boards for later.
![]()

How to CROCHET TOP WITH V-NECK ON THE BACK
This pattern is made for beginners - only a basic skill level is required to make it. If you don't understand any of my instructions, don't worry I am here for you.
Have questions? Join the Facebook Group!
I hope this article will be useful for you! If you have any additional questions, feel free to join my Facebook Group. I created this group for you to share pictures, ask questions, and help each other out.
CROCHET TOP WITH V-NECK ON THE BACK
So let me now get started and tell you what you will need in order to crochet this amazing CROCHET TOP WITH V-NECK ON THE BACK.
This CROCHET TOP WITH V-NECK ON THE BACK is very fun and quick to make.
The pattern uses only basic crochet stitches - single crochets and trebles and chains.
This easy-to-fit TOP is really a crocheter's dream, made with the airy stitches, is worked in rows.
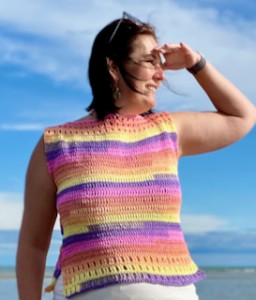
Size: woman - MEDIUM SIZE
This can easily be adapted to a smaller size or bigger size just by reducing or increasing the number of chains and rows for the coat and as well as making less or more chains in the basic chain.
The CROCHET TOP WITH V-NECK ON THE BACK is crocheted with soft cosy premium acrylic yarn.
This is a beautifully colored yarn made of premium acrylic with an anti-pilling treatment.
The soft structure of the fiber is slightly terry-style.
Weight: 100g
One ball: 250m
100% acrylic
https://www.vlnika.cz/z21746-prize-papatya-cottonish
Recommended Hook: 3.5 mm
For this women medium size you will need only 2.5 skeins
Colors:
one color self striping
Scissors and tapestry needle
Difficulty Level: Level 1 – Easy, for beginners
US crochet terms:
SlSt – slip stitch
CH/s – chain/s
SC - single crochet
DC - double crochet
TR - treble
SK - skip
T - turn
ST/s - stitch(es)
REP - repeat
YO – yarn over
CROCHET TOP WITH V-NECK ON THE BACK
PATTERN NOTES
1) Before you start take a measurement, I would recommend to determine the width of your top. If you want to have your top wider, make a longer foundation chain at the beginning of front / back panel. If you want to have your top narrower, make a shorter foundation chain at the beginning of front / back panel.
2) This pattern is for Medium women size, but you can easily adapt to a smaller size or bigger size just by reducing or increasing the number of chains and rows for the top and as well as making less or more chains in the basic chain.
3) A ch1 at beg of the row DOESN'T COUNT as a stitch.
4) A ch3 at beg of the row/round DOESN'T COUNT as a stitch.
5) The TOP measures:
length: 54 cm / 21 inch
width: 44 cm / 17 inch
back panel length:
width: 44 cm / 17 inch
*Measurements are taken from the garment lying flat, before the yarn has stretched out/dropped.
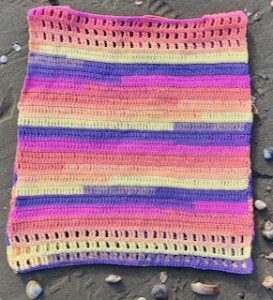
5) The TOP is worked in 2 basic pieces:
CROCHET TOP WITH V-NECK ON THE BACK
THE WRITTEN PATTERN
Work in rows, turn your work when your finish row.
The same crochet hook, the same yarn.
RECTANGLE
Crochet Hook 3.50 mm.
Make a slip knot and chain foundation chain.
Ch 74 chains
Multiple of 6 + 2 (72 + 2)
R1: ch1, 1sc in 2nd chain from hook, 1sc in each st till end of row, turn (74 st)
R2: ch3, 1tr in 1st st, 1tr in next st, *ch1, sk 1st, 1tr in next 2st*, repeat from * to * till end of row, turn (74 st) (24 ch1sp)
R3: ch1, 1sc in each st till end of row, turn (74 st)
R4-R5, R6-R7 = R2-R3
R8: ch3, 1tr in each st till end of row, turn
R9: ch1, 1sc in each st till end of row, turn

R10 – R39: repeat R8—R9
R40: ch3, 1tr in 1st st, 1tr in next st, *ch1, sk 1st, 1tr in next 2st* repeat from * to * till end of row, turn (74 st) (24 ch1sp)
R41: ch1, 1sc in each st till end of row, turn (74 st)
R42 – R45: repeat R40 and R41
Fasten off your work and hide all loose tails and you are all done with your front panel.

Let’s make a back panel: repeat the instructions and make the same panel.
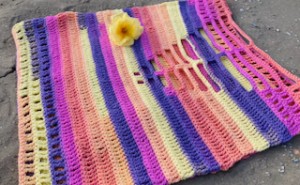
START TO CREATE V-NECK FROM ROW 22!
R1: ch1, 1sc in 2nd chain from hook, 1sc in each st till end of row, turn (74 st)
R2: ch3, 1tr in 1st st, 1tr in next st, *ch1, sk 1st, 1tr in next 2st*, repeat from * to * till end of row, turn (74 st) (24 ch1sp)
R3: ch1, 1sc in each st till end of row, turn (74 st)
R4-R5, R6-R7 = R2-R3
R8: ch3, 1tr in each st till end of row, turn
R9: ch1, 1sc in each st till end of row, turn
R10 – R21: repeat R8—R9
R22: ch3, 1tr in 1st st, 1tr in next 33 st,
ch2, sk 2st, 1tr in next 2st, ch2, sk 2st
1tr in next 34 st, turn
R23: ch1, 1sc in each st till end of row, turn
R24: ch3, 1tr in 1st st, 1tr in next 31 st,
ch4, sk 4st, 1tr in next 2st, ch4, sk 4st
1tr in next 32 st, turn
R25: ch1, 1sc in each st till end of row, turn
R26: ch3, 1tr in 1st st, 1tr in next 29 st,
Ch6, sk 6st, 1tr in next 2st, ch6, sk 6st
1tr in next 30 st, turn
R27: ch1, 1sc in each st till end of row, turn
R28: ch3, 1tr in 1st st, 1tr in next 27 st,
Ch8, sk 8st, 1tr in next 2st, ch8, sk 8st
1tr in next 28 st, turn
R29: ch1, 1sc in each st till end of row, turn
R30: ch3, 1tr in 1st st, 1tr in next 25 st,
Ch10, sk 10st, 1tr in next 2st, ch10, sk 10st
1tr in next 26 st, turn
R31: ch1, 1sc in each st till end of row, turn
R32: ch3, 1tr in 1st st, 1tr in next 23 st,
Ch12, sk 12st, 1tr in next 2st, ch12, sk 12st
1tr in next 24 st, turn
R33: ch1, 1sc in each st till end of row, turn
R34: ch3, 1tr in 1st st, 1tr in next 21 st,
Ch14, sk 14st, 1tr in next 2st, ch14, sk 14st
1tr in next 22 st, turn
R35: ch1, 1sc in each st till end of row, turn
R36: ch3, 1tr in 1st st, 1tr in next 19 st,
Ch16, sk 16st, 1tr in next 2st, ch16, sk 16st
1tr in next 20 st, turn
R37: ch1, 1sc in each st till end of row, turn
R38: ch3, 1tr in 1st st, 1tr in next 17 st,
Ch18, sk 18st, 1tr in next 2st, ch18, sk 18st
1tr in next 18 st, turn
R39: ch1, 1sc in each st till end of row, turn
R40: ch3, 1tr in 1st st, 1tr in next st, *ch1, sk 1st, 1tr in next 2st*, repeat from * to * 5 times
Ch20, sk 20st, 1tr in next 2st, ch20, sk 20st
1tr in next 2 st, *ch1, sk 1st, 1tr in next 2st*, repeat from * to * till end of row, turn
R41: ch1, 1sc in each st till end of row, turn
R42: ch3, 1tr in 1st st, 1tr in next st, *ch1, sk 1st, 1tr in next 2st*, repeat from * to * 5 times
Ch21, sk 21st, 1tr in next 2st, ch21, sk 21st
1tr in next 2 st, *ch1, sk 1st, 1tr in next 2st*, repeat from * to * till end of row, turn
R43: ch1, 1sc in each st till end of row, turn
R44: ch3, 1tr in 1st st, 1tr in next st, *ch1, sk 1st, 1tr in next 2st*, repeat from * to * 4 times
Ch23, sk 23st, 1tr in next 2st, ch23, sk 23st
1tr in next 2 st, *ch1, sk 1st, 1tr in next 2st*, repeat from * to * till end of row, turn
R45: ch1, 1sc in each st till end of row, turn
Join the front and back panel on shoulders: join the shoulders from the corner of the back panel.
We will continue with the same yarn and the same hook to crochet the shoulders as follows:
R46: ch3, 1 tr to 1st st on the back panel, sl st to 1st st on the front panel, 1 tr in next st on the back panel, sl st in next st on the front panel, *sl st in next st on the front panel, skip 1 st on the back panel, 1 tr to the next st on the back panel, sl st in next st on the front panel, 1 tr in next st on the back panel, sl st in next st on the front panel*, repeat from * to * 4 times. Cut the yarn, sew the end.
Re-join a new yarn on the opposite side and crochet in the same way: ch3, 1 tr to 1st st on the back panel, sl st to 1st st on the front panel, 1 tr in next st on the back panel, sl st in next st on the front panel, *sl st in next st on the front panel, skip 1 st on the back panel, 1 tr to the next st on the back panel, sl st in next st on the front panel, 1 tr in next st on the back panel, sl st in next st on the front panel*, repeat from * to * 4 times. Cut the yarn, sew the end.
Join the front and back panel on sides:
Join your panels with slip stitches.
Join the top so that the right sides are facing each other (inside).
Join the wrong sides together.
On the sides, we sew 27 rows from the bottom up, leaving 18 rows unjoined. Join stitch to stitch.
Fasten off your work and hide all loose tails and you are all done with your AMAZING TOP.
You just created a beautiful cheerful CROCHET TOP WITH V-NECK ON THE BACK and I hope you enjoy this pattern!
What’s Next?
Pin this post: Save this tutorial to your Pinterest boards so that you can come back to it later.
Leave a comment: I love to hear your feedback. Tell me in the comments below!
Share on Instagram and Facebook: When you make this project, share it on social media and tag me @sonanebeska. I love to see what you make!
More Crochet patterns?
For even more crochet VESTS and PONCHOS patterns, check out my collection.
I prepared a playlist:
Crochet_Shawls, scarfs, cowls, ponchos, cardigans, vests and sweaters
or visit the web page:
Cardigans, Sweaters, Ponchos and Vests
All of the patterns on that list of beautifully designed, and suitable for both beginners and experienced crocheters. They are different levels of difficulties and techniques that you might have never seen before. Just click on them and you can find the free pattern, each of the patterns comes with a video tutorial.
Explore More Crochet Patterns
If you love to crochet as much as I do, I think you’ll love these other free crochet patterns.
Have fun and let me know what you make. I would love to know how your project turns out.
Please don't forget to like and I really appreciate your comments.
If the pattern did not make sense to you, please don’t hesitate to contact me, I am happy to help :)
If you like this pattern, please follow and share my projects on social networks as a THANK YOU and to help me to create new projects and patterns for you.
If you pin my patterns to your Favorites and share it on social media as a link, I will be able to share a lot more free crochet patterns for you all.
Stay in touch at Facebook, Instagram and Pinterest.
Thank you very much once again for your visit and see you soon!
♥♥♥


