This seems very hard to understand. The pictures show you how to expand the yarn further and further into 3 strands and to create the bulky yarn – while you crochet.
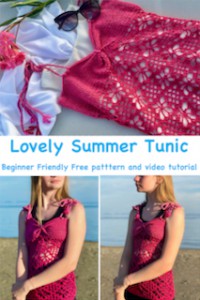
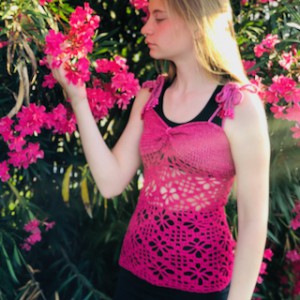
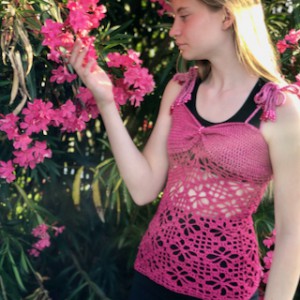
Crochet Lovely Summer Tunic with Flowers
2021-08-01
Are you a summer lover? I personally love summertime. It is such a lovely time of the year! The sun is shining and there are flowers everywhere.
I’m so happy to be enjoying some sunshine here and I hope you are too.
Today’s crochet tunic project will be just in time for the coming summer heat.
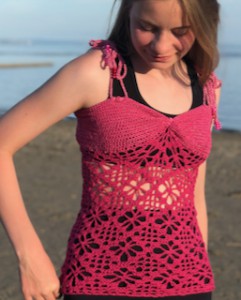
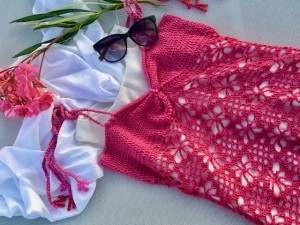
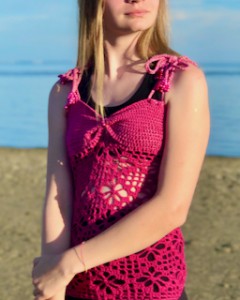
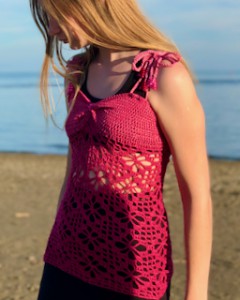
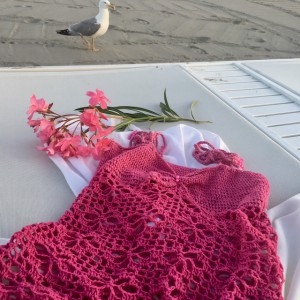
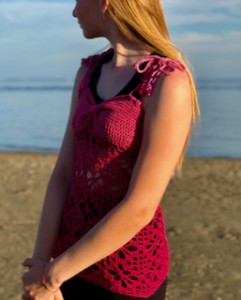
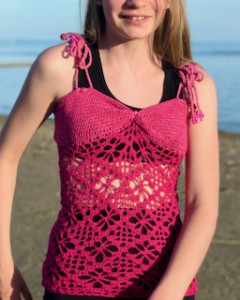
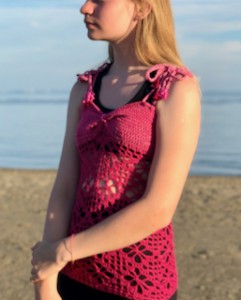
This lovely summer tunic has a beautiful flower pattern. It makes it a fun and flirty crochet summer top for beach days. The thinner crocheted strings also make it perfect for layering and wearing.
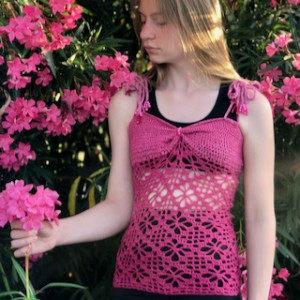
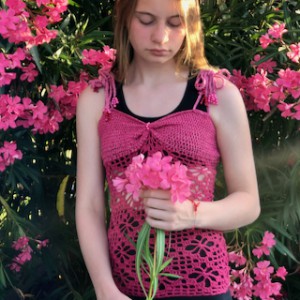
Wear it on beaches or for a casual evening dinner. Make it in your favorite cotton and see how quickly it becomes your fave go to top for summer days. I couldn’t be more pleased with how it turned out!
This Crochet Summer Tunic is absolutely fabulous and outstanding and will complete your summer outfits.
So, expand your summer wardrobe with beautiful and stunning handmade crochet tunic that will hit this summer.
VIDEO TUTORIAL
You can find the step-by-step video tutorials below which will help you along if you prefer to watch video instruction rather than using a written pattern. Don’t forget to subscribe if you like me videos, it’s FREE!![]()
A huge thanks to everyone who want to support my blog and download PDF paid pattern. Thank you very much, I really appreciate it and it helps me create more new video tutorials and patterns for you. Love you!
![]()
This pattern is made for very beginners - only a basic skill level is required to make it. If you don't understand any of my instructions, don't worry I am here for you - enter the comments at the end of this post.
Let's start or PIN this idea to your Pinterest boards for later.
![]()
You may would love to try these summer tops as well:
So let me now get started and tell you what you will need in order to crochet this amazing Summer Tunic with Flowers Pattern.
Lovely Summer Tunic with Flowers Pattern instructions
The top is crochet as a one part.
The pattern uses only basic crochet stitches - chains and double crochets and single crochets.
This top is crochet from the bottom up and you just need to measure the hips circumference and crochet the body part accordingly.
The direction shown are for women XS size but can be easily converted into bigger size or smaller size – just by making the starting part (foundation chain) - the bottom part according to the circumference of your body.
For this XS size you will need: 1 Ball Etrofil Puzzle Cake Yarn, 55% Organic Cotton 45% Anti Pilling Acrylic, 250 g (8.8 Oz) 1000 m (1093 yds), Fuchsia-Pink-Cream
For this pattern you will need 4.00 mm and 3.00 mm crochet hooks.
Pattern Notes
1) Before you start take a measurement of height of your body and a body measurement (please see the final measurement of the summer tunic below).
2) This pattern is for XS women size, but you can easily adapt to a smaller size or bigger size just by reducing or increasing the number of ch and rows. Remember that when making your tank top bigger you will need more yarn.
3) A Ch 3 at beg of the row counts as dc throughout and each rounds ends with slip stitch placed in 3rd chain from beg
4) The tank top is made as a one part with 4 strings on the top of shoulders
You can customize your fit based on how oversized you would like the garment to be. The top is worked from bottom to top, so additional rows in the panel give you additional length and extra stitches give you additional width.
Difficulty Level: Level 1 – Easy, for beginners
US crochet term:
SlSt – slip stitch
CH/s – chain/s
DC - double crochet
SC - single crochet
SK - skip
T - turn
ST/s - stitch(es)
REP - repeat
YO – yarn over
WRITTEN INSTRUCTIONS FOR LOVELY SUMMER TUNIC WITH FLOWER PATTERN
Crochet hook 4.00 mm
foundation chain
162 chains, join and the round
work in round
R1: ch3(1dc), *ch2, sk 2st, 1dc in next st* repeat from * to * till end of round, sl st in 3rd ch from beg. Make 54 dc and 54 ch2 sp (54 squares)
R2: ch3(1dc), (ch2, sk ch2sp, 1dc in next st) repeat 3 times, 2dc in ch2sp, *(1dc in next st, ch2, sk ch2s) repeat 5 times, 2dc in ch2 sp* repeat from * to * 8 times,
(1dc in next st, ch2, sk ch2sp) repeat 2 times, sl st in 3rd ch from beg
R3: ch3(1dc), (ch2, sk ch2sp, 1dc in next st) repeat 2 times, 2dc in ch2sp, 1dc in next st, ch5, skip 2st, 1dc in next st, 2dc in ch2sp,
*(1dc in next st, ch2, sk ch2sp) repeat 3 times, 1dc in next st, 2dc in ch2sp, ch5, sk 2st, 1dc in next st, 2dc in ch2sp)*, repeat from * to * 8 times
1dc in next st, ch2, sk ch2sp, sl st in 3rd ch from beg
R4: ch3(1dc), ch2, sk ch2sp, 1dc in next 4st, ch5, 1sc in ch5sp, ch5, sk 2st, 1dc in next 4st, ch2, sk ch2sp,
*1dc in next 4st, ch5, 1sc in ch5sp, ch5, sk 2st, 1dc in next 4st, ch2, sk ch2sp* repeat from * to * 8 times
1dc in next st, 2dc in ch2sp, sl st in 3rd ch from beg
R5: ch3(1dc), 2dc in ch2sp, 1dc in next st, ch6, 1sc in ch5sp, 1sc in 1sc from previous round, 1sc in ch5sp, ch6, sk 3st,
*1dc in next st, 2dc in ch2sp, 1dc in next st, ch6, 1sc in ch5sp, 1sc in 1sc from previous round, 1sc in ch5sp, ch6, sk 1st* repeat from * to * 8 times
sl st in 3rd ch from beg
R6: ch3(1dc) ch2, sk 2st, 1dc in next st, 3dc in ch6sp,
*ch5, sk 1sc, 1sc in 1sc from previous round, sk 1sc, ch5, 3dc in ch6sp, 1dc in next st, ch2, sk 2st, 1dc in next st, 3dc in ch6sp* repeat from * to * 8 times
sl st in 3rd ch from beg
R7: ch3(1dc), ch2, sk ch2sp, 1dc in next st, ch2 sk 2st, 1dc in next st, 3dc in ch5sp, ch2, 3dc in ch5sp, 1dc in next st, ch2, sk 2st,
*1dc in next st, ch2, sk ch2sp, 1dc in next st, ch2, sk 2st, 1dc in next st, 3dc in ch5sp, ch2, 3dc in ch5sp, 1dc in next st, ch2 * repeat from * to * 8 times
sl st in 3rd ch from beg
R8 = ch3(1dc), ch2, sk ch2sp, 1dc in next st, ch2, sk ch2sp, 1dc in next st, ch2, sk 2st, 1dc in next st, 2dc in ch2sp
*1dc in next st, ch2, sk 2st, (1dc in next st, ch2, sk ch2sp) repeat 3 times, 1dc in next st, sk 2st, 1dc in next st, 2dc in ch2sp* repeat from * to * 8 times
1dc in next st, ch2, sk 2st, 1dc in next st, ch2, sk ch2sp, sl st in 3rd ch from beg
Repeat 4 times: R3 - R8
R9 = R3
R10 = R4
R11 = R5
R12 = R6
R13 = R7
R14 = R8
Crochet hook 3.0mm
R15 - R20: repeat R3 - R8
R21 - R26: repeat R3 - R8
R27 - R32: repeat R3 - R8
R33: ch3(1dc), *(2dc in ch2sp, 1dc in next st) repeat 3times, 1dc in next 3st, (2dc in ch2sp, 1dc in next st) repeat 2 times * repeat from * to * 8 times, sk ch2sp, sl st in 3rd ch from beg (162 dc)
R33 - R49: repeat round R28 (162dc in each round)
Lay your work down. Center your work, find the middle point - between 2 flowers.
Wrap the topper part (R33 - R49) several times with a piece of yarn. Make a knot on wrong side (inside).
Make 4 strings - chain foundation chain, use 3 yarns together - please see instructions bellow.
Make string about 39 inch / 100 cm long.
Pull string 18st left from the wrap, from the middle part of front side, then skip 2st and pull the string inside, skip 2st and pull the string outside and repeat these instructions 2 times or as many times as you wish to have the space between the string long.
Pull string also 18st right from the wrap and repeat the instructions above.
Join 2 strings on the back part of your tunic as well.
HOW TO MAKE A BULKY YARN STRING
Lay the yarn down and make an "S" with your yarn, so there are 3 rows: you will have a loop on 2 sides and the beginning of the yarn and the yarn ball opposite from each other, push them together, combine start of the yarn with one loop – creating 3 strands and make a slip knot to hold these 3 strands together and start crocheting.
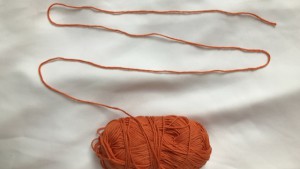
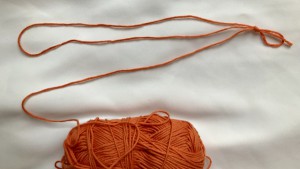
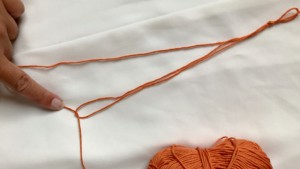
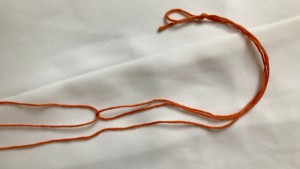
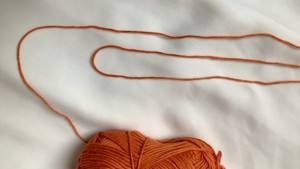
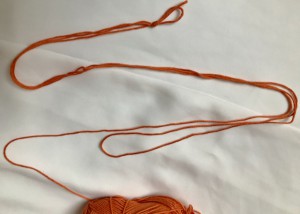
Make a chain till you reach the second loop, you will pull the yarn from the yarn ball through to create another loop. And keep crocheting, you will not need to cut your yarn or create knots. simply use that one skein of Etrofil yarn and create a bulky yarn from it while you crochet
FINISHING
Let's decorate the ends of the strings with some beads. Also feel free to add some beads on the wrap in the middle of the topper part.
FINAL SIZE:
Measurement: bottom width= 19 inch / 48 cm
Measurement: topper width = 15 inch / 38 cm
Measurement: topper part length: 4.7 inch / 12 cm
Measurement: part with flowers: 15.75 inch / 40 cm
Measurement: total length = 20.5 inch / 52 cm
Measurement: string = 39 inch / 100 cm long
Want a printable copy of this pattern? Why not visit my Etsy shop and purchase the PDF with photo instructions. Not only does it mean you get your own copy of the pattern to print, you also support a small business and help me to keep making free patterns!
Have fun and let me know what you make. I would love to know how your project turns out.
Please don't forget to like and I really appreciate your comments.
If the pattern did not make sense to you, please don’t hesitate to contact me, I am happy to help :)
If you like this pattern, please follow and share my projects on social networks as a THANK YOU and to help me to create new projects and patterns for you.
If you pin my patterns to your Favorites and share it on social media as a link, I will be able to share a lot more free crochet patterns for you all.
Stay in touch at Facebook, Instagram and Pinterest.
Thank you very much once again for your visit and see you soon!
♥♥♥


