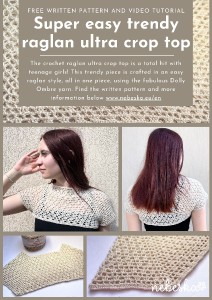
Crochet Trendy Raglan Ultra Crop top
Hello everyone! Wishing you all a lovely day!
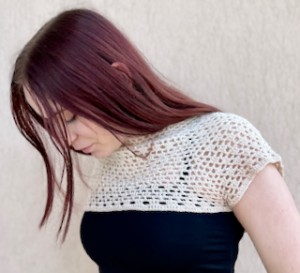
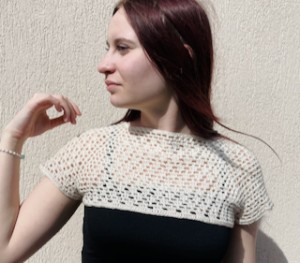
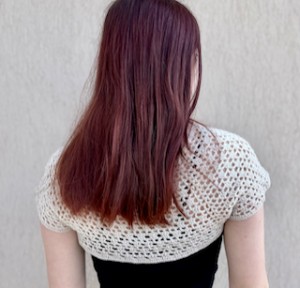
With these beautiful May days upon us, it's the perfect time for the ladies to flaunt their tops. One trendy option is to wear a crocheted perforated crop top over a tank top or T-shirt.
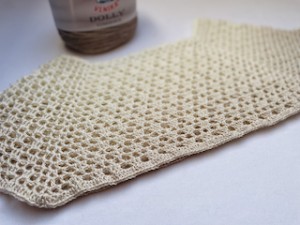
Why not give this simple filet pattern a try? It consists of double crochets and chain stitches.
The top is crocheted from the top down, starting from the yoke in a raglan style and progressing to a rectangle. As you crochet, the top continuously expands and lengthens. You can crochet it as a short crop top or extend it to waist length or even longer.
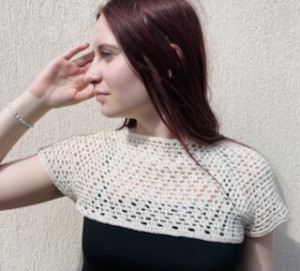
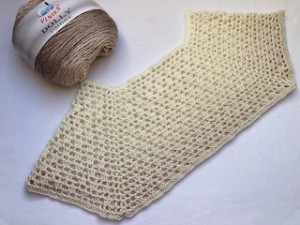
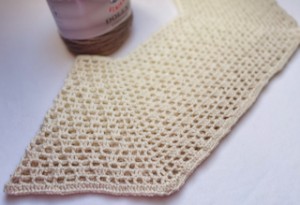
I used my favorite Dolly Ombre yarn for this project, which I've previously used for a crochet summer dress and was thrilled with the results! Due to Dolly Ombre's subtle color transitions from light to dark, I opted to crochet from top to bottom. Similar to the dress, the beginning of the top features a raglan rectangle style with a simple and airy pattern.
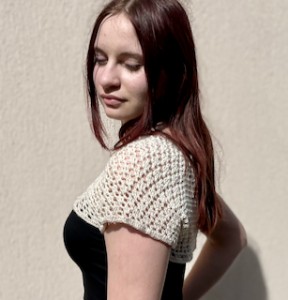
The raglan shape with a rectangular seat means that the armholes are seamlessly incorporated into the design. Once you start crocheting the yoke, you'll find that creating a crop top to your liking is quick and easy, requiring minimal calculations. The top comes with short sleeves that can be adjusted to your preferred length.
This crop top boasts a simple, sporty, and modern style that's suitable for year-round wear. It's a project that can be tackled by crocheters of any skill level and any size. Plus, the beauty of the raglan design is its ability to be customized to fit your exact measurements as you crochet! Even beginners can give it a try. Doesn't that sound amazing?
VIDEO TUTORIAL
You can find the step-by-step video tutorials below which will help you along if you prefer to watch video instruction rather than using a written pattern. Don’t forget to subscribe if you like me videos, it’s FREE!
![]()
If you pin my patterns to your Favorites and share it on social media as a link, I will be able to share a lot more free crochet patterns for you all.
Stay in touch at Facebook, Instagram and Pinterest.
Let's start or PIN this idea to your Pinterest boards for later.
![]()
More Crochet patterns?
For even more crochet patterns, check out my e-book.
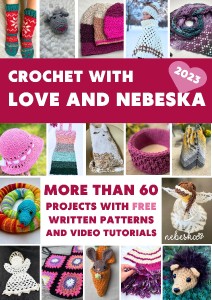
CROCHET WITH LOVE AND NEBESKA
I prepared for you the e-book CROCHET WITH LOVE AND NEBESKA, it is a set of more than 60 projects with instructions and video instructions for the whole year 2023!
You can download the e-book as a pdf with links to allow you to better find the guide you need. Or maybe you missed one of the pattern instructions and now it will make you happy, or you are just looking for inspiration and one of my ideas will move you in your next creation!
This e-book is FREE and you can share it with your friends. Due to the size, it is necessary to download CROCHET WITH LOVE AND NEBESKA from the link (it cannot be sent as an e-mail attachment). Click on the ebook link or image and download the e-book CROCHET WITH LOVE AND NEBESKA 2023 for FREE.
https://forms.gle/CyJZqXs4fTWechtE6
All of the patterns on that list of beautifully designed, and suitable for both beginners and experienced crocheters. They are different levels of difficulties and techniques that you might have never seen before. Just click on them and you can find the free pattern, each of the patterns comes with a video tutorial.
CROCHET TRENDY RAGLAN UTRA CROP TOP PATTERN
This crop top is perfect for beginners, featuring a simple filet pattern of double crochets and chain stitches.
All you need is a basic understanding of crocheting, as everything is clearly explained in the step-by-step instructions below and demonstrated in detail in the accompanying video tutorial.
If you have any questions regarding the instructions, don't hesitate to reach out to me. I am here to help!
Have questions? Join the Facebook Group OR my Youtube Community!
I hope this article will be useful for you! If you have any additional questions, feel free to join my Facebook Group or Youtube Community. I created these groups for you to share pictures, ask questions, and help each other out.
CROCHET TRENDY RAGLAN UTRA CROP TOP
This TRENDY CROCHET RAGLAN ULTRA CROP TOP is not only super fun to make but also fairly quick to crochet.
With just 2 rows to remember and repeat, you'll be done in no time! The top is crocheted from the yoke, working from top to bottom in rows, making it grow rapidly.
If you need to adjust the size, simply change the number of rows and stitches in each row.
CROCHET TRENDY RAGLAN UTRA CROP TOP
MATERIALS
What will you need to crochet this TRENDY CROCHET RAGLAN ULTRA CROP TOP?
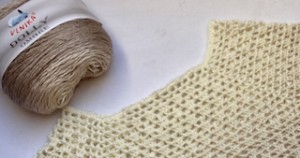
The CROP TOP is crocheted using yarn: DOLLY OMBRE.
This fine, shiny yarn gradually transitions from light to darker shades, making it perfect for blouses, tops, large scarves, and summer tunics. It's suitable for both crocheting and knitting.
Yarn Details:
DOLLY OMBRE
Available at: https://www.vlnika.cz/z24696-prize-dolly-ombre
250 g / 875 m
100% Microacrylic
Approximate consumption: 1/5 ball
![]()
You'll also need:
Hook: 2.5 and 3.5 mm
Sewing needle
Markers for marking 4 raglan corners
Scissors
With these materials on hand, you'll be all set to start crocheting your stylish crop top!
Difficulty Level: Level 1 – Easy, for beginners
US crochet terms:
SlSt – slip stitch
CH/s – chain/s
SC - single crochet
DC - double crochet
SK - skip
T - turn
ST/s - stitch(es)
REP – repeat
CROCHET TRENDY RAGLAN UTRA CROP TOP
PATTERN NOTES
1)This Crocheted Raglan TOP is designed in women's size S as a body top with a classic cut, perfect for wearing under a T-shirt or tank top.
2)The crop top is crocheted in a simple raglan style from top to bottom, allowing you to try on the fit as you crochet and adjust the size accordingly.
3)The instructions use chain stitches and double crochets to create a simple fillet pattern. If you're new to crocheting raglan tops, you'll find this pattern easy to follow.
4)While the tutorial demonstrates a body fit, you can easily achieve a classic style by crocheting a size up. Additionally, you can adjust the length of the top by crocheting more rows in the "body" section after joining the front and back pieces.
5) A Ch 3 at beg of the row counts as a stitch, start every row with ch3
6)This top is crocheted in rows, expanding by one repetition in each of the 4 parts. Rows are joined with slip stitches after completing each row.
How to crochet this raglan top:
This top is worked seamlessly from the top down, in a raglan style.
I really love this type of construction, the size is super easy to adjust!
This top is crocheted from top to bottom in a raglan style with a rectangular yoke.
One of the great things about top-down crochet raglans is that you can try them on as you go and adjust the size to your liking. For instance, if you find the underarm area too tight after completing the yoke, simply add a few more closed yoke rows before dividing into the sleeves and body of the top.
Similarly, if you want to change the length of the top or sleeves, you can easily do so by subtracting or adding rows until you're satisfied. This type of raglan construction is perfect for beginners looking to try simple patterns.
TRENDY CROCHET RAGLAN ULTRA CROP TOP - CONSTRUCTION
The top consists of the following parts:
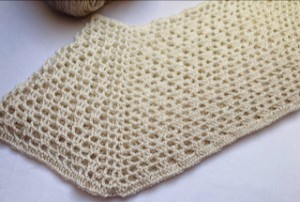
YOKE – Begin with the foundation chain to create a neckline around the neck. Crochet in rows, gradually widening the neckline on the front parts into a clamshell.
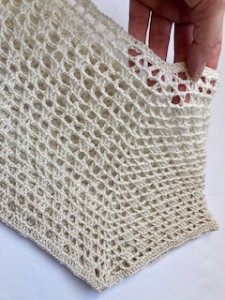
Keep crocheting on the right side without turning the work. The yoke expandc at 4 corners, with each addition causing the back part and sleeves to expand by one repetition / pattern repeat.
BODY - Split the yoke to create the armholes, then crochet down the rows without expanding. Use the same pattern as for the yoke.
To adjust the length of the body of the top or the sleeves, simply repeat the last rows until you are satisfied with the length.
TRENDY CROCHET RAGLAN ULTRA CROP TOP
WRITTEN PATTERN
YOKE
Crochet hook 3.5 mm and 2.5 mm
Start with a crochet hook 3.5 mm
ch3 at beg of row = double crochet
work in rows, don’t turn your work
close the round with a slip stitch
Make a foundation chain. Divide the chain into 4 parts and 4 corners
Foundation Chain: 146 chains
Sleeve 31 (3x10 + 1) + Front part 40 (3x13 + 1) + Sleeve 31 (3x10 + 1) + Back part 40 (3x13 + 1) + 4 chains to make corners
R1: ch1, 1sc in each chain, close round with a slip stitch in 1st chain (146 st)
We divide the chain into 4 parts by placing markers on the stitches: 32, 73, 105 and 146.
corner st
10 repetitions to make sleeve
corner st
13 repetitions to make front panel
corner st
10 repetitions to make sleeve
corner st
13 repetitions to make back panel
Crochet hook 2.5 mm till end of project
R2: ch3 (dc), *ch2, skip 2 st, 1dc in next st* from * to * (10 repetitions) till marker,
corner: ch2, (1dc, ch2, 1dc) in next st, ch2,
1dc in next st, *ch2, skip 2 st, 1dc in next st* from * to * (13 repetitions) till marker,
corner: ch2, (1dc, ch2, 1dc) in next st, ch2,
1dc, *ch2, skip 2 st, 1dc in next st* from * to * (10 repetitions) till marker,
corner: ch2, (1dc, ch2, 1dc) in next st, ch2,
1dc in next st, *ch2, skip 2 st, 1dc in next st* from * to * (13 repetitions) till marker,
corner: ch2, (1dc, ch2, 1dc) in next st, ch2
close round with a slip stitch in 3rd ch from beg of row
R3: sl st in next st to move in next chain space
ch3 (dc), *ch2, dc in next ch-sp* from * to * (10 repetitions) till marker,
corner: ch2, (1dc, ch2, 1dc) in next st, ch2,
1dc in next ch-sp, *ch2, dc in next ch-sp* from * to * (14 repetitions) till marker,
corner: ch2, (1dc, ch2, 1dc) in next st, ch2,
1dc in next ch-sp, *ch2, dc in next ch-sp* from * to * (11 repetitions) till marker,
corner: ch2, (1dc, ch2, 1dc) in next st, ch2,
1dc in next ch-sp, *ch2, dc in next ch-sp* from * to * (14 repetitions) till marker,
corner: ch2, (1dc, ch2, 1dc) in next st, ch2
1dc in next ch-sp, ch2 (1 repetition to finish sleeve)
close round with a slip stitch in 3rd ch from beg of row
R4: sl st in next st to move in next chain space
ch3 (dc), *ch2, dc in next ch-sp* from * to * (10 repetitions) till marker,
corner: ch2, (1dc, ch2, 1dc) in next st, ch2,
1dc in next ch-sp, ch2, 1dc in next ch-sp, 1dc in dc, 1dc in next ch-sp, *ch3, dc in next ch-sp, 1dc in dc, dc in next ch-sp* from * to * (7 squares), ch2, 1dc in ch-sp before marker,
corner: ch2, (1dc, ch2, 1dc) in next st, ch2,
1dc in next ch-sp, *ch2, dc in next ch-sp* from * to * (12 repetitions) till marker,
corner: ch2, (1dc, ch2, 1dc) in next st, ch2,
1dc in next ch-sp, ch2, 1dc in next ch-sp, 1dc in dc, 1dc in next ch-sp, *ch3, dc in next ch-sp, 1dc in dc, dc in next ch-sp* from * to * (7 squares), ch2, 1dc in ch-sp before marker,
corner: ch2, (1dc, ch2, 1dc) in next st, ch2
*1dc in next ch-sp, ch2* repeat till end of row (2 repetitions to finish sleeve)
close round with a slip stitch in 3rd ch from beg of row
R5: sl st in next st to move in next chain space
ch3 (dc), 1dc in dc, 1dc in next ch-sp *ch3, dc in next ch-sp, 1dc in dc, 1dc in next ch-sp* from * to * (5 squares), ch2, 1dc in ch-sp before marker,
corner: ch2, (1dc, ch2, 1dc) in next st, ch2,
1dc in next ch-sp, *ch2, dc in next ch-sp* from * to * (16 repetitions) till marker,
corner: ch2, (1dc, ch2, 1dc) in next st, ch2,
1dc in next ch-sp, ch2, 1dc in next ch-sp, 1dc in dc, 1dc in next ch-sp, *ch3, dc in next ch-sp, 1dc in dc, dc in next ch-sp* from * to * (6 squares), ch2, 1dc in ch-sp before marker,
corner: ch2, (1dc, ch2, 1dc) in next st, ch2,
1dc in next ch-sp, *ch2, dc in next ch-sp* from * to * (16 repetitions) till marker,
corner: ch2, (1dc, ch2, 1dc) in next st, ch2
1dc in next ch-sp, ch2, 1dc in next ch-sp, 1dc in dc, 1dc in next ch-sp, ch3 (1 square)
close round with a slip stitch in 3rd ch from beg of row
R6: sl st in next st to move in next double crochet
ch3 (dc), *ch2, dc in next ch-sp* from * to * (10 repetitions) till marker,
corner: ch2, (1dc, ch2, 1dc) in next st, ch2,
1dc in next ch-sp, ch2, 1dc in next ch-sp, 1dc in dc, 1dc in next ch-sp, *ch3, dc in next ch-sp, 1dc in dc, dc in next ch-sp* from * to * (8 squares), ch2, 1dc in ch-sp before marker,
corner: ch2, (1dc, ch2, 1dc) in next st, ch2,
1dc in next ch-sp, *ch2, dc in next ch-sp* from * to * (14 repetitions) till marker,
corner: ch2, (1dc, ch2, 1dc) in next st, ch2,
1dc in next ch-sp, ch2, 1dc in next ch-sp, 1dc in dc, 1dc in next ch-sp, *ch3, dc in next ch-sp, 1dc in dc, dc in next ch-sp* from * to * (8 squares), ch2, 1dc in ch-sp before marker,
corner: ch2, (1dc, ch2, 1dc) in next st, ch2
*1dc in next ch-sp, ch2* repeat till end of row (4 repetitions to finish sleeve)
close round with a slip stitch in 3rd ch from beg of row
R7 - R22: repeat rows R5 and R6
R23: ch3, work 1dc in each st and 2dc in each ch2sp, 1dc in corner st dc.
Join front and back part together: insert your hook in corner ch2 space on both front and back part and work 2dc in these ch2spaces.
Then work 1dc in corner dc on the front panel and continue crocheting 1dc in each st and 3dc in each ch3space till you reach next corner, 1dc in corner dc.
Join front and back part together: insert your hook in corner ch2 space on both front and back part and work 2dc in these ch2spaces.
Then work 1dc in corner dc on the front panel and continue crocheting 1dc in each st and 2dc in each ch2space till you reach the joined corner.
1dc in corner dc, sl st in next 2 dc (work slip stitch in double crochet st, which create the join of the front and the back parts.
Then work 1dc in corner dc on the front panel and continue crocheting 1dc in each st and 3dc in each ch3space till you reach the next join, 1dc in corner dc, sl st in next 2 dc (work slip stitch in double crochet st, which create the join of the front and the back parts.
Then work 1dc in corner dc on the front panel and continue crocheting 1dc in each st and 2dc in each ch2space till you reach the beg of round.
Close round with a slip stitch in 3rd ch from beg of row.
Join the front and back parts together: Insert your hook into the corner ch2 space on both the front and back parts, and work 2 dc in these ch2 spaces. Then, work 1 dc in the corner dc on the front panel and continue crocheting 1 dc in each st and 2 dc in each ch2 space until you reach the joined corner.
Work 1 dc in the corner dc, sl st in the next 2 dc (this creates the join of the front and back parts).
Then, work 1 dc in the corner dc on the front panel and continue crocheting 1 dc in each st and 3 dc in each ch3 space until you reach the next join.
Work 1 dc in the corner dc, sl st in the next 2 dc (again, creating the join of the front and back parts).
Then, work 1 dc in the corner dc on the front panel and continue crocheting 1 dc in each st and 2 dc in each ch2 space until you reach the beginning of the round.
Close the round with a slip stitch in the 3rd ch from the beginning of the row.
Measurements:
Width of front and back part: 39 cm (circumference 78 cm)
Width of sleeve: 15 cm (circumference 30 cm)
Armhole: 20 cm
Neckline: 64 cm (7 + 18 + 7 + 7 + 18 + 7)
Length of front and back part: 18 cm
HURRAH! THE FABULOUS TRENDY CROCHET RAGLAN ULTRA CROP TOP IS FINISHED! ENJOY THIS ULTRA CROP TOP NOT ONLY ON SUMMER DAYS BUT ANYTIME OF THE YEAR!
What’s Next?
Pin this post: Save this tutorial to your Pinterest boards so that you can come back to it later.
Leave a comment: I love to hear your feedback. Tell me in the comments below!
Share on Instagram and Facebook: When you make this project, share it on social media and tag me @sonanebeska. I love to see what you make!
MORE PATTERNS?
Do you crochet HATS? You may would like to try these popular video tutorials:
You know me, I love making PONCHOS, VESTS and CARDIGANS.
If you do as well, you may would love to try these patterns as well:
Explore More Crochet Patterns
If you love to crochet as much as I do, I think you’ll love these other free crochet DRESSES and TUNICS patterns ❤️
♥♥♥
Have fun and let me know what you make. I would love to know how your project turns out.
Please don't forget to like and I really appreciate your comments.
If the pattern did not make sense to you, please don’t hesitate to contact me, I am happy to help :)
If you like this pattern, please follow and share my projects on social networks as a THANK YOU and to help me to create new projects and patterns for you.
Thank you very much once again for your visit and see you soon!
♥♥♥


